Introduction
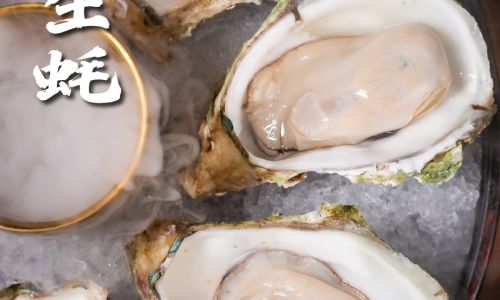
Chilled oysters, with their briny sweetness and delicate texture, have long been a symbol of luxury and celebration. Whether served at a sophisticated cocktail party, a romantic dinner, or a casual gathering, these mollusks elevate any occasion. While ordering oysters at a restaurant is effortless, mastering the art of preparing them at home allows for a deeper appreciation of their flavor and a sense of culinary accomplishment. This guide will walk you through every step of selecting, shucking, and serving chilled oysters, ensuring a flawless presentation that rivals any five-star establishment.

Choosing the Perfect Oysters
The foundation of an exceptional oyster dish begins with selecting the freshest, highest-quality specimens. Oysters are available in various regions, each offering a unique taste profile influenced by their environment. Pacific oysters, for example, are known for their crisp, cucumber-like finish, while Kumamoto oysters boast a buttery, melon-like sweetness. Atlantic oysters, on the other hand, often carry a metallic, mineral-rich flavor. When purchasing oysters, look for shells that are tightly closed, free of cracks, and heavy for their size. Avoid any with a fishy odor; fresh oysters should smell like the ocean—briny and clean.
Tools of the Trade
Shucking oysters requires precision and the right equipment to ensure safety and efficiency. Invest in a sturdy oyster knife with a short, blunt blade and a comfortable grip. Unlike regular kitchen knives, oyster knives are designed to pry open shells without damaging the meat. Additionally, a thick kitchen towel or gloves will protect your hands from accidental slips. A stable cutting board, preferably with a non-slip base, and a bowl for discarded shells are also essential. For presentation, consider a platter lined with crushed ice, rock salt, or seaweed to keep the oysters chilled and stable.
Cleaning and Preparing Oysters
Before shucking, rinse each oyster under cold running water to remove any mud or debris. Scrub the shells gently with a stiff brush if necessary, but avoid using soap, as it can permeate the shell and alter the oyster’s flavor. Pat them dry with a clean towel and arrange them on a tray. Some chefs recommend refrigerating oysters for an hour before shucking to relax the muscles, making the process slightly easier.

The Art of Shucking
Shucking oysters is a skill that combines technique and patience. Here’s a step-by-step breakdown:
- Positioning: Hold the oyster cup-side down on a towel-covered surface, with the hinge (the pointed end) facing you. Fold the towel over the oyster to secure it, leaving the hinge exposed.
- Inserting the Knife: Gently wedge the tip of the oyster knife into the hinge. Apply steady pressure while twisting the knife back and forth until you feel the hinge pop.
- Opening the Shell: Slide the knife along the top shell, cutting through the adductor muscle that holds the shells together. Be cautious not to puncture the oyster itself.
- Separating the Shells: Pry open the top shell and discard it. Run the knife under the oyster to detach it from the bottom shell, taking care to preserve the liquor (the natural juice inside).
- Serving Preparation: Leave the oyster nestled in its bottom shell, ensuring it remains level to retain the liquor.
Creating the Perfect Ice Bed
Chilled oysters are traditionally served on a bed of crushed ice, which not only keeps them cold but also adds visual appeal. Line a serving platter with a layer of crushed ice, rock salt, or a mixture of both. Nestle each oyster into the ice, ensuring they remain upright. For an elegant touch, garnish the platter with lemon wedges, fresh herbs (such as parsley or dill), or edible flowers. Some chefs also add a few drops of food-safe glitter or seaweed for a coastal aesthetic.
Sauces and Accompaniments
The beauty of chilled oysters lies in their versatility; they can be enjoyed plain or paired with an array of condiments. Classic accompaniments include:

- Mignonette Sauce: A French staple made with minced shallots, red wine vinegar, and black pepper.
- Cocktail Sauce: A zesty blend of ketchup, horseradish, lemon juice, and Worcestershire sauce.
- Lemon Wedges: A simple squeeze of citrus enhances the oyster’s natural brininess.
- Grated Horseradish: For those who enjoy a fiery kick.
- Vinegar Mignonette: A lighter alternative with rice vinegar, chives, and ginger.
Arrange small bowls of these accompaniments around the platter, allowing guests to customize their experience.
Pairing with Beverages
The right beverage can elevate the oyster-eating experience to new heights. Sparkling wines like Champagne or Prosecco are classic choices, as their effervescence cuts through the oyster’s richness. Dry white wines, such as Sauvignon Blanc or Muscadet, complement the brininess without overpowering the flavor. For beer lovers, a crisp lager or a tart wheat beer provides a refreshing contrast. Non-alcoholic options include ginger ale, iced tea, or a splash of tomato juice with a celery salt rim.
Storing and Serving Safety
Oysters are perishable and should be consumed within a day of purchase. Store them in the refrigerator, cup-side down, covered with a damp cloth to retain moisture. Never submerge them in freshwater, as this will kill the oysters and compromise their flavor. If preparing in advance, shuck the oysters no more than an hour before serving to maintain their texture. Discard any oysters that do not close when tapped, as this indicates spoilage.

Health Benefits of Oysters
Beyond their culinary appeal, oysters are a nutritional powerhouse. Rich in zinc, iron, and vitamin B12, they support immune function and energy metabolism. A single oyster provides nearly 100% of the daily recommended zinc intake, making them an excellent addition to a balanced diet. Their low-calorie and high-protein content also make them a guilt-free indulgence.
Common Mistakes to Avoid
Even seasoned chefs can stumble when preparing oysters. Here are a few pitfalls to sidestep:
- Using Dull Knives: A blunt oyster knife increases the risk of injury and damages the shell.
- Overcrowding the Platter: Oysters need space to prevent their liquor from spilling.
- Skipping the Ice Bed: Serving oysters at room temperature dulls their flavor and texture.
- Ignoring Guest Preferences: Always offer a variety of sauces to cater to different palates.
Conclusion
Preparing chilled oysters at home is a rewarding endeavor that transforms a simple meal into a memorable occasion. By selecting the finest oysters, mastering the shucking technique, and pairing them with thoughtful accompaniments, you can recreate the ambiance of a seaside oyster bar in your own dining room. Whether you’re hosting a gathering or treating yourself to a solo indulgence, the briny, buttery taste of a perfectly chilled oyster is an experience worth savoring. So gather your tools, embrace the process, and let the ocean’s bounty grace your table.


0 comments