Snow skin mooncakes, also known as “ice skin” or “crystal skin” mooncakes, have emerged as a refreshing alternative to traditional baked varieties. Their delicate, translucent outer layer and customizable fillings make them a favorite during festive seasons, particularly Mid-Autumn Festival. Unlike their baked counterparts, snow skin mooncakes require no oven and rely on a steamed dough infused with aromatic oils and milk. This article delves into the intricacies of crafting these delectable treats, from selecting premium ingredients to mastering the art of assembly. Discover the secrets to achieving a soft, pliable texture and a harmonious balance of flavors that will impress both novice bakers and seasoned chefs.
Understanding the Basics: What Makes Snow Skin Mooncakes Unique?
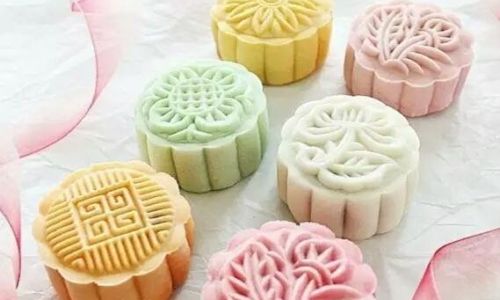
Snow skin mooncakes derive their name from the milky-white, velvety exterior resembling freshly fallen snow. The dough is crafted from a blend of glutinous rice flour, rice flour, and wheat starch, which, when steamed, transforms into a chewy yet tender canvas. Unlike traditional mooncakes, which are dense and rich, snow skin versions offer a lighter, almost mousse-like experience. Their popularity stems from their versatility—fillings can range from classic lotus seed paste to modern innovations like matcha green tea, yuzu, or even chocolate ganache.
Ingredients: The Foundation of Flavor
Creating the perfect snow skin mooncake begins with sourcing high-quality ingredients. Here’s a breakdown of the essential components:
- Glutinous Rice Flour (Sweet Rice Flour): The star ingredient, this flour provides the signature chewiness. Opt for a brand labeled “glutinous” or “sticky rice flour,” as regular rice flour lacks the necessary stickiness.
- Rice Flour: Adds structure and prevents the dough from becoming too gummy. Look for finely milled rice flour for a smoother texture.
- Wheat Starch (Tung Mein Fun): Critical for achieving a translucent, slightly stretchy skin. Wheat starch is available in Asian grocery stores or online.
- Powdered Sugar: Ensures a melt-in-the-mouth sweetness without graininess.
- Milk: Whole milk or coconut milk imparts richness. For a dairy-free option, almond or oat milk works well.
- Neutral Oil: Vegetable oil, grapeseed oil, or melted coconut oil keeps the dough moist and prevents cracking.
- Fillings: Store-bought or homemade pastes (e.g., lotus seed, red bean) are traditional, but feel free to experiment with salted egg yolk, fruit compotes, or nut butters.
The Dough: Mastering the Steaming Technique
The dough-making process is both an art and a science. Follow these steps for flawless results:
- Sift Dry Ingredients: In a mixing bowl, combine 80g glutinous rice flour, 20g rice flour, 20g wheat starch, and 60g powdered sugar. Sifting eliminates lumps and ensures even distribution.
- Prepare Wet Mixture: In a separate bowl, whisk 180ml milk, 30ml neutral oil, and ½ teaspoon vanilla extract (optional) until emulsified.
- Combine and Steam: Gradually pour the wet mixture into the dry ingredients, stirring until smooth. Strain the batter through a fine sieve to remove any residual clumps. Pour into a heatproof dish, cover tightly with foil (to prevent condensation), and steam for 20–25 minutes over medium heat.
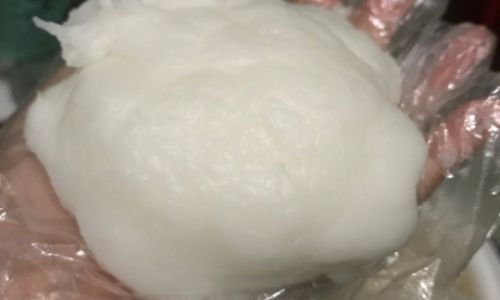
- Knead to Perfection: Once steamed, the dough will resemble a thick custard. Let it cool slightly, then knead it on a surface dusted with cooked glutinous rice flour (to prevent sticking) until smooth and elastic. This step develops the dough’s gluten-like structure, enhancing its stretchiness.
Pro Tip: For added flavor, infuse the milk with pandan leaves, osmanthus flowers, or a cinnamon stick during steaming. Strain before combining with the dry ingredients.
Filling Preparation: Balance is Key
The filling-to-dough ratio is crucial for a pleasant eating experience. Aim for a 4:6 or 5:5 ratio (filling to dough) depending on preference. Here’s how to prepare fillings like a pro:
- Store-Bought Pastes: Opt for low-sugar varieties to control sweetness. If the paste is too stiff, gently warm it in a microwave (5-second intervals) to soften.
- Homemade Fillings: For lotus seed paste, soak dried lotus seeds overnight, cook until tender, then blend with sugar and oil. Similarly, red bean paste requires simmering adzuki beans with sugar until thickened.
- Modern Twists: For a contemporary flair, mix 200g white chocolate ganache with 50g freeze-dried fruit powder (e.g., strawberry, mango). Chill until firm before portioning.
Portioning Hack: Use a kitchen scale to divide both dough and filling into equal 25g–30g balls. This ensures uniform size and even cooking.
Assembly: Precision Meets Creativity
Assembling snow skin mooncakes is a tactile experience. Follow these steps for picture-perfect results:
- Flatten the Dough: Dust your palm with cooked glutinous rice flour. Flatten a dough ball into a 3-inch circle, ensuring the edges are thinner than the center.
- Wrap the Filling: Place a filling ball in the center, then gently pinch the dough upward to encase the filling. Seal tightly and roll into a smooth sphere.
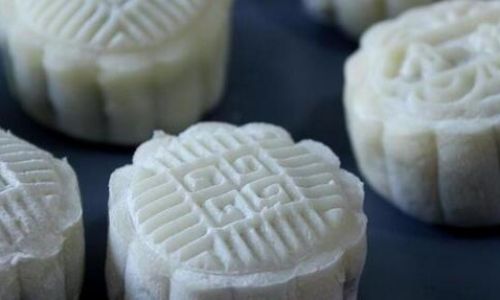
- Molding Magic: Dust a mooncake mold with cornstarch or cooked flour. Press the filled dough firmly into the mold, then tap gently on the counter to release.
- Chill and Set: Refrigerate the molded mooncakes for at least 2 hours to firm up. This step also mellows the flavors, resulting in a more cohesive taste.
Troubleshooting:
- Sticky Dough: Add ½ teaspoon of oil or dust with more flour.
- Cracked Skin: The dough was overworked or under-kneaded. Knead until smooth and rest for 10 minutes before assembling.
- Uneven Fillings: Ensure both dough and filling are at room temperature before wrapping.
Storing and Serving: Maximizing Freshness
Snow skin mooncakes are best enjoyed chilled. Store them in an airtight container in the refrigerator for up to 5 days. For longer shelf life, freeze for up to 2 months and thaw overnight before serving.
Presentation Ideas:
- Garnish: Lightly dust with matcha powder, cocoa, or edible gold leaf for elegance.
- Accompaniments: Serve with a side of jasmine tea, chrysanthemum infusion, or a glass of sweet osmanthus wine.
Secrets to Success: Pro Tips from Master Chefs
- Quality Over Quantity: Invest in premium ingredients. Organic milk and natural flavorings elevate the taste.
- Precision Matters: Use a digital scale for accurate measurements. Even a 5g discrepancy can alter the texture.
- Rest the Dough: After kneading, let the dough rest for 15–20 minutes. This relaxes the gluten, making it easier to handle.
- Even Steaming: Ensure the steamer basket is large enough to prevent the dish from touching the water. Direct contact can cause sogginess.
- Experiment Boldly: Add ½ teaspoon of activated charcoal for black sesame-flavored skin, or blend steamed purple sweet potato into the dough for a vibrant hue.
Common Pitfalls and How to Avoid Them
- Gummy Texture: Oversteaming the dough. Set a timer and check at 20-minute intervals.
- Dry Crust: Insufficient oil or over-kneading. Add 1–2 teaspoons of oil during kneading if the dough feels parched.
- Filling Leakage: The dough wasn’t sealed properly. Practice pinching techniques until the seal is airtight.
Beyond the Basics: Advanced Techniques
For those seeking a challenge, try these gourmet variations:
- Layered Skins: Color portions of the dough with natural dyes (e.g., beetroot powder for pink, spinach for green) and marble them together.
- Alcohol-Infused Fillings: Mix 1 tablespoon of baijiu or cognac into lotus paste for a boozy kick.
- Savory Twists: Experiment with fillings like black truffle and mushroom or foie gras for a gourmet appetizer.
Conclusion: The Joy of Craftsmanship
Crafting snow skin mooncakes is a labor of love that rewards patience and precision. Each step—from sifting flours to molding the final product—offers an opportunity to infuse creativity into a timeless tradition. Whether you adhere strictly to classic recipes or venture into avant-garde flavor combinations, the key lies in balancing technique with intuition. So, gather your ingredients, embrace the process, and savor the satisfaction of presenting a platter of homemade snow skin mooncakes that are as visually stunning as they are delicious.
Final Tip: Share your creations with loved ones—after all, the best mooncakes are those enjoyed in good company. Happy baking!

0 comments