Introduction
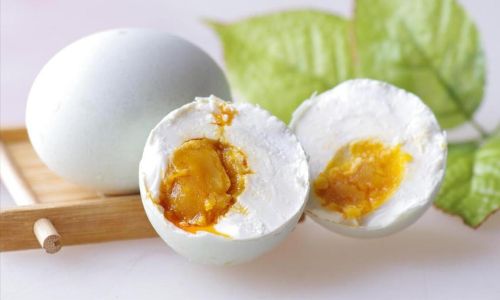
In the realm of culinary traditions, few dishes evoke as much nostalgia and delight as the humble salted duck egg. This timeless delicacy, with its rich, creamy yolk and slightly salty, savory whites, is a staple in many Asian cuisines, particularly in China, where it has been enjoyed for centuries. The process of transforming an ordinary duck egg into a flavorful, preserved treat involves a blend of science and art, requiring patience, precision, and an understanding of the delicate balance between salt, time, and temperature. This article delves into the methods and techniques for making salted duck eggs, offering insights that will enable even the most novice food enthusiast to master this ancient preservation art.
Understanding the Basics
Before diving into the specifics of how to make salted duck eggs, it’s crucial to grasp the fundamental principles behind their preservation. Salt acts as a natural preservative, drawing moisture out of the egg and creating an environment hostile to bacteria and other microorganisms. This dehydration process, combined with the salty flavor imparted by the salt, not only extends the shelf life of the egg but also enhances its taste.
Duck eggs are preferred over chicken eggs for salted preservation due to their larger size and richer yolk, which results in a more luxurious texture and flavor once preserved. The shells of duck eggs are also thicker, providing an additional layer of protection during the salting process.

Choosing the Right Eggs
The quality of the eggs is paramount to the success of your salted duck eggs. Here are some key criteria to consider when selecting your eggs:
- Freshness: Always use fresh eggs. Older eggs have thinner shells and are more prone to cracking.
- Size: While duck eggs naturally vary in size, opt for medium to large eggs for a more consistent final product.
- Source: If possible, source your eggs from free-range ducks. These eggs tend to have healthier yolks and stronger shells.
- Inspection: Before beginning the salting process, carefully inspect each egg for cracks or imperfections. Any damaged eggs should be discarded to prevent contamination.
Preparation and Cleaning
Once you’ve selected your eggs, it’s essential to clean them thoroughly to remove any dirt, debris, or natural oils that could interfere with the salting process. Here’s how to do it:
- Gentle Washing: Use warm water (not too hot, as this could cause the eggs to crack) and a soft sponge or cloth to gently wash each egg. Avoid using soap, as it can leave a residue that affects the taste.
- Drying: Pat the eggs dry with a clean towel or let them air-dry. Ensure they are completely dry before proceeding to the next step, as any moisture left on the shell can cause mold or affect the salting.
- Inspection Again: After cleaning, re-inspect each egg for cracks or missed spots. Any damaged eggs should be discarded at this point.
Traditional Salting Methods
There are several traditional methods for salting duck eggs, each with its own unique characteristics and flavor profile. Here are three popular techniques:
Dry Salting Method
This method involves coating the eggs directly with salt and allowing them to sit for an extended period.
- Materials Needed: Fresh duck eggs, coarse sea salt or kosher salt, a clean, non-reactive container (such as glass or ceramic), and a cloth or paper towels.
- Steps:
- Place a layer of salt in the bottom of the container.
- Carefully arrange the cleaned and dried eggs in a single layer on top of the salt.
- Sprinkle more salt over the eggs, ensuring they are completely covered.
- Repeat layers of eggs and salt until all eggs are used, ending with a thick layer of salt on top.
- Cover the container with a lid or cloth and place it in a cool, dark place.
- Allow the eggs to sit for about 20-30 days, depending on your desired level of saltiness and yolk firmness. Check periodically to ensure the eggs are not drying out excessively.
Wet Salting Method (Brine Method)

This method uses a saltwater brine to preserve the eggs.
- Materials Needed: Fresh duck eggs, coarse sea salt, water, a large, non-reactive pot, and a clean, non-reactive storage container.
- Steps:
- Dissolve a sufficient amount of salt in water to create a brine solution. The general ratio is about 1 cup of salt per quart of water, but this can be adjusted based on personal preference.
- Bring the brine to a boil, then let it cool completely.
- Carefully place the cleaned and dried eggs in the storage container.
- Pour the cooled brine over the eggs, ensuring they are fully submerged.
- Cover the container and place it in a cool, dark location.
- Allow the eggs to sit in the brine for about 2-3 weeks, checking periodically to ensure they remain submerged and adjusting the brine level if necessary.
Mud Packing Method
This traditional Chinese method uses a mixture of salt, clay, and water to create a protective coating around the eggs.
- Materials Needed: Fresh duck eggs, coarse sea salt, clay (preferably food-grade), water, a clean bowl, and a non-reactive container.
- Steps:
- Mix the clay with enough water to form a thick, paste-like consistency.
- Gradually add salt to the clay mixture, stirring until well combined. The mixture should be firm enough to hold its shape but not too dry.
- Roll each cleaned and dried egg in the clay mixture, ensuring it is evenly coated.
- Place the coated eggs in a single layer in the container.
- Cover the container and store it in a cool, dark place.
- Allow the eggs to sit for about 3-4 weeks, depending on your desired level of saltiness.
Advanced Techniques and Tips
While the traditional methods are effective, there are several advanced techniques and tips that can enhance the quality and flavor of your salted duck eggs:
Temperature Control
The temperature during the salting process plays a crucial role in determining the final texture and flavor of the eggs. Ideally, the eggs should be stored at a consistent temperature between 68-77°F (20-25°C). Too high temperatures can cause the yolks to become overly firm, while too low temperatures may slow down the salting process.
Humidity Management
Humidity is another important factor. Excessive moisture can lead to mold growth, while too little can cause the eggs to dry out. In humid climates, consider using desiccants or placing the eggs in a well-ventilated container to help control humidity.

Flavor Infusions
For an added layer of complexity, experiment with flavor infusions. For example, you can add spices such as five-spice powder, star anise, or cloves to the salt or brine. Alternatively, you can wrap the eggs in tea leaves or herbs before coating them in salt or mud for a unique, aromatic twist.
Monitoring and Adjustment
Regularly check the eggs during the salting process. If you notice any mold growth, carefully remove the affected areas with a clean, dry cloth. If the eggs appear to be drying out, you may need to adjust the humidity or add more brine if using the wet method.
Conclusion
The art of making salted duck eggs is a blend of science, patience, and creativity. By understanding the basics of egg preservation, selecting high-quality eggs, and mastering traditional and advanced techniques, you can create delicious, flavorful salted duck eggs that are sure to impress even the most discerning palate. Whether you choose the simplicity of the dry salting method, the flexibility of the brine method, or the authenticity of the mud packing method, the journey from fresh egg to preserved delicacy is a rewarding culinary adventure. So, gather your ingredients, roll up your sleeves, and embark on the timeless tradition of making salted duck eggs – a taste of history that’s as delightful today as it was centuries ago.


0 comments