Introduction
Pickling tender ginger, a time-honored tradition in many culinary cultures, transforms this aromatic root vegetable into a versatile and delicious condiment. Whether you’re looking to add a zesty kick to your dishes or preserve the fresh flavor of ginger for later use, pickling offers a delightful solution. This ancient preservation technique not only enhances the ginger’s natural sweetness and spice but also introduces a tangy, acidic note that pairs beautifully with a wide array of foods.
In this comprehensive guide, we’ll delve into the intricacies of pickling tender ginger, from selecting the perfect ingredients to mastering the pickling process itself. We’ll explore the various flavors and techniques that can elevate your pickled ginger to gourmet status, ensuring that every bite is a burst of flavor. Whether you’re a seasoned chef or a home cook eager to experiment, this guide promises to be an invaluable resource for anyone passionate about food preservation and flavor enhancement.
Chapter 1: Understanding Tender Ginger
Before diving into the pickling process, it’s crucial to understand the unique qualities of tender ginger. Unlike mature ginger, which has a tough skin and a stronger, more fibrous texture, tender ginger is characterized by its smooth, thin skin and juicy, mild flavor. It’s typically harvested earlier in the growing season, making it ideal for pickling due to its delicate taste and tender consistency.
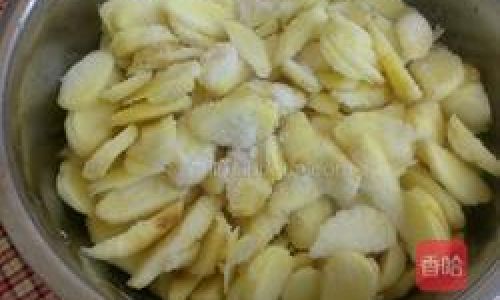
When selecting tender ginger for pickling, look for roots that are firm, smooth, and free of blemishes. The color should be a vibrant yellow or light brown, indicating freshness. Avoid ginger that is wrinkled, soft, or has mold spots, as these are signs of spoilage.
Chapter 2: The Science Behind Pickling
Pickling is a preservation technique that involves submerging food in a brine or vinegar solution. This acidic environment inhibits the growth of harmful bacteria, thereby extending the shelf life of the food. In the case of pickling tender ginger, the vinegar not only acts as a preservative but also adds a tangy, refreshing flavor.
The choice of vinegar is crucial. Apple cider vinegar, rice vinegar, and white wine vinegar are popular options due to their mild, slightly sweet flavors that complement the ginger. However, feel free to experiment with other types of vinegar, such as balsamic or red wine vinegar, to create unique flavor profiles.
In addition to vinegar, pickling brines often include sugar, salt, and spices to balance the acidity and add complexity to the final product. The ratio of these ingredients can be adjusted to suit personal preferences, but a good starting point is typically one part vinegar to one part water, with sugar and salt added to taste.
Chapter 3: Preparing the Ginger
Once you’ve selected your tender ginger, it’s time to prepare it for pickling. Begin by thoroughly washing the ginger under running water to remove any dirt or debris. Use a vegetable peeler to remove the thin skin, being careful not to削 too much of the flesh, as this can reduce the ginger’s flavor.
Next, slice the ginger into thin rounds, matchsticks, or julienne strips, depending on your preferred texture and how you plan to use the pickled ginger. Thinner slices will pickle more quickly and have a more intense flavor, while thicker pieces will retain a bit more crunch.
Chapter 4: Creating the Pickling Brine
Now it’s time to prepare the pickling brine. In a large pot, combine your chosen vinegar, water, sugar, and salt. The exact amounts will depend on the quantity of ginger you’re pickling, but a good rule of thumb is to use approximately one cup of vinegar and one cup of water per pound of ginger. Start with a modest amount of sugar and salt, then taste and adjust as needed.
If you’re adding spices, such as star anise, cloves, or cinnamon sticks, now is the time to do so. These aromatic spices will infuse the brine with additional layers of flavor, enhancing the ginger’s natural sweetness and spice.
Bring the brine to a gentle simmer over medium heat, stirring occasionally until the sugar and salt have fully dissolved. Remove the pot from the heat and let the brine cool to room temperature. It’s important to let the brine cool before adding the ginger, as hot liquid can cook the ginger and soften its texture.
Chapter 5: The Pickling Process
Once the brine has cooled, it’s time to add the prepared ginger. Pack the ginger tightly into clean, sterile jars, leaving about half an inch of headspace at the top to allow for expansion during storage. Pour the cooled brine over the ginger, ensuring that all pieces are fully submerged.
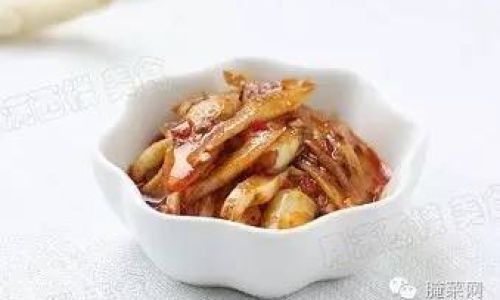
If necessary, use a clean, weighted object, such as a small glass or a fermentation weight, to keep the ginger submerged. Air exposure can lead to mold and spoilage, so it’s crucial to maintain a tight seal once the jars are filled.
Seal the jars tightly and label them with the date and contents. Place the jars in a cool, dark place, such as a pantry or cellar, where temperatures remain consistent. The pickling process will take several weeks, allowing the ginger to slowly absorb the flavors of the brine and develop its signature tangy, sweet taste.
Chapter 6: Storing and Using Pickled Ginger
After a few weeks, your pickled ginger should be ready to enjoy. The exact timing will depend on your personal preference for flavor intensity and texture. Taste-test a piece of ginger from one of the jars to determine if it’s reached your desired level of pickling.
Once you’re satisfied with the flavor, transfer the jars to the refrigerator to slow further fermentation and extend the shelf life. Properly stored, pickled ginger can last for several months, making it a convenient and versatile condiment to have on hand.
Pickled ginger is incredibly versatile and can be used in a myriad of ways. It’s a classic accompaniment to sushi and sashimi, adding a refreshing contrast to rich, fatty fish. It can also be used as a garnish for salads, stir-fries, and grilled meats, or incorporated into marinades and dressings for an extra layer of flavor.
Chapter 7: Experimenting with Variations
The beauty of pickling tender ginger lies in its adaptability. Don’t be afraid to experiment with different ingredients and techniques to create unique flavors and textures. For instance, adding a splash of soy sauce or mirin can give your pickled ginger a Japanese twist, while incorporating fresh herbs like mint or cilantro can add a tropical note.
You can also try pickling ginger with different types of vinegar or even fruit juices, such as apple or pineapple, for a sweeter, more complex flavor profile. For a spicy kick, incorporate fresh chili peppers or a pinch of red pepper flakes into the brine.
Remember, the key to successful pickling is patience and attention to detail. With a bit of practice and experimentation, you’ll soon be crafting batches of pickled ginger that rival even the most seasoned professionals.
Conclusion
Pickling tender ginger is not only a delicious way to preserve this aromatic root vegetable but also a fun and rewarding culinary project. By following the steps outlined in this guide, you’ll be able to create batches of pickled ginger that are bursting with flavor, texture, and versatility. Whether you’re a seasoned chef or a home cook eager to expand your repertoire, pickling tender ginger offers a world of culinary possibilities. So, gather your ingredients, roll up your sleeves, and start pickling – your taste buds will thank you!
0 comments