Introduction
Spring rolls, a beloved dish across Asian cuisines, owe much of their delightful texture and versatility to their delicate, paper-thin wrappers. These translucent sheets, often crispy when fried or soft when steamed, serve as the canvas for a medley of fillings—vegetables, meats, or seafood. While store-bought wrappers are convenient, mastering the craft of making spring roll wrappers at home elevates the dish to new heights. This guide delves into the intricacies of creating flawless wrappers from scratch, ensuring flexibility, durability, and a taste that rivals any restaurant-quality version. Whether you’re a novice cook or a seasoned chef, this comprehensive tutorial will equip you with the skills to produce wrappers that are both visually stunning and culinarily exceptional.
Understanding the Basics: Ingredients and Tools
Before diving into the process, gathering the right ingredients and tools is paramount. The beauty of spring roll wrappers lies in their simplicity, requiring only a handful of staple items:
- All-Purpose Flour: The backbone of the dough, providing structure and elasticity.
- Water: Acts as the binding agent, hydrating the flour to form a cohesive mixture.
- Salt: Enhances flavor and tightens the gluten network.
- Optional Additives: A touch of cornstarch or tapioca flour can increase crispiness, while a drizzle of oil adds suppleness.
Tools of the Trade:
- A large mixing bowl for combining ingredients.
- A wooden spoon or spatula for stirring.
- A clean work surface (marble or granite works best for its cool temperature).
- A rolling pin (preferably a slender, tapered model for precision).
- A non-stick skillet or crepe pan for cooking.
- A damp kitchen towel to keep dough balls moist.
The Dough: From Mixing to Resting
The foundation of exceptional spring roll wrappers begins with a well-prepared dough. Achieving the perfect consistency requires patience and attention to detail.
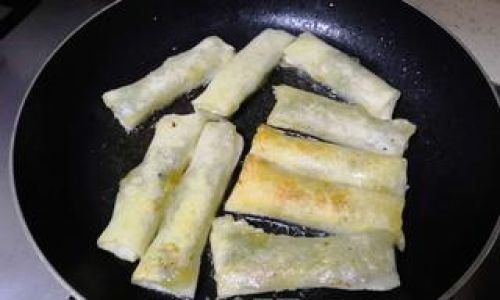
Step 1: Mixing the Dough
In a large bowl, combine 2 cups of all-purpose flour with ½ teaspoon of salt. Create a well in the center and gradually pour in ¾ cup of lukewarm water, stirring continuously to avoid lumps. The mixture should resemble a shaggy, cohesive mass. If the dough feels too dry, add water one tablespoon at a time; if sticky, sprinkle in additional flour.
Step 2: Kneading
Transfer the dough to a lightly floured surface and knead for 8–10 minutes. The goal is to develop gluten, which imparts elasticity and prevents tearing. A properly kneaded dough will feel smooth, springy, and slightly tacky. Avoid over-kneading, as this can lead to tough wrappers.
Step 3: Resting
Wrap the dough in plastic film or place it in a lightly oiled bowl covered with a damp cloth. Allow it to rest for 30–45 minutes. Resting relaxes the gluten, making the dough easier to roll and reducing shrinkage during cooking.
Shaping the Wrappers: Precision and Patience
The most challenging—and rewarding—aspect of wrapper-making lies in rolling the dough into paper-thin circles. This step demands practice but yields unparalleled results.
Step 4: Dividing the Dough
Unwrap the rested dough and knead it briefly to expel air bubbles. Divide it into 16–20 equal portions, each roughly the size of a golf ball. Roll each portion into a smooth ball and cover them with a damp cloth to prevent drying.
Step 5: Rolling Technique
Flatten one dough ball into a disc using your palm. Lightly dust the work surface and rolling pin with flour or cornstarch to prevent sticking. Begin rolling from the center outward, applying even pressure. Rotate the disc frequently to maintain a circular shape. The ideal wrapper should be 6–7 inches in diameter and translucent enough to read text through—a sign of proper thinness.
Pro Tip: If the dough resists stretching, let it rest for 5 minutes before resuming. This allows the gluten to relax further.

Cooking the Wrappers: A Delicate Balance
Cooking the wrappers requires precision to achieve the desired texture without burning or undercooking.
Step 6: Heating the Pan
Preheat a non-stick skillet over medium-low heat. The pan should be hot enough to cook the wrapper quickly but not so scorching that it browns unevenly.
Step 7: Cooking Each Wrapper
Gently lift a rolled wrapper and lay it flat on the pan. Cook for 20–30 seconds, or until bubbles form and the edges curl slightly. Flip the wrapper using a spatula and cook for an additional 10–15 seconds. The finished wrapper should be pale with a few golden spots—overcooking will make it brittle.
Step 8: Stacking and Storing
Transfer cooked wrappers to a plate lined with parchment paper to prevent sticking. If not using immediately, stack them with parchment between each layer, wrap tightly in plastic, and refrigerate for up to 3 days or freeze for 3 months.
Troubleshooting Common Issues
Even seasoned cooks encounter hiccups. Here’s how to address common pitfalls:
- Tough Wrappers: Over-kneading or insufficient resting time. Let the dough rest longer next time.
- Uneven Thickness: Inconsistent rolling pressure. Practice rotating the dough frequently.
- Sticky Dough: Add flour sparingly; too much makes wrappers dense.
- Burnt Edges: Lower the heat and cook for shorter intervals.
Advanced Techniques and Variations
Once comfortable with the basics, experiment with flavors and textures:
- Herb-Infused Wrappers: Add finely chopped cilantro, chives, or mint to the dough for a fragrant twist.
- Gluten-Free Option: Substitute all-purpose flour with a 1:1 blend of rice flour and tapioca starch.
- Colored Wrappers: Incorporate natural dyes like turmeric (yellow) or beet juice (pink) for visual appeal.
- Stuffed Wrappers: Before cooking, place a small mound of filling in the center, fold the edges, and seal with a cornstarch slurry for mini spring rolls.
Serving Suggestions and Pairings
Homemade wrappers shine in both traditional and innovative recipes:

- Classic Vegetable Spring Rolls: Fill with shredded cabbage, carrots, mushrooms, and glass noodles.
- Crispy Shrimp Rolls: Wrap seasoned shrimp and serve with a sweet chili dipping sauce.
- Dessert Wrappers: Sprinkle with cinnamon sugar post-frying for a sweet treat.
The Science Behind Perfect Wrappers
Understanding the chemistry of dough can demystify the process:
- Gluten Development: Kneading aligns wheat proteins, creating a network that traps gases and expands during cooking.
- Hydration Levels: The ratio of flour to water affects elasticity; too little water results in a stiff dough, while excess water makes it sticky.
- Maillard Reaction: The brief cooking time at medium heat initiates this reaction, creating subtle flavor notes without excessive browning.
Cultural Significance and Global Adaptations
Spring rolls, known as chūn juǎn in China, poh pia in Thailand, and lumpia in the Philippines, reflect regional ingredients and traditions. In Vietnam, gỏi cuốn features fresh herbs and rice paper, while Japanese harumaki often incorporates seafood. Adapting the wrapper recipe to suit local tastes—such as adding spices or using alternative grains—celebrates this dish’s global appeal.
Conclusion: The Joy of Homemade Wrappers
Crafting spring roll wrappers from scratch is a labor of love that rewards the cook with unparalleled freshness and customization. While the process demands time and practice, the results—golden, crispy, or tender wrappers—are a testament to culinary artistry. Whether you’re hosting a dinner party or indulging in a solo cooking project, mastering this skill opens doors to endless creativity. So roll up your sleeves, embrace the rhythm of dough and heat, and savor the satisfaction of creating a dish that bridges tradition and innovation.
Final Tips for Success
- Maintain a consistent workspace temperature—cool surfaces prevent dough from drying out.
- Use a spray bottle to mist the work surface if rolling becomes challenging.
- Practice with scrap dough first to refine your technique.
With dedication and these guidelines, you’ll soon produce spring roll wrappers that rival those of seasoned street vendors and Michelin-starred chefs alike. Bon appétit!

0 comments