Chestnuts, with their sweet, earthy flavor and versatile culinary applications, have been a beloved ingredient in kitchens worldwide for centuries. From roasted chestnuts sold on street corners during autumn festivals to elaborate dishes like stuffing, soups, and desserts, these nuts add a unique depth to recipes. However, the process of peeling chestnuts—often a frustrating and time-consuming task—can deter even the most enthusiastic home cooks. The challenge lies in removing the stubborn outer shell and inner skin without damaging the delicate flesh inside. This article delves into the most effective methods for peeling chestnuts, combining traditional techniques with modern shortcuts to ensure a hassle-free experience. Whether you’re preparing a holiday feast or simply craving a snack, mastering these techniques will transform chestnut peeling from a chore into a breeze.
Understanding Chestnut Anatomy: Why Peeling Is Tricky
Before diving into peeling methods, it’s essential to grasp the structure of a chestnut. Each nut is encased in a hard, glossy outer shell (pericarp) and an inner brown skin (pellicle) that clings tightly to the flesh. The shell is porous but tough, designed to protect the seed inside. The pellicle, while thin, adheres stubbornly due to natural tannins and oils. Unlike other nuts, such as almonds or walnuts, chestnuts lack a natural seam or weak point, making manual peeling difficult. Additionally, fresh chestnuts have higher moisture content, which can cause the skin to stick even more stubbornly if not handled properly.
Method 1: The Classic Roasting Technique
Roasting is arguably the most popular method for peeling chestnuts, as it enhances their flavor while loosening the shell and skin. Here’s a step-by-step breakdown:
-
Preparation:
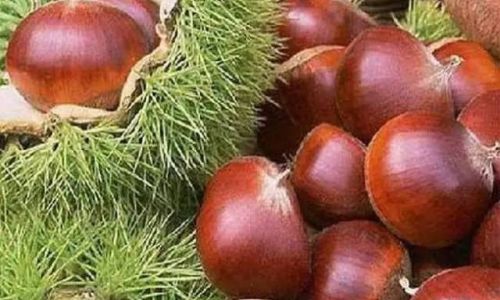
- Preheat your oven to 425°F (220°C).
- Score the chestnuts: Using a sharp paring knife or chestnut knife, cut an “X” or straight line into the flat side of each nut. This step is critical—it allows steam to escape during roasting, preventing explosions and making peeling easier.
-
Roasting:
- Spread the scored chestnuts in a single layer on a baking sheet.
- Roast for 15–20 minutes, shaking the pan occasionally to ensure even cooking.
- The shells will begin to curl back at the cuts when ready.
-
Peeling:
- Remove the chestnuts from the oven and let them cool slightly until safe to handle.
- Peel while still warm, as cooling causes the skin to re-adhere. Hold each nut with a kitchen towel (to protect your hands) and gently squeeze to pop the shell open. Use the knife to lift the shell and pellicle away from the flesh.
Pro Tip: For added ease, wrap the roasted chestnuts in a clean kitchen towel and let them steam for 5 minutes before peeling. The residual heat and moisture will further loosen the skin.
Method 2: Boiling for Speed and Simplicity
Boiling chestnuts is a quicker alternative to roasting, especially when preparing large batches. The hot water softens the shells and skins, making them easier to remove.
-
Preparation:
- Score the chestnuts as described earlier. Without scoring, the pressure from boiling can cause the nuts to explode.
-
Boiling:
- Bring a pot of water to a rolling boil.
- Add the scored chestnuts and boil for 3–5 minutes.
- Drain immediately and transfer to a bowl of ice water to halt cooking.
-
Peeling:
Pat the chestnuts dry and peel while still warm. The shells should slip off easily, and the inner skin can be rubbed away with a towel.
Variation: Add a tablespoon of baking soda to the boiling water. The alkaline solution helps break down the tannins in the skin, further easing peeling.
Method 3: Microwave Magic
For those short on time, the microwave offers a surprisingly effective solution. This method is best suited for small batches.
-
Preparation:
Score each chestnut deeply to prevent bursting.
-
Microwaving:
- Place the nuts in a single layer on a microwave-safe plate.
- Microwave on high for 30–45 seconds per ounce of chestnuts (adjust based on your microwave’s power).
-
Peeling:
Allow the chestnuts to cool slightly, then peel as you would roasted or boiled nuts. The shells should crack open, revealing the flesh inside.
Caution: Overcooking in the microwave can dry out the chestnuts, making them rubbery. Err on the side of shorter cooking times.
Method 4: The Freezer Technique
This unconventional method leverages temperature shock to loosen the shell and skin.
-
Preparation:
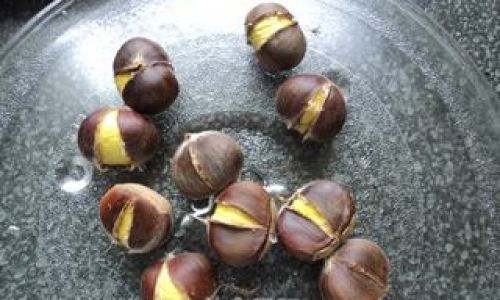
Score the chestnuts and boil them for 2–3 minutes.
-
Freezing:
Drain the chestnuts and spread them on a baking sheet. Freeze for 1–2 hours.
-
Peeling:
Thaw the chestnuts slightly, then peel. The freezing process causes the shells to contract, separating them from the flesh.
Method 5: The Pressure Cooker Hack
Pressure cooking combines the speed of boiling with the intensity of steam, yielding tender chestnuts with minimal effort.
-
Preparation:
Score the chestnuts and place them in a steamer basket inside the pressure cooker.
-
Cooking:
Add 1 cup of water and cook at high pressure for 3–4 minutes.
-
Peeling:
Release the pressure naturally, then drain and peel the chestnuts while warm.
Tools of the Trade: Essential Equipment
While chestnuts can be peeled with minimal tools, certain gadgets streamline the process:
- Chestnut Knife: Specifically designed with a curved blade to score nuts safely.
- Serrated Peeler: Useful for gripping slippery shells.
- Kitchen Shears: Alternative to a knife for scoring.
- Nutcracker: For stubborn shells (use gently to avoid crushing the flesh).
Safety First: Avoiding Common Pitfalls
- Scoring Depth: Always cut through the shell but not the flesh. A shallow cut won’t vent steam, while a deep cut may shatter the nut.
- Handling Heat: Use oven mitts or towels when handling hot chestnuts to prevent burns.
- Stale Chestnuts: Older nuts have drier flesh, making peeling harder. Opt for fresh, plump chestnuts whenever possible.
Troubleshooting: When Peels Won’t Budge
- Sticky Pellicle: After peeling, rub the nuts with a rough towel or soak them in warm water for 5 minutes to remove residual skin.
- Frozen Nuts: Thaw partially frozen chestnuts at room temperature before peeling.
- Undercooked Shells: Return tough nuts to the oven or boiling water for a few extra minutes.
Storing Peeled Chestnuts
Peeled chestnuts can be stored for later use:
- Refrigerator: Place in an airtight container for up to 5 days.
- Freezer: Blanch in boiling water for 1 minute, then freeze in a single layer before transferring to a freezer bag. They’ll keep for up to 6 months.
Creative Uses for Peeled Chestnuts
Beyond roasting, peeled chestnuts shine in:
- Stuffing and Dressing: Add to bread stuffing for a nutty twist.
- Soups and Stews: Simmer in broth for richness.
- Desserts: Purée into pastries or fold into ice cream.
- Vegan Dishes: Use as a meat substitute in stews or casseroles.
The Environmental Angle: Composting Shells
Chestnut shells are biodegradable and can be added to compost piles. Their high carbon content makes them excellent “brown” material. Crush the shells first to accelerate decomposition.
Conclusion: Elevate Your Chestnut Game
Peeling chestnuts need not be a daunting task. By understanding the nut’s structure and experimenting with the methods outlined here—roasting, boiling, microwaving, freezing, or pressure cooking—you can tailor your approach to suit your needs. Whether you’re a purist who enjoys the aroma of roasting nuts over an open fire or a multitasking cook seeking efficiency, these techniques ensure perfectly peeled chestnuts every time. So grab your apron, sharpen your knife, and embark on a culinary adventure that celebrates the humble chestnut in all its glory. Your next feast awaits—shell-free and delicious.


0 comments