Introduction
Indian cuisine is renowned worldwide for its diverse flavors, aromatic spices, and rich cultural heritage. Among the myriad of delightful dishes, one staple that holds a special place in every Indian household is the humble chapati. A chapati, also known as a roti, is a thin, unleavened flatbread made primarily from whole wheat flour. It is a versatile accompaniment to curries, dals (lentil dishes), and sabzis (vegetables), and its soft, slightly chewy texture pairs beautifully with a variety of Indian meals.
In this comprehensive guide, we will delve into the art of making perfect Indian chapatis. From understanding the ingredients and equipment needed to mastering the technique of rolling, cooking, and serving, this article aims to empower you with the skills to create authentic, homemade chapatis that will transport you straight to the heart of Indian culinary tradition.
Ingredients and Equipment

Before we begin, let’s gather the necessary ingredients and equipment:
-
Ingredients:
- 2 cups of whole wheat flour (atta)
- A pinch of salt
- Approximately 3/4 to 1 cup of warm water (depending on the flour’s absorption)
- A small amount of ghee or oil for cooking (optional, but recommended for added flavor and to prevent sticking)
-
Equipment:
- A large mixing bowl
- A rolling pin (belan) or a sturdy bottle can also be used
- A clean, dry cloth or kitchen towel
- A non-stick skillet or tawa (a small, flat, round griddle specifically designed for making rotis and chapatis)
- A spatula or tongs for flipping the chapatis
- A bowl or plate for serving
Step-by-Step Guide to Making Chapatis
Preparing the Dough
-
Combine Ingredients: Begin by placing the wheat flour and a pinch of salt in the mixing bowl. Mix them well to ensure the salt is evenly distributed.
-
Add Water Gradually: Gradually add warm water to the flour mixture, a little at a time, while stirring continuously with a spoon or your hands. The warmth of the water helps to activate the gluten in the flour, making the dough more elastic.
-
Knead the Dough: Once the mixture starts to come together, switch to kneading by hand. Knead for about 8-10 minutes until the dough becomes smooth, elastic, and no longer sticky. If the dough feels too sticky, add a bit more flour; if it’s too dry and crumbly, add a teaspoon of water.
-
Rest the Dough: Cover the dough with a clean, damp cloth and let it rest for at least 20-30 minutes. This resting period allows the gluten to relax, making the dough easier to roll out without tearing.

Rolling Out the Chapatis
-
Divide the Dough: Once the dough has rested, divide it into equal portions, typically around 6-8 pieces for the quantities mentioned. Shape each portion into a smooth ball.
-
Flatten and Roll: Lightly dust a work surface with flour to prevent sticking. Take one dough ball, flatten it slightly with your palm, and then use the rolling pin to roll it out into a thin, circular shape, about 6-7 inches in diameter. Aim for an even thickness to ensure uniform cooking.
-
Dust Lightly: If the dough starts to stick to the rolling pin or surface, dust it lightly with more flour. However, avoid using too much flour as it can make the chapatis dry.
Cooking the Chapatis
-
Heat the Tawa: Place the tawa or skillet over medium-high heat. It should be hot but not smoking before you begin cooking.
-
Cook One Side: Carefully place the rolled-out chapati onto the hot tawa. Let it cook for about 30 seconds to 1 minute until you see small bubbles forming on the surface and the bottom starts to turn golden brown with light brown spots.
-
Flip and Cook: Using a spatula or tongs, flip the chapati over to cook the other side. Press down gently with the spatula while cooking to ensure even heat distribution and to create a soft, fluffy texture. Cook for another 30 seconds to 1 minute until both sides are evenly browned.
-
Apply Ghee (Optional): For added flavor and a slight crispiness, you can brush a small amount of ghee or oil on one or both sides of the chapati while it’s still hot. This step is optional but highly recommended.

-
Stack and Keep Warm: Once cooked, transfer the chapati to a plate or bowl lined with a clean cloth to keep it warm and soft. Repeat the process with the remaining dough balls.
Serving the Chapatis
-
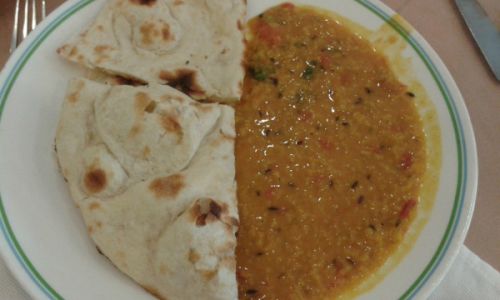
Accompany with Curries: Chapatis are traditionally served with a variety of Indian curries, dals, and sabzis. They act as a perfect scoop for lifting and enjoying the flavors of the meal.
-
Pair with Pickles and Yogurt: Enhance your meal by serving chapatis with pickles (achar), raita (a yogurt-based salad), and other condiments like chutneys or pickled vegetables.
-
Customize Your Experience: Feel free to experiment with different fillings or toppings, such as stuffed chapatis with potatoes, paneer, or spinach, for a more elaborate dish.
Tips for Perfect Chapatis
- Use Fresh Flour: Always use fresh, high-quality whole wheat flour for the best texture and flavor.
- Knead Thoroughly: Kneading the dough well is crucial for achieving a soft, elastic texture.
- Rest the Dough: Don’t skip the resting period; it makes a significant difference in the final texture of the chapatis.
- Even Heat: Ensure the tawa is evenly heated to avoid any burnt spots or uncooked patches.
- Cooking Time: Be patient and don’t rush the cooking process. Allow each side to cook thoroughly for an even color and texture.
Conclusion
Making Indian chapatis may seem like a simple task, but mastering the art requires patience, practice, and an understanding of the ingredients and technique. With this guide, you’re well-equipped to create delicious, homemade chapatis that will complement any Indian meal and bring a touch of authenticity to your kitchen. Whether you’re a seasoned chef or a novice cook, the joy of preparing and sharing homemade chapatis with family and friends is an experience that transcends culinary boundaries, connecting you to the rich heritage of Indian cuisine. So, roll up your sleeves, ignite your stove, and embark on a culinary journey that promises both delight and fulfillment. Bon appétit!


0 comments