Introduction: The Temptation of Oil Pancakes
In the vast culinary landscape of global gastronomy, there exists a humble yet profoundly satisfying dish that has captivated the hearts and taste buds of countless food enthusiasts: oil pancakes. These golden-brown, crispy-on-the-outside-yet-tender-on-the-inside wonders are a staple in many cuisines, each region offering its unique twist on this timeless delicacy. From the streets of Beijing to the kitchens of Southeast Asia, oil pancakes embody the essence of comfort food, promising a warm, hearty experience with every bite.
But how does one achieve the perfect balance of flavors and textures that make oil pancakes truly irresistible? This guide delves into the intricacies of crafting delicious and tender oil pancakes, revealing secrets that have been handed down through generations and refined over time. Whether you’re a seasoned chef or a home cook eager to impress, the following steps and tips will ensure your oil pancakes stand out for their mouthwatering appeal.
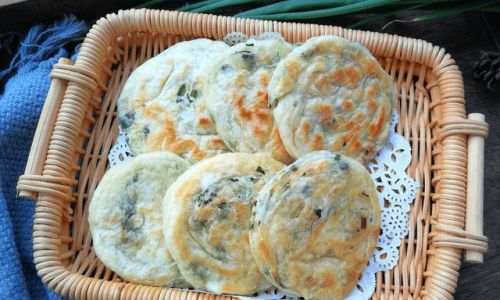
Understanding the Ingredients: The Foundation of Flavor
Before diving into the recipe, it’s crucial to understand the role each ingredient plays in creating the perfect oil pancake. The staples include flour, water, salt, oil, and sometimes a touch of baking powder or yeast for added fluffiness. Here’s a closer look at how these components contribute to the final dish:
-
Flour: The backbone of any pancake, flour provides structure and body. All-purpose flour is a versatile choice, but you can experiment with different types like whole wheat or rice flour for unique textures and flavors.
-
Water: Acts as the binding agent, helping to form a cohesive dough. The amount of water needed may vary depending on the humidity and type of flour used.
-
Salt: Enhances the overall flavor, making each bite more satisfying. A pinch is all you need, but don’t skip it!
-
Oil: Essential for both frying and adding moisture to the dough, oil also contributes to the golden crust and crispy exterior. Choose a neutral oil with a high smoking point, such as canola or vegetable oil, to avoid overpowering the natural flavors of the pancake.
-
Baking Powder/Yeast: Optional but recommended for achieving a lighter, airier texture. Baking powder reacts with liquid to release carbon dioxide, causing the dough to rise, while yeast requires time to ferment, resulting in a more complex, bread-like flavor.
The Dough: The Secret to Tenderness
The key to tender oil pancakes lies in the dough. It should be neither too stiff nor too sticky but just right—soft and pliable. Here’s a step-by-step guide to preparing the perfect dough:
-
Combine Dry Ingredients: In a large mixing bowl, whisk together the flour, salt, and a pinch of baking powder if using. This ensures an even distribution of leavening and seasoning.
-
Add Wet Ingredients: Gradually pour in the water, mixing with a wooden spoon or your hands until a shaggy dough forms. Be cautious with the water; you may need to add a little more or less depending on the dough’s consistency.
-
Knead Gently: Transfer the dough onto a lightly floured surface and knead lightly for about 5-7 minutes. The goal is to develop gluten without overworking the dough, which can make it tough. The dough should feel smooth and elastic.
-
Rest the Dough: Cover the dough with a damp cloth or plastic wrap and let it rest for at least 30 minutes. This resting period allows the gluten to relax, making the dough more extensible and easier to roll out without tearing.
Rolling and Shaping: The Art of Precision
Once the dough has rested, it’s time to roll and shape it into pancakes. Precision here is key to achieving uniform thickness and size, which in turn ensures even cooking.
-
Divide and Roll: Divide the dough into small, equal portions. Work with one portion at a time, keeping the others covered to prevent drying out. Use a rolling pin to flatten each portion into a thin circle, about 1/4 inch thick.
-
Use a Template: For perfect circles, you can use a bowl or cookie cutter as a guide. Simply place it over the rolled-out dough and trim the excess with a sharp knife.
-
Lightly Brush with Oil: Before frying, lightly brush each pancake with oil on both sides. This not only adds flavor but also helps create a crispier exterior.

Frying to Perfection: The Science of Crispiness
Now, it’s time to fry your pancakes. The temperature of the oil and the frying technique are crucial for achieving that perfect balance of crispy and tender.
-
Heat the Oil: Pour enough oil into a heavy-bottomed skillet or wok to cover the bottom by about 1/2 inch. Heat the oil over medium-high heat until it reaches about 350°F (175°C). A thermometer is helpful here, but you can also test the readiness by dropping a small piece of dough into the oil; it should sizzle immediately and turn golden brown in about 30 seconds.
-
Fry in Batches: Carefully place a few pancakes into the hot oil, avoiding overcrowding. Fry until golden brown on both sides, flipping once with a slotted spoon or tongs. This should take about 2-3 minutes per side.
-
Drain and Cool: Once golden and crispy, remove the pancakes from the oil and let them drain on a plate lined with paper towels. This removes excess oil and helps keep them crispy.
-
Maintain Temperature: Between batches, adjust the heat as necessary to maintain the oil’s temperature. Too low will result in soggy pancakes, while too high can burn them.
Serving: Elevating the Simple Pleasure
Oil pancakes are versatile and can be enjoyed in numerous ways. Here are a few serving suggestions to elevate your dish from good to great:
-
Dipping Sauces: Serve with a variety of dipping sauces such as soy sauce, chili oil, or a tangy vinegar-based sauce. These add layers of flavor and make each bite more exciting.
-
Toppings: Add fresh herbs like cilantro or parsley, a sprinkle of sea salt, or a drizzle of honey for sweetness. For a savory twist, try topping with shredded cheese, crispy bacon bits, or a dollop of sour cream.
-
Accompaniments: Pair your oil pancakes with a side of pickled vegetables, stir-fried greens, or a simple soup for a balanced meal.
Storage and Reheating: Keeping the Magic Intact
Proper storage and reheating are essential to enjoy your oil pancakes later without compromising their texture and flavor.
-
Storage: Let the pancakes cool completely before storing them in an airtight container. They can be kept at room temperature for up to a day or refrigerated for up to three days. For longer storage, freeze them in single layers between sheets of parchment paper, then transfer to a freezer bag.
-
Reheating: To reheat, place the pancakes in a single layer on a baking sheet and warm them in a preheated oven at 350°F (175°C) for about 5-7 minutes, or until heated through and crispy. Alternatively, you can use a toaster oven or microwave, but be mindful of overcooking, which can make them soggy.
Conclusion: A Culinary Journey in Every Bite
Making delicious and tender oil pancakes is an art that combines science, precision, and a touch of creativity. By understanding the role of each ingredient, mastering the dough preparation, and perfecting your frying technique, you can transform a humble pancake into a culinary masterpiece. Whether enjoyed as a quick snack, a hearty breakfast, or a sophisticated appetizer, oil pancakes offer a world of flavors and textures that delight the senses and nourish the soul. So, roll up your sleeves, heat up the oil, and embark on a culinary journey that promises to satisfy both your taste buds and your creative spirit. Happy cooking!

0 comments