Table of content
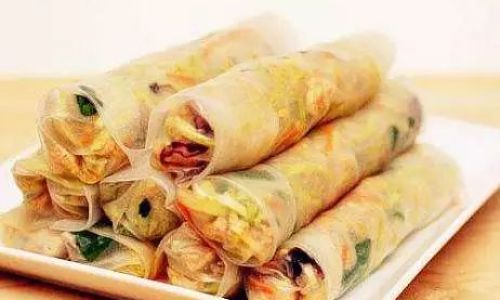
Spring rolls, with their golden, crispy exteriors and flavorful fillings, are a beloved appetizer or snack enjoyed across the globe. Originating from Asian cuisine, these delicate parcels have evolved into a versatile dish that adapts to regional tastes and dietary preferences. Whether you prefer them filled with fresh vegetables, tender meat, or a combination of both, mastering the technique to create perfect spring rolls at home is a rewarding culinary endeavor. This comprehensive guide will walk you through selecting ingredients, preparing fillings, assembling rolls, and frying them to crispy perfection. By the end, you’ll have the skills to impress family and friends with a batch of homemade spring rolls that rival any restaurant’s offering.
Understanding the Basics of Spring Rolls
Spring rolls are traditionally made with thin, translucent wrappers filled with a mixture of shredded vegetables, proteins, and aromatic seasonings. Unlike their heartier cousin, the egg roll, spring rolls are lighter and often feature a crispier texture due to their thin wrapper and minimal oil absorption during frying. The key to a great spring roll lies in balancing flavors and textures—crunchy vegetables, savory proteins, and fragrant herbs all work together to create a harmonious bite.
Ingredients You’ll Need
Before diving into the cooking process, gather your ingredients. The beauty of spring rolls lies in their adaptability, so feel free to customize the fillings based on your tastes or dietary needs.

For the Wrappers
- Spring roll wrappers: These are typically made from rice flour, water, and a pinch of salt, resulting in a pliable, translucent dough. They can be found in the frozen or refrigerated section of most Asian grocery stores.
- Water: For sealing the edges of the wrappers.
For the Filling (Classic Vegetable and Shrimp Version)
- 1 cup shredded cabbage (Napa or green cabbage works best)
- 1/2 cup grated carrots
- 1/2 cup julienned bell peppers (red, yellow, or green for color)
- 1/4 cup thinly sliced mushrooms (shiitake or button mushrooms)
- 1/4 cup bean sprouts
- 1/2 cup cooked shrimp, peeled and finely chopped (optional; substitute with tofu for vegetarian rolls)
- 2 green onions, thinly sliced
- 2 garlic cloves, minced
- 1 teaspoon fresh ginger, grated
- 1 tablespoon soy sauce (or tamari for gluten-free)
- 1 teaspoon sesame oil
- 1/2 teaspoon sugar
- Salt and pepper to taste
For Frying
- 2-3 cups vegetable oil (peanut or canola oil works well for high-heat cooking)
Step-by-Step Preparation
Preparing the Filling
The filling is the heart of your spring rolls. Achieving the right balance of flavors and textures ensures every bite is satisfying.
- Sauté the Aromatics: Heat a tablespoon of vegetable oil in a large skillet over medium heat. Add the minced garlic and ginger, sautéing for 30 seconds until fragrant. Be careful not to burn them, as this can impart a bitter taste.
- Cook the Vegetables: Add the shredded cabbage, carrots, bell peppers, and mushrooms to the skillet. Stir-fry for 3-4 minutes until the vegetables begin to soften but retain their crunch. Season with soy sauce, sesame oil, sugar, salt, and pepper.
- Incorporate Protein: If using shrimp or tofu, add it to the skillet and cook for an additional 2 minutes until heated through. Remove from heat and stir in the bean sprouts and green onions. Allow the mixture to cool completely before assembling the rolls. Warm filling can make the wrappers soggy.
Assembling the Spring Rolls
Assembling spring rolls requires patience and a gentle touch. Follow these steps for neat, tightly wrapped rolls:

- Prepare Your Workstation: Fill a small bowl with warm water. Lay out a damp kitchen towel to prevent the wrappers from drying out. Place one wrapper on a clean, dry surface.
- Soften the Wrapper: Dip your fingertips into the warm water and lightly moisten the edges of the wrapper. Wait 10-15 seconds for the wrapper to soften—it should become pliable but not overly sticky.
- Add the Filling: Spoon 2-3 tablespoons of filling onto the lower third of the wrapper, forming a horizontal log. Leave a 1-inch border on all sides to prevent leakage.
- Fold the Sides: Fold the left and right edges of the wrapper over the filling, creating a tight seal.
- Roll Tightly: Starting from the bottom edge, roll the wrapper upward, tucking in the filling as you go. Continue rolling until the roll is fully formed, using a dab of water to seal the edge.
Pro Tip: For extra crispiness, ensure the roll is tightly wrapped. Air pockets can cause the wrapper to puff unevenly during frying.
Frying the Spring Rolls
Frying is where the magic happens—transforming delicate wrappers into golden, crispy delights.

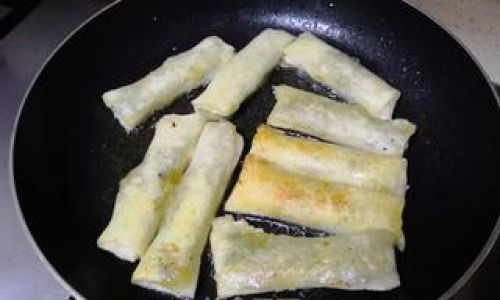
- Heat the Oil: Pour vegetable oil into a deep skillet or wok, ensuring it’s at least 2 inches deep. Heat the oil to 350°F (175°C). Use a thermometer for accuracy, as incorrect oil temperature can lead to greasy or undercooked rolls.
- Fry in Batches: Gently lower 3-4 spring rolls into the hot oil using tongs. Fry for 2-3 minutes per side until golden brown. Avoid overcrowding the pan, as this lowers the oil temperature and results in soggy rolls.
- Drain Excess Oil: Transfer the fried rolls to a wire rack or paper towel-lined plate to drain. This prevents them from becoming greasy.
Safety Note: Always exercise caution when frying with hot oil. Keep a lid nearby in case of splatters, and never leave the pan unattended.
Tips for Perfect Spring Rolls
- Prevent Soggy Wrappers: Ensure the filling is completely cooled before assembling. Excess moisture can soften the wrappers.
- Avoid Tearing: Handle the wrappers gently, as they are delicate. If a wrapper tears, discard it and start fresh.
- Storage: Uncooked spring rolls can be frozen for up to a month. Place them on a baking sheet in the freezer until firm, then transfer to a zip-top bag. Fry directly from frozen, adding 1-2 minutes to the cooking time.
- Dipping Sauces: Serve with sweet chili sauce, peanut sauce, or a soy-based dipping sauce for added flavor.
Variations to Experiment With
- Vegetarian Delight: Swap shrimp with sautéed tofu or tempeh. Add shredded jicama or water chestnuts for extra crunch.
- Spicy Kick: Incorporate thinly sliced chili peppers or a sprinkle of red pepper flakes into the filling.
- Baked Option: For a healthier twist, brush the rolls with oil and bake at 400°F (200°C) for 15-20 minutes until golden.
- Sweet and Savory: Include thinly sliced mango or pineapple in the filling for a tropical twist.
Troubleshooting Common Issues
- Oily Rolls: The oil temperature was too low. Use a thermometer to maintain 350°F (175°C).
- Uneven Browning: Crowding the pan caused temperature fluctuations. Fry in small batches.
- Burst Wrappers: Overfilling or insufficient sealing. Use less filling and ensure the edges are fully sealed with water.
The Cultural Significance of Spring Rolls
Spring rolls hold a special place in many Asian cultures, often served during festivals and celebrations. In Vietnam, gỏi cuốn (fresh spring rolls) are a popular street food, while in China, chūn juǎn are a Lunar New Year staple symbolizing wealth and prosperity. Their versatility reflects the diversity of Asian cuisine, making them a universal crowd-pleaser.

Conclusion
Crafting homemade spring rolls is a labor of love that rewards you with a plate of crispy, flavorful treats. With practice, you’ll master the art of wrapping and frying, creating rolls that are as visually stunning as they are delicious. Whether you stick to the classic recipe or experiment with bold flavors, these golden parcels are sure to become a favorite in your kitchen. So gather your ingredients, roll up your sleeves, and embark on a culinary adventure that bridges tradition and innovation—one crispy bite at a time.


0 comments