Introduction
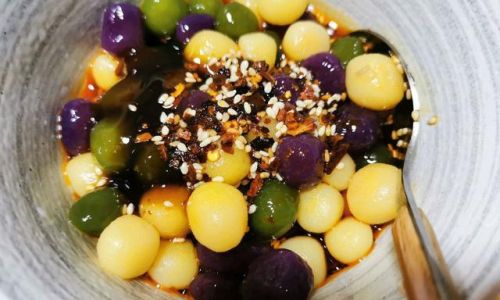
Taro balls, known as “芋圆” (yú yuán) in Mandarin, are a beloved Taiwanese dessert celebrated for their delightful chewiness and versatile flavor profiles. These vibrant, jelly-like treats are a staple in bubble tea shops, dessert cafes, and home kitchens across Asia and beyond. The term “Q弹” (Q-dan) refers to the ideal texture—bouncy, springy, and satisfyingly elastic. Achieving this texture requires precision in ingredient selection, preparation techniques, and cooking methods. This article will guide you through creating perfect taro balls from scratch, ensuring your homemade batch rivals those found in gourmet dessert parlors.
The Science Behind Chewy Taro Balls
The secret to irresistibly chewy taro balls lies in the interplay between starch and moisture. Cassava starch (tapioca flour), a key ingredient, forms a gel-like network when heated, creating that signature “Q” texture. Taro root, a starchy tuber with a mild, nutty flavor, provides the base, while sweet potatoes or purple yams add color and sweetness. Balancing these elements is critical: too much starch results in a gummy, tough texture, while too little leads to mushy, fragile balls.
Ingredients: Building Blocks of Perfection
- Taro Root (500g): Choose firm, heavy taro with smooth, unblemished skin. Avoid specimens with soft spots or sprouts.
- Sweet Potato or Purple Yam (200g): Optional but recommended for visual appeal and flavor complexity. Orange sweet potatoes add a golden hue, while purple yams yield striking violet hues.
- Cassava Starch (Tapioca Flour) (300–400g): The workhorse ingredient. Opt for fine, high-quality starch for optimal texture.
- Granulated Sugar (50–80g): Adjust to taste; brown sugar offers a caramel-like depth, while white sugar keeps the flavor neutral.
- Water (50–100ml): Boiling water activates the starch’s gelatinization process.
- Optional Add-Ins:
- Pandan extract for fragrance
- Matcha powder for earthy bitterness
- Black sesame seeds for nutty crunch
Tools of the Trade
- Sharp Knife & Cutting Board: For peeling and dicing root vegetables.
- Steamer Basket or Pot: To cook taro and sweet potato until tender.
- Ricer or Potato Masher: Ensures a lump-free base.
- Large Mixing Bowl: For combining ingredients.
- Bench Scraper or Spatula: To knead and shape dough.
- Ice Bath: Halts cooking and firms up taro balls.
- Fine-Mesh Sieve: For sifting starch to prevent clumps.
Step-by-Step Preparation

Preparing the Taro and Sweet Potato
- Roasting vs. Steaming: While steaming preserves moisture, roasting intensifies flavor. For this recipe, we’ll steam to maintain control over hydration.
- Peel and Dice: Slice taro and sweet potato into 1-inch cubes. Soak taro in cold water to prevent discoloration.
- Steam: Arrange vegetables in a steamer basket over boiling water. Cover and steam for 15–20 minutes until a knife pierces easily.
- Mash: Press through a ricer or mash until smooth. Let cool slightly (warm, not hot) to avoid cooking the starch prematurely.
Creating the Dough
- Sift Starch: Combine 300g cassava starch with sugar in a bowl. Sifting eliminates lumps.
- Gradual Incorporation: Add starch to the taro-sweet potato mash in thirds, mixing with a spatula. The dough should resemble coarse crumbs.
- Hydration: Sprinkle 50ml boiling water over the mixture. Stir vigorously until a shaggy dough forms. Tip: If the dough feels dry, add water 1 teaspoon at a time.
Kneading for Elasticity
- Hands-On Approach: Turn dough onto a lightly starch-dusted surface. Knead for 8–10 minutes, stretching and folding to develop gluten-like proteins (though cassava starch lacks gluten, mechanical action aligns starch molecules).
- Texture Check: The dough should be smooth, pliable, and slightly sticky. Overkneading leads to toughness; underkneading results in crumbly balls.
Shaping and Cutting
- Roll into Logs: Divide dough into 4 portions. Roll each into a 1-inch-thick rope.
- Cut into Pieces: Use a bench scraper to slice into 0.5-inch segments. Dust with starch to prevent sticking.
- Optional: Add Texture: Press each piece with a fork or knife to create grooves, enhancing sauce absorption.
Cooking to Perfection
- Boil Water: Bring a large pot of water to a rolling boil. Add a pinch of salt to enhance flavor.
- Cook in Batches: Gently lower taro balls into the water. Stir occasionally to prevent sticking.
- Monitor Doneness: Cook for 3–5 minutes until they float to the surface. Key Insight: Floating indicates gelatinization is complete.
- Ice Bath Shock: Transfer cooked balls to an ice water bath for 30 seconds. This halts cooking and firms the texture.
Finishing Touches
- Drain and Coat: Toss cooked taro balls in a thin layer of cassava starch to prevent clumping.
- Storage: Refrigerate in an airtight container for up to 5 days, or freeze for 3 months.
Troubleshooting Common Issues
- Sticky Dough: Add starch 1 tablespoon at a time.
- Tough Texture: Reduce kneading time or increase hydration.
- Mushy Balls: Overcooked; shorten boiling time by 1 minute.
- Cracked Surfaces: Undercooked; extend boiling by 1–2 minutes.
Flavor Variations and Creative Twists
- Black Sesame Taro Balls: Mix 1 tablespoon black sesame powder into the dough.
- Matcha-Infused: Add 2 teaspoons matcha during the starch incorporation phase.
- Coconut-Lime: Substitute 20ml coconut milk for water and add lime zest.
- Stuffed Surprises: Encase a small cube of brown sugar or red bean paste inside each ball.
Serving Suggestions
- Classic Dessert Soup: Simmer taro balls in coconut milk with tapioca pearls and mango cubes.
- Bubble Tea Addition: Slurp through a wide straw with black tea, milk, and chewy boba.
- Ice Cream Topping: Freeze-dry taro balls and crush over vanilla ice cream.
- Savory-Sweet Fusion: Toss in a stir-fry with garlic chives and soy sauce.
Health Benefits and Dietary Adaptations
- Gluten-Free: Naturally suitable for celiac diets.
- Vegan Options: Use agave syrup instead of sugar.
- Nutrient Profile: Taro is rich in dietary fiber, potassium, and vitamin E.
Cultural Significance
Taro balls trace their roots to Taiwan’s night markets, where vendors pioneered textural contrasts in desserts. Today, they symbolize culinary innovation and comfort, bridging traditional and modern palates.
Conclusion
Crafting chewy taro balls is an alchemy of science and artistry. By mastering starch ratios, kneading techniques, and cooking precision, you unlock a dessert that delights both the eye and the palate. Whether nestled in a bowl of sweet soup or bobbing in a glass of milk tea, homemade Q弹芋圆 invites creativity and culinary pride. Experiment with flavors, share your creations, and savor the joy of perfecting this timeless treat.

0 comments