The Ultimate Guide to Peeling and Shelling Roasted Chestnuts: Tips, Tricks, and Techniques for Perfectly Prepared Nuts Every Time**
Roasted chestnuts are a beloved autumn and winter treat, prized for their sweet, buttery flavor and versatility in both sweet and savory dishes. Whether you’re adding them to stuffing, pureeing them into soups, or enjoying them straight from the fire, the challenge of peeling and shelling these stubborn nuts often overshadows their culinary appeal. The process can be frustrating: burnt fingers, shattered shells, and inner skins that cling like glue. But fear not! This comprehensive guide will demystify the art of peeling roasted chestnuts, offering step-by-step instructions, expert tips, and creative solutions to transform this tedious task into a breeze. By the end, you’ll master the techniques needed to enjoy perfectly peeled chestnuts with minimal effort and maximum reward.
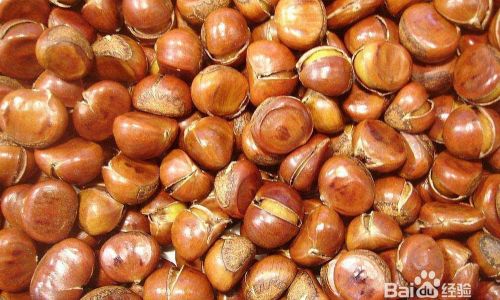
Understanding Chestnut Anatomy: Why Peeling Is So Challenging
Before diving into techniques, it’s essential to grasp why chestnuts are notoriously difficult to peel. Unlike almonds or walnuts, which have smooth, thin shells, chestnuts are enclosed in a hard, spiky outer husk (called the burr) and a woody inner shell. Beneath this shell lies a thin, papery skin (the pellicle) that adheres tightly to the flesh. When roasted, the shell softens slightly but the pellicle often becomes even more stubborn, sticking to the nut due to moisture loss and caramelization of sugars. This dual-layer defense—hard shell plus sticky skin—makes mechanical peeling alone ineffective. Success lies in a combination of heat, timing, and strategic cuts.
Preparation: The Foundation of Easy Peeling
The key to effortless peeling begins before you even roast the chestnuts. Proper preparation ensures the shells loosen and the pellicle separates from the flesh.
-
Select Fresh, High-Quality Chestnuts
- Choose nuts that are glossy, firm, and heavy for their size. Avoid those with cracks, mold, or hollow sounds when shaken (a sign of dryness).
- Freshness matters: Older chestnuts have drier flesh, making the pellicle cling even more aggressively.
-
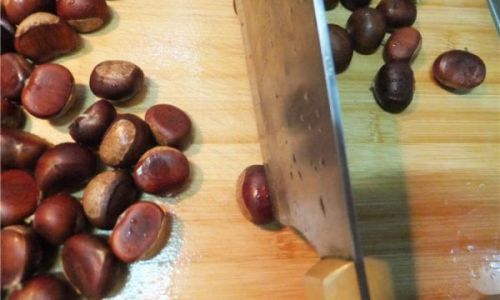
Score the Shells
This is the most critical step. Scoring creates a vent for steam to escape during roasting, preventing explosions and loosening the shell.- Tool: Use a sharp paring knife or a chestnut knife (a specialized tool with a curved blade).
- Method: Lay the chestnut flat on a cutting board. Hold it firmly and cut an “X” or straight line across the rounded side (not the flat bottom). Aim to cut through the shell but not the flesh—about 1/8 inch deep.
- Pro Tip: Soak scored chestnuts in warm water for 15–30 minutes before roasting. This hydrates the shells, making them more pliable and reducing pellicle adhesion.
Roasting Methods: Oven, Sttovetop, or Open Fire?
The roasting method impacts peeling ease. Here’s how to optimize each:
-
Oven Roasting (Ideal for Large Batches)
- Preheat to 425°F (220°C). Arrange scored chestnuts in a single layer on a baking sheet.
- Roast for 15–20 minutes, shaking the pan halfway through. The shells should curl open at the scores.
-
Stovetop Roasting (Quick and Hands-On)
- Use a heavy-bottomed skillet or chestnut pan (with holes for steam release). Heat over medium-high.
- Roast chestnuts for 10–15 minutes, stirring frequently. The scores will gap as they cook.
-
Open Fire (For Smoky Flavor)
- Roast over hot coals or a gas burner using a wire basket or long-handled perforated pan.
- Cook for 8–12 minutes, turning regularly. This method chars the shells, which can aid peeling but requires caution to avoid burning.
The Peeling Process: Step-by-Step
Once roasted, act quickly—chestnuts are easiest to peel while warm.
-
Immediate Handling
Transfer roasted chestnuts to a kitchen towel or heatproof bowl. Cover to trap steam for 5–10 minutes. This softens the shells further.
-
Peeling the Outer Shell
- Grab a chestnut and pinch the scored area. The shell should begin to flake off. If stuck, use the knife to pry it gently.
- Discard shells as you go to avoid confusion with unpeeled nuts.
-
Removing the Pellicle
- The pellicle is the real nemesis. To loosen it:
- Rubbing Method: Rub two peeled chestnuts together vigorously. The friction often dislodges the skin.
- Hot Water Soak: Submerge peeled nuts in boiling water for 1–2 minutes, then drain and pat dry. The steam helps release the pellicle.
- Microwave Trick: Place stubborn nuts on a plate and microwave for 10–15 seconds. The heat reactivates moisture, making the skin easier to peel.
- The pellicle is the real nemesis. To loosen it:
-
Final Inspection
Check for any remaining pellicle fragments. A paring knife or vegetable peeler can scrape off stubborn bits.
Tips and Tricks for Easier Peeling
- Freeze and Thaw: Roast, then freeze chestnuts for 24 hours. Thawing introduces moisture, loosening the pellicle.
- Vinegar Soak: After scoring, soak chestnuts in a mix of 1 cup water + 1 tbsp white vinegar for 30 minutes. The acidity aids shell separation.
- Use a Towel: Hold hot chestnuts with a folded towel to protect your hands while peeling.
- Buy Pre-Scored Chestnuts: Some specialty stores sell chestnuts pre-scored, saving time and reducing injury risks.
Common Mistakes to Avoid
- Scoring Too Shallow: A superficial cut won’t vent steam, leading to explosive nuts and harder shells.
- Over-Roasting: Burnt chestnuts become brittle and shatter, mixing shell fragments with flesh.
- Peeling When Cold: Waiting too long allows the shells and pellicle to harden again.
- Using Dull Knives: A blunt blade crushes the shell instead of slicing it, making peeling harder.
Advanced Techniques and Tools
For frequent chestnut enthusiasts, investing in specialized tools can streamline the process:
- Chestnut Knife: Its curved blade follows the nut’s contour, reducing slippage.
- Electric Chestnut Roaster: Automates roasting with even heat and built-in trays for easy peeling.
- Food Dehydrator: After peeling, dehydrate chestnuts at 145°F (63°C) for 8–10 hours to make crispy snacks.
Troubleshooting Peeling Problems
- Shell Won’t Open: Re-roast for 2–3 minutes. The heat may have been insufficient.
- Pellicle Sticks to Nut: Soak in warm water, then rub with a rough towel.
- Nut Meat is Crumbly: You’ve over-roasted. Next time, reduce cooking time by 2–3 minutes.
Creative Uses for Peeled Chestnuts
Don’t let your hard work go to waste! Try these recipes:
- Chestnut Soup: Simmer peeled nuts with onions, garlic, and vegetable stock. Blend until creamy.
- Stuffing Enhancer: Mix chopped chestnuts into bread stuffing for a sweet, nutty crunch.
- Vegan “Pâté”: Puree chestnuts with sautéed mushrooms, thyme, and olive oil.
- Chestnut Honey: Roast nuts, then simmer in honey until thick. Drizzle over yogurt or ice cream.
Conclusion
Peeling roasted chestnuts need not be a battle. By understanding their anatomy, mastering scoring techniques, and leveraging heat and moisture, you can transform this once-arduous task into a satisfying ritual. Whether you’re a home cook experimenting with seasonal recipes or a holiday host aiming to impress, these methods will ensure your chestnuts are as beautifully peeled as they are delicious. So fire up the oven, grab your knife, and prepare to savor the rewards of your labor—one perfectly smooth, golden chestnut at a time.



0 comments