Introduction
Steaming corn buns, a delightful fusion of traditional Chinese bun-making techniques with the sweet, earthy flavor of cornmeal, is a culinary art that combines simplicity with rich, satisfying results. These buns, often known as “yu mi tou” (玉米馍) in Mandarin, are a staple in many Chinese households, especially during festive occasions or as a comforting snack. They are not only visually appealing but also pack a nutritious punch, thanks to the dietary fiber and essential nutrients found in cornmeal.
In this comprehensive guide, we will walk you through the entire process of making corn buns from scratch, ensuring that even the most novice baker can achieve fluffy, delicious results. From preparing the ingredients to shaping and steaming the buns, each step is broken down into easy-to-follow instructions, complete with tips and tricks to enhance your baking experience.
Section 1: Ingredients and Equipment Preparation
Before diving into the recipe, it’s crucial to gather all the necessary ingredients and equipment. This not only ensures a smooth workflow but also helps maintain hygiene and organization in the kitchen.
Ingredients:
- Cornmeal: The star ingredient, providing the unique flavor and texture. Opt for finely ground cornmeal for a smoother dough.
- All-purpose Flour: Adds structure and softness to the buns.
- Active Dry Yeast: Essential for leavening, giving the buns their fluffy texture.
- Sugar: Aids in yeast activation and adds a hint of sweetness.
- Warm Water: Activates the yeast and helps form a cohesive dough.
- Milk: Adds richness and flavor. You can use whole milk, skim milk, or a non-dairy alternative.
- Salt: Enhances flavor and controls the yeast’s activity.
- Vegetable Oil or Shortening: Keeps the dough moist and aids in shaping.
- Baking Powder (Optional): Provides additional lift and ensures the buns rise evenly.
Equipment:
- Mixing Bowls: For combining ingredients and kneading the dough.
- Measuring Cups and Spoons: Ensure accurate ingredient quantities.
- Rubber Spatula: For scraping down the sides of the bowl and folding the dough.
- Clean Kitchen Towel or Plastic Wrap: For covering the dough during proofing.
- Steamer: Essential for steaming the buns. You can use a traditional bamboo steamer, an electric steamer, or even a makeshift steamer with a pot and a steaming rack.
- Parchment Paper or Silicone Baking Mats: Prevents sticking and makes handling the dough easier.
- Rolling Pin: For rolling out the dough into uniform thickness.
- Sharp Knife or Dough Cutter: For cutting the dough into shapes.
Section 2: Preparing the Dough
Step 1: Activate the Yeast
Begin by activating the yeast. In a small bowl, combine warm water (around 110°F or 45°C), a pinch of sugar, and the active dry yeast. Stir gently and let it sit for about 5-10 minutes until frothy and bubbly. This indicates that the yeast is active and ready to use.
Step 2: Combine Dry Ingredients
In a large mixing bowl, whisk together the cornmeal, all-purpose flour, a teaspoon of sugar, and a pinch of salt. If using baking powder, add it to the dry ingredients now.
Step 3: Create a Well and Add Wet Ingredients
Make a well in the center of the dry ingredients and pour in the activated yeast mixture, milk, and vegetable oil. Gradually incorporate the dry ingredients into the wet ones, using a rubber spatula or your hands, until a shaggy dough forms.
Step 4: Knead the Dough
Transfer the dough to a lightly floured surface and knead for about 8-10 minutes until it becomes smooth and elastic. Kneading helps develop gluten, which is crucial for the structure and texture of the final product. If the dough feels too sticky, add a little more flour; if it’s too dry, add a splash of water.
Step 5: First Proof
Place the kneaded dough back into the mixing bowl, cover it with a clean kitchen towel or plastic wrap, and let it proof in a warm, draft-free place for about 1-2 hours, or until it has doubled in size. This step allows the yeast to do its work, creating the air pockets that make the buns fluffy.
Section 3: Shaping the Buns
Step 1: Punch Down the Dough
Once the dough has finished proofing, punch it down to release any trapped gases. This step prevents the buns from having large, uneven air pockets.
Step 2: Divide and Shape
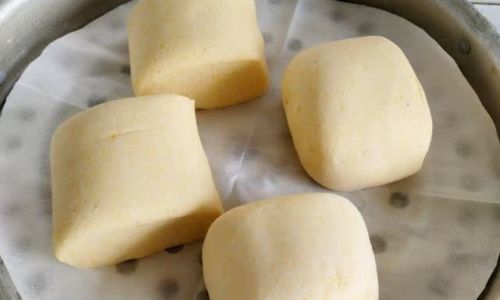
Transfer the dough to a lightly floured surface and divide it into equal portions using a sharp knife or dough cutter. Shape each portion into a smooth ball by cupping your hands around the dough and gently rotating it on the work surface. Alternatively, you can roll the dough out into a flat rectangle, brush with a little oil or milk, and roll it up tightly like a jelly roll before slicing into individual pieces.
Step 3: Second Proof
Place the shaped buns on a parchment-lined tray or steaming rack, spacing them apart to allow for expansion. Cover them with a clean kitchen towel or plastic wrap and let them proof for another 30 minutes to an hour, or until they have puffed up slightly and feel light to the touch.
Section 4: Steaming the Buns
Step 1: Prepare the Steamer
While the buns are undergoing their second proof, prepare your steamer. Fill the bottom with water and bring it to a boil. If using a bamboo steamer, line it with parchment paper or banana leaves to prevent sticking.
Step 2: Arrange the Buns
Carefully lift the proofed buns and place them in the steamer basket, ensuring they are not overcrowded. Leave some space between each bun to allow for steam circulation.
Step 3: Steam the Buns
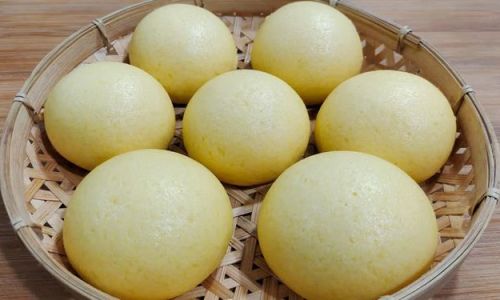
Cover the steamer and reduce the heat to medium-low. Steam the buns for about 15-20 minutes, or until they are cooked through and have a slight bounce when touched. Avoid opening the steamer lid frequently, as this can cause the buns to collapse.
Step 4: Cool and Serve
Once steamed, carefully remove the buns from the steamer and let them cool on a wire rack for a few minutes. This helps set their shape and prevents them from becoming soggy. Serve warm, with a spread of butter or a drizzle of honey for added flavor.
Section 5: Tips and Troubleshooting
Temperature Control:
- Ensure the water used for activating the yeast and the room temperature are within the optimal range (around 110°F or 45°C for yeast activation). Too hot will kill the yeast, while too cold will slow its activity.
Kneading Technique:
- Knead the dough thoroughly to develop gluten, but avoid over-kneading, which can make the buns dense.
Proofing Environment:
- Create a warm, humid environment for proofing. You can use a proofing box, place the dough in a slightly warmed oven (turned off), or cover it with a damp towel.
Steaming Consistency:
- Ensure the steamer is properly sealed to retain steam. If using a makeshift steamer, check for leaks and cover any gaps with aluminum foil.
Avoiding Collapse:
- Do not open the steamer lid frequently during steaming, as sudden temperature changes can cause the buns to collapse.
Conclusion
Steaming corn buns is a rewarding culinary endeavor that combines the art of traditional baking with the wholesome goodness of cornmeal. By following this detailed guide, you’ll be able to create fluffy, delicious corn buns that are perfect for breakfast, snacks, or even as part of a festive meal. Remember, the key to success lies in precise ingredient measurement, thorough kneading, proper proofing, and consistent steaming. With practice, you’ll soon master this technique and enjoy the sweet, earthy taste of homemade corn buns in every bite. Happy baking!


0 comments