Introduction
Fried chicken wings are a culinary delight enjoyed by people worldwide. Whether you’re hosting a game-day party, a family gathering, or simply craving a comforting snack, crispy, juicy chicken wings can elevate any occasion. While the concept may seem straightforward, achieving the perfect balance between a golden, crunchy exterior and a tender, flavorful interior requires attention to detail and a few key techniques. This comprehensive guide will walk you through every step of the process, from selecting the right wings to mastering the frying technique, ensuring you produce restaurant-quality fried chicken wings at home.
Section 1: Choosing the Right Chicken Wings
Before you dive into the frying process, it’s crucial to start with high-quality ingredients. Here are some tips for selecting the best chicken wings:

-
Freshness Matters: Always opt for fresh, never frozen, chicken wings if possible. Fresh wings retain more moisture, leading to juicier results. If fresh wings aren’t available, choose frozen wings that have been properly sealed and haven’t been thawed and refrozen multiple times.
-
Size and Shape: Chicken wings come in various sizes and shapes. For even cooking, try to select wings that are relatively uniform in size. This will ensure they cook at the same rate, preventing some from overcooking while others remain raw.
-
Organic or Free-Range: If you’re concerned about the quality and ethical sourcing of your food, consider buying organic or free-range chicken wings. These chickens are typically raised without antibiotics or hormones and have a healthier diet, which can positively impact the taste and nutritional value of your final dish.
-
Inspect for Quality: Before purchasing, visually inspect the wings. They should have a clean, slightly pinkish hue with no signs of discoloration, sliminess, or off odors.
Section 2: Preparation and Brining
Once you’ve secured your wings, it’s time to prepare them for frying. Brining is a crucial step that can significantly enhance the juiciness and flavor of your wings.
-
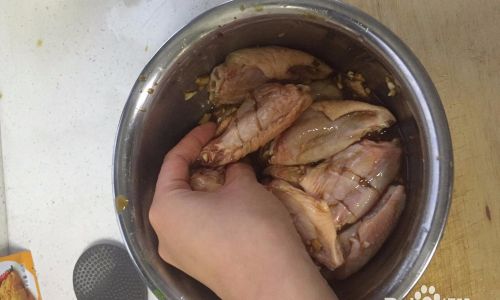
Rinsing and Patting Dry: Start by rinsing the wings under cold running water to remove any surface impurities. Pat them dry thoroughly with paper towels. Moisture on the wings can cause them to steam rather than fry, leading to a soggy exterior.
-
Brining Basics: Brining involves soaking the wings in a saltwater solution for a few hours or overnight. This process draws moisture into the meat cells by osmosis, making the wings more juicy and flavorful. A simple brine consists of 1 cup of kosher salt dissolved in 1 gallon of cold water. For added flavor, you can include a few tablespoons of sugar, a handful of garlic cloves, and a few sprigs of fresh thyme or rosemary.
-
Brining Time: Submerge the wings in the brine, ensuring they are fully covered. Refrigerate for at least 4 hours, preferably overnight. The longer they brine, the more moisture they will absorb, but don’t exceed 24 hours as this can make the wings too salty.
-
Rinsing and Drying Again: After brining, rinse the wings under cold water to remove any excess salt and pat them dry once more with paper towels. This step is vital to prevent the wings from becoming too salty during frying.
Section 3: Seasoning and Coating
Seasoning and coating your wings correctly can make or break the final dish. Here’s how to do it right:
-
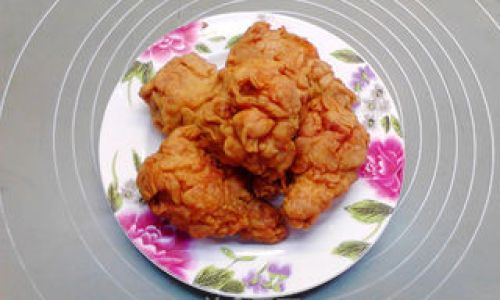
Basic Seasoning: A simple blend of salt, pepper, and garlic powder is a classic choice. For more complex flavors, consider adding paprika, cayenne pepper, onion powder, or your favorite spices. Mix the seasonings in a bowl and toss the wings to coat evenly.
-
Flour Coating: For a classic crispy crust, use all-purpose flour. You can also mix in some cornstarch, which raises the frying temperature of the coating, creating an even crispier exterior. Season the flour with salt and pepper, then dredge each wing in the flour, shaking off any excess.
-
Buttermilk Bath (Optional): For an extra layer of flavor and tenderness, soak the seasoned wings in buttermilk for 30 minutes to an hour before coating them in flour. The acidity of the buttermilk helps break down some of the proteins in the chicken, making it more tender.
-
Double-Dipping Technique: For maximum crispiness, use the double-dipping method. First, coat the wings in seasoned flour, shake off the excess, then dip them in buttermilk (if using) or water, and coat again in the flour mixture. This creates a thicker crust that holds more oil, resulting in a crunchier bite.
Section 4: Setting Up for Frying
Proper equipment and oil selection are essential for successful frying.
-
Choosing the Right Oil: Neutral oils like peanut, canola, or vegetable oil are best for frying chicken wings because they have a high smoke point, meaning they can reach high temperatures without burning. Avoid using olive oil, as its lower smoke point can lead to smoking and an unpleasant flavor.
-
Deep Fryer or Heavy-Bottomed Pot: A deep fryer simplifies the process, maintaining a consistent temperature. However, a heavy-bottomed pot with a capacity of at least 4-6 quarts works well too. Ensure the pot is deep enough to fully submerge the wings without overflowing.
-
Heating the Oil: Pour enough oil into the pot to fully cover the wings. Heat the oil to 350°F (175°C). Use a deep-fry thermometer to monitor the temperature accurately. Maintaining the correct temperature is crucial for achieving an evenly cooked, crispy exterior.
Section 5: The Frying Process
Now, it’s time to fry your wings. Follow these steps carefully to ensure success:
-
Drying the Wings Again: Before frying, ensure the wings are completely dry. Any remaining moisture can cause dangerous splattering and steam, preventing the wings from frying properly.
-
Frying in Batches: Avoid overcrowding the pot. Fry the wings in small batches, about 4-6 wings per batch depending on the size of your pot. This ensures the oil temperature remains consistent and allows for even frying.
-
Cooking Time: Fry the wings for about 8-10 minutes, or until they reach an internal temperature of 165°F (75°C). Use a meat thermometer to check for doneness. The wings should be golden brown and crispy.
-
Draining and Cooling: Once done, remove the wings from the oil using a slotted spoon or frying basket and let them drain on a wire rack set over paper towels. This helps remove excess oil and keeps the wings crispy.
-
Optional: Finishing with a Higher Heat: For an extra crunchy finish, you can increase the oil temperature to 375°F (190°C) and fry the wings for an additional 1-2 minutes. This step, known as “finishing,” helps to drive off any remaining moisture and solidify the oil in the crust, making it even crispier.
Section 6: Serving and Sauce Options
Your fried chicken wings are now ready to be enjoyed. Here are some serving and sauce ideas to elevate your dish:
-
Classic Buffalo Sauce: A blend of melted butter and hot sauce (like Frank’s RedHot) is a timeless favorite. Adjust the heat level by adding more or less hot sauce to taste.
-
BBQ Sauce: Sweet and tangy BBQ sauce adds a whole new dimension to your wings. Brush on after frying or serve on the side for dipping.
-
Honey Garlic Sauce: Mix honey, minced garlic, soy sauce, and a touch of rice vinegar for a sweet and savory glaze.
-
Dry Rubs: For a different approach, try a dry rub made from brown sugar, smoked paprika, garlic powder, and a pinch of cayenne pepper. Rub the mixture onto the wings before or after frying.
-
Serving Suggestions: Serve your wings with sides like celery sticks, carrot sticks, blue cheese dressing, ranch dressing, or a side of crispy fries.
Conclusion
Mastering the art of frying chicken wings takes time and practice, but with this comprehensive guide, you’re well-equipped to produce delicious, crispy wings at home. From selecting the right ingredients to perfecting your frying technique and experimenting with various sauces, the journey is half the fun. So, gather your ingredients, preheat your oil, and get ready to enjoy the crispy, juicy, and flavorful results of your hard work. Happy frying!


0 comments