In the vast realm of culinary arts, there exists a dish that combines the essence of ancient traditions with the delight of modern palates – Tea-Oil Duck. This dish, renowned for its crispy skin and juicy, flavorful meat, is a testament to the harmony between simple ingredients and meticulous cooking techniques. Originating from China, where it has been a cherished part of festive meals and family gatherings for centuries, Tea-Oil Duck embodies the art of balance in gastronomy. This article will guide you through the step-by-step process of making this exquisite dish, ensuring that you can recreate its magic in your own kitchen.
Understanding the Ingredients
Before diving into the recipe, it’s crucial to understand the key ingredients that make Tea-Oil Duck unique. The star of the show is, of course, the duck – preferably a Peking duck or any breed known for its fatty skin and tender meat. The skin’s fat content is vital for achieving the desired crispiness. Next, we have tea oil, extracted from the seeds of the camellia plant, which adds a subtle, earthy flavor and a rich, golden hue to the dish. Other essential ingredients include ginger, garlic, soy sauce, rice wine (or dry sherry), five-spice powder, honey, and salt.

Preparation and Marination
Step 1: Preparing the Duck
Begin by thawing the duck if it’s frozen. Once fully thawed, rinse it thoroughly under cold running water, inside and out, to remove any impurities. Pat it dry with paper towels to ensure even cooking and crispier skin. Make sure to check the cavity for any remaining feathers or pinfeathers and remove them.
Step 2: Seasoning the Duck
In a small bowl, mix together 2 tablespoons of soy sauce, 1 tablespoon of rice wine, 1 teaspoon of five-spice powder, minced ginger and garlic (about 1 tablespoon each), and a pinch of salt. Rub this marinade evenly over the duck’s skin and inside the cavity. Be generous with the seasoning, especially on the skin, as this will help form the crispy crust. Let the duck marinate for at least 2 hours, preferably overnight in the refrigerator for maximum flavor penetration.
Cooking Techniques: From Roasting to Glazing
Step 3: Preparing for Roasting
Preheat your oven to 375°F (190°C). While the oven is preheating, prepare the duck for roasting. Place the duck breast-side up on a rack set inside a roasting pan. This allows the heat to circulate evenly around the duck, promoting even cooking and crispier skin.
Step 4: Roasting the Duck
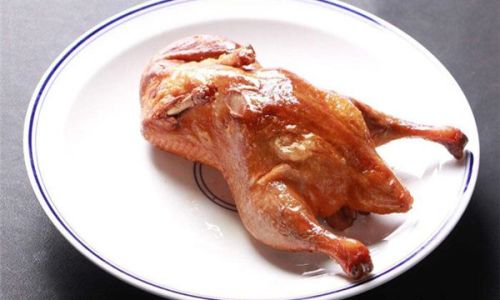
Pour 1-2 inches of boiling water into the bottom of the roasting pan (this creates steam, helping to keep the duck moist while the skin crisps up). Carefully transfer the pan to the preheated oven. Roast the duck for about 1 hour and 15 minutes, or until the skin is golden brown and the internal temperature reaches 165°F (75°C).
Step 5: Preparing the Glaze
While the duck is roasting, make the glaze by mixing 2 tablespoons of honey, 1 tablespoon of soy sauce, and 1 teaspoon of tea oil in a small saucepan. Heat gently until the mixture is smooth and slightly thickened. This glaze will add a shiny finish and an extra layer of flavor to the duck.
Step 6: Glazing and Final Roasting
After the initial roasting period, carefully remove the duck from the oven. Using a pastry brush, coat the duck evenly with the prepared glaze, focusing on the skin. Return the duck to the oven and roast for an additional 10-15 minutes, or until the skin is deeply caramelized and very crispy. Keep a close eye on the duck during this final stage to prevent it from burning.
Resting and Serving
Step 7: Resting the Duck
Once done, remove the duck from the oven and let it rest for at least 15 minutes before carving. This resting period allows the juices to redistribute, ensuring that each bite is juicy and flavorful.
Step 8: Carving and Serving
To carve the duck, start by removing the legs and thighs. Then, slice the breast meat into thin pieces. Serve the duck hot, accompanied by steamed buns, pickled vegetables, and a dipping sauce made from soy sauce, rice vinegar, and a touch of sesame oil. The contrast of textures and flavors will elevate your dining experience to new heights.
Tips for Perfection
- Patience is Key: Marinating overnight can significantly enhance the flavor of your duck.
- Temperature Control: Ensure your oven temperature is accurate to avoid overcooking or undercooking the duck.
- Skin Care: For extra crispy skin, you can prick the duck’s skin all over with a fork before roasting to allow the fat to render more effectively.
- Glazing Technique: Apply the glaze in multiple thin coats during the final roasting phase for an even, glossy finish.
Conclusion
Making Tea-Oil Duck is a journey through time-honored traditions and culinary excellence. By following these steps, you’ll not only recreate a dish that has delighted generations but also embark on a personal culinary adventure. The combination of tea oil’s subtle aroma, the duck’s rich flavor, and the meticulous cooking process results in a meal that is as much an art as it is a nourishment. So, gather your ingredients, preheat your oven, and embark on this culinary journey to create a Tea-Oil Duck that will be remembered fondly by all who taste it.

0 comments