Table of content
Introduction
Bread, a staple in countless cuisines worldwide, is a versatile and comforting food that can be enjoyed in various forms—from a simple slice of toast with butter to an intricate sandwich loaded with toppings. While many people might think of baking bread as a complex and time-consuming process, the truth is that you can make simple, delicious bread at home with minimal effort and ingredients. In this comprehensive guide, we’ll walk you through the basics of how to make simple bread, from gathering your materials to kneading, shaping, and baking. By following these steps, you’ll be able to enjoy freshly baked bread in no time.
Understanding the Ingredients
Before diving into the recipe, let’s break down the essential ingredients you’ll need to make simple bread:
-
Flour: The foundation of bread, flour provides structure and texture. All-purpose flour is a good choice for beginners as it works well in a variety of recipes.

-
Water: Acts as a hydrating agent, helping to form gluten and giving the dough its elasticity.
-
Yeast: A living organism that, when fed sugar and moisture, produces carbon dioxide gas, causing the dough to rise. Active dry yeast is commonly used and needs to be activated in warm water before use.

-
Salt: Enhances flavor and controls the yeast’s activity, preventing it from over-rising.
-
Sugar: Optional but recommended, sugar feeds the yeast, helping it to grow and produce more gas. It also adds a touch of sweetness to the bread.

-
Fat (Optional): Ingredients like butter, oil, or milk can be added to enrich the dough, making the bread softer and more tender.
Equipment You’ll Need
- Mixing Bowls: For combining ingredients and letting the dough rise.
- Measuring Cups and Spoons: To ensure accurate ingredient quantities.
- Dough Hook or Wooden Spoon: For mixing and kneading the dough.
- Clean Kitchen Towel or Plastic Wrap: To cover the dough while it rises.
- Baking Sheet or Loaf Pan: For shaping and baking the bread.
- Oven: To bake the bread to perfection.
- Cooling Rack: For letting the bread cool after baking.
Step-by-Step Guide to Making Simple Bread
Step 1: Activate the Yeast
- Warm Water: Pour 1/2 cup of warm water (about 110°F or 45°C) into a small bowl. The water should be warm to the touch but not hot, as this can kill the yeast.
- Add Sugar and Yeast: Sprinkle 1 teaspoon of sugar and 1 packet (about 2 1/4 teaspoons) of active dry yeast into the warm water. Stir gently to combine.
- Let It Sit: Allow the mixture to sit for about 5-10 minutes. You should see bubbles forming on the surface, indicating that the yeast is active and ready to use.
Step 2: Combine Ingredients
- Large Mixing Bowl: Place 3 cups of all-purpose flour in a large mixing bowl.
- Create a Well: Use your fingers to create a well in the center of the flour.
- Add Salt and Activated Yeast: Pour the activated yeast mixture and 1 teaspoon of salt into the well.
- Add More Water: Gradually add another 1/2 cup to 3/4 cup of warm water, a little at a time, mixing with a dough hook or wooden spoon as you go. The exact amount of water may vary depending on the humidity and the type of flour used.
Step 3: Knead the Dough
- Transfer to a Floured Surface: Once the ingredients are mostly combined, turn the dough out onto a lightly floured surface.
- Knead: Use the heel of your hand to push the dough away from you and then fold it back over itself. Repeat this motion for about 8-10 minutes, or until the dough becomes smooth and elastic. It should no longer feel sticky and should start to spring back when lightly pressed.
Step 4: First Rise
- Lightly Oil Bowl: Lightly oil the mixing bowl you used initially to prevent the dough from sticking.
- Shape Dough into Ball: Shape the dough into a ball and place it back into the bowl.
- Cover: Cover the bowl with a clean kitchen towel or plastic wrap.
- Let It Rise: Place the bowl in a warm, draft-free place. Allow the dough to rise for about 1-2 hours, or until it has doubled in size.
Step 5: Punch Down and Shape
- Punch Down Dough: Once the dough has risen, punch it down gently to release any air bubbles.
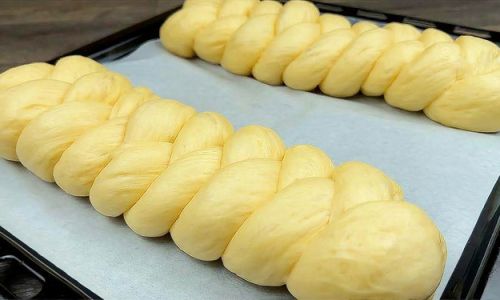
- Shape Dough: Depending on your preference, you can shape the dough into a loaf, rolls, or any other desired shape. For a loaf, shape the dough into an oval and place it in a greased loaf pan.
Step 6: Second Rise
- Cover Again: Cover the shaped dough with a towel or plastic wrap.
- Let It Rise Again: Allow the dough to rise for another 30 minutes to 1 hour, or until it has risen slightly and looks puffy.
Step 7: Preheat the Oven
- Preheat: While the dough is undergoing its second rise, preheat your oven to 375°F (190°C).
Step 8: Bake the Bread
- Place in Oven: Once the dough has risen, place it in the preheated oven.
- Bake Time: Bake for 25-35 minutes, or until the bread is golden brown and sounds hollow when tapped on the bottom. An instant-read thermometer inserted into the center should read between 190°F and 200°F (88°C and 93°C).
Step 9: Cool the Bread
- Remove from Oven: Carefully remove the bread from the oven and place it on a cooling rack.
- Allow to Cool: Let the bread cool completely on the rack before slicing. This allows the gluten to set, ensuring a better texture and flavor.
Tips for Perfect Bread
- Temperature Control: The temperature of your ingredients and environment plays a crucial role in bread-making. Warm water and a warm, draft-free place for rising help activate the yeast and ensure proper fermentation.
- Kneading Technique: Proper kneading is key to developing gluten, which gives bread its structure. Take your time and ensure the dough becomes smooth and elastic.
- Patience: Don’t rush the rising process. Allowing the dough to rise sufficiently ensures a lighter, airier loaf.
- Experimentation: Once you’ve mastered the basics, feel free to experiment with different ingredients, shapes, and baking techniques to find your perfect bread.
Variations and Additions
- Whole Wheat Bread: Replace half of the all-purpose flour with whole wheat flour for a nutritious twist.
- Herb and Garlic Bread: Incorporate finely chopped fresh herbs and minced garlic into the dough for added flavor.
- Cinnamon Raisin Bread: Add cinnamon and raisins to the dough for a sweet treat.
- Cheese Bread: Mix shredded cheese into the dough for a savory option.
Conclusion
Making simple bread at home is a rewarding experience that can turn even the most basic meal into something special. With just a few ingredients and some basic equipment, you can create delicious, homemade bread that rivals anything you’d find in a bakery. By following the steps outlined in this guide and embracing a bit of patience and experimentation, you’ll soon be enjoying freshly baked bread that’s tailored to your taste preferences. So, why wait? Gather your ingredients, roll up your sleeves, and start baking! Your taste buds will thank you.

This guide provides a comprehensive look at how to make simple bread, from understanding the ingredients and equipment needed to the step-by-step process of mixing, kneading, shaping, rising, and baking. With tips for perfecting your bread and suggestions for variations, you’ll have the foundation and inspiration to create delicious homemade bread that suits your taste and lifestyle. Happy baking!


0 comments