Table of content
- Step 1: Activate the Yeast
- Step 2: Mix the Dough Ingredients
- Step 3: First Rise
- Step 1: Punch Down the Dough
- Step 2: Divide and Roll Out the Dough
- Step 3: Add the Pork Floss
- Step 4: Roll Up the Dough
- Step 5: Second Rise
- Step 1: Preheat the Oven
- Step 2: Prepare the Egg Wash
- Step 3: Brush with Egg Wash and Add Sesame Seeds
- Step 4: Bake the Rolls
- Step 5: Cool and Serve
Introduction
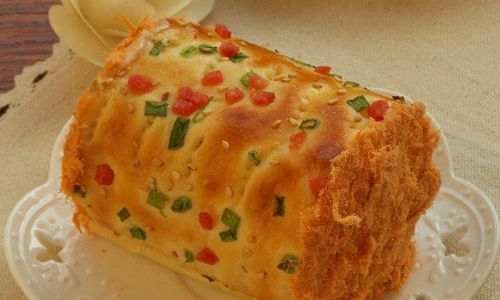
Pork floss rolls, also known as meat floss buns or roulades, are a delightful snack that combines the savory taste of pork floss with the soft, fluffy texture of dough. Originating from Taiwan, these rolls have gained popularity worldwide due to their unique flavor and appealing appearance. Whether you’re a seasoned baker or a novice in the kitchen, making pork floss rolls can be a rewarding experience. In this comprehensive guide, we’ll walk you through the entire process, from preparing the ingredients to shaping and baking the rolls. By the end, you’ll have a batch of delicious, homemade pork floss rolls that are sure to impress your family and friends.
Understanding the Ingredients
Before diving into the recipe, it’s essential to understand the role of each ingredient in making pork floss rolls. Here’s a breakdown of the key components:

-
Bread Flour: This high-protein flour is essential for creating a strong dough that can hold its shape during baking. It also contributes to the fluffy texture of the final product.
-
Water: Water acts as a binding agent, helping to form gluten in the dough. The amount of water needed may vary depending on the humidity and temperature of your kitchen.
-
Dry Active Yeast: Yeast is crucial for leavening the dough, causing it to rise and become light and airy. Make sure your yeast is fresh and has not expired.
-
Sugar: Sugar provides food for the yeast, helping it to grow and multiply. It also adds a touch of sweetness to the dough.
-
Salt: Salt enhances the flavor of the dough and helps to control the yeast’s activity, preventing it from over-rising.
-
Vegetable Oil: Oil adds moisture to the dough, making it softer and more pliable. It also helps to prevent the dough from sticking to your hands or work surface.

-
Pork Floss: Pork floss, or meat floss, is a finely shredded, dried pork product that has been seasoned and sweetened. It is the star ingredient in pork floss rolls, providing a savory and slightly sweet flavor.
-
Egg Wash: An egg wash made from beaten eggs is often brushed onto the surface of the rolls before baking. It gives the rolls a glossy finish and adds a nice color.
-
Sesame Seeds: Optional, but adding sesame seeds to the top of the rolls adds a crunchy texture and a nutty flavor.
Preparing the Dough
Now that you understand the ingredients, let’s move on to preparing the dough. This is a crucial step in making pork floss rolls, as the quality of the dough will directly affect the texture and taste of the final product.
Step 1: Activate the Yeast
- In a small bowl, combine warm water (about 110°F or 45°C) with a pinch of sugar. The water should be warm enough to activate the yeast but not too hot to kill it.
- Sprinkle the dry active yeast over the water and let it sit for about 5-10 minutes. The yeast should start to foam and bubble, indicating that it is active and ready to use.
Step 2: Mix the Dough Ingredients
- In a large mixing bowl, combine the bread flour, remaining sugar, and salt. Mix well to ensure that all the dry ingredients are evenly distributed.
- Create a well in the center of the dry ingredients and pour in the activated yeast mixture and vegetable oil.
- Gradually add more water, a little at a time, mixing with a wooden spoon or dough hook until the ingredients come together to form a shaggy dough.
- Transfer the dough to a lightly floured work surface and knead for about 8-10 minutes, until it becomes smooth and elastic. If the dough is too sticky, add a little more flour. If it’s too dry, add a few drops of water.
Step 3: First Rise
- Lightly grease a large mixing bowl with vegetable oil or non-stick spray. Place the kneaded dough in the bowl, turning it once to coat it with oil.
- Cover the bowl with a clean kitchen towel or plastic wrap and let the dough rise in a warm, draft-free place for about 1-2 hours, or until it has doubled in size. You can create a warm environment by placing the bowl on a preheated oven rack (turned off) or in a microwave with a bowl of hot water.
Shaping the Rolls
Once the dough has risen, it’s time to shape the rolls. This step requires a bit of patience and practice, but with time, you’ll get the hang of it.
Step 1: Punch Down the Dough
After the dough has doubled in size, punch it down to release any trapped gases. This will make the dough easier to handle and prevent the rolls from having large air pockets.

Step 2: Divide and Roll Out the Dough
- Transfer the dough to a lightly floured work surface and divide it into equal portions. The number of portions will depend on the size of the rolls you want. For standard-sized rolls, aim for about 12-16 portions.
- Roll each portion into a ball and let them rest for about 10 minutes to relax the gluten.
- Take one ball of dough and flatten it into a disk with your hands. Use a rolling pin to roll it out into a thin rectangle, about 4-5 inches long and 3 inches wide.
Step 3: Add the Pork Floss
- Spread a generous layer of pork floss evenly over the rolled-out dough rectangle. Make sure to leave a small border around the edges to help seal the roll.
- If desired, you can also sprinkle a little bit of sesame seeds or other seasonings over the pork floss for added flavor.
Step 4: Roll Up the Dough
- Starting from the long side, roll up the dough tightly, like a jelly roll. Pinch the seam to seal it well.
- Gently shape the roll into a cylinder and place it seam-side down on a parchment-lined baking sheet. Repeat the process with the remaining dough portions.
Step 5: Second Rise
Cover the shaped rolls with a clean kitchen towel or plastic wrap and let them rise in a warm, draft-free place for about 30-45 minutes, or until they have puffed up and increased in size.
Baking the Rolls
Now that the rolls have risen again, it’s time to bake them. This final step will transform the dough into golden, fluffy pork floss rolls.
Step 1: Preheat the Oven
Preheat your oven to 375°F (190°C) while the rolls are undergoing their second rise.
Step 2: Prepare the Egg Wash
In a small bowl, beat an egg until smooth. This will be used as an egg wash to give the rolls a glossy finish.
Step 3: Brush with Egg Wash and Add Sesame Seeds
- Once the rolls have risen, gently brush the tops with the beaten egg wash. This will help them achieve a nice golden color when baked.
- If desired, sprinkle a few sesame seeds over the top of each roll for added texture and flavor.
Step 4: Bake the Rolls
- Place the baking sheet in the preheated oven and bake for about 12-15 minutes, or until the rolls are golden brown and have reached an internal temperature of 190°F (88°C).
- Rotate the baking sheet halfway through the baking time to ensure even cooking.
Step 5: Cool and Serve
- Remove the baked rolls from the oven and let them cool on the baking sheet for about 5 minutes. This will allow them to set and firm up slightly.
- Transfer the rolls to a wire rack to cool completely. Once cool, they can be served as is or stored in an airtight container for later use.
Troubleshooting and Tips
Making pork floss rolls can sometimes be challenging, especially if you’re new to baking. Here are some troubleshooting tips and helpful hints to ensure success:
- Yeast Activation: If your yeast doesn’t foam or bubble after 10 minutes, it may be dead or expired. Discard the yeast and start with a fresh batch.
- Dough Temperature: The temperature of your dough is crucial. If it’s too warm, the yeast will over-rise and produce a dense, gummy texture. If it’s too cold, the yeast will be sluggish and the dough will take longer to rise.
- Kneading: Kneading the dough properly is essential for developing gluten, which gives the rolls their structure and texture. Don’t be afraid to knead for the full 8-10 minutes.
- Rising Time: Rising times can vary depending on the temperature and humidity of your kitchen. Be patient and let the dough rise until it has doubled in size.
- Shaping: When shaping


0 comments