Introduction
Plum juice, also known as suan mei zhi in Chinese, is a refreshing and tangy beverage that has been enjoyed for centuries in various parts of Asia. Its unique flavor combines the tartness of plums with the sweetness of sugar, making it an ideal drink during hot summer days or as a digestive aid after meals. While traditionally associated with China, plum juice has gained popularity worldwide due to its delightful taste and health benefits. This article will provide a comprehensive guide on how to make plum juice at home, ensuring you can enjoy this delightful beverage whenever you want.
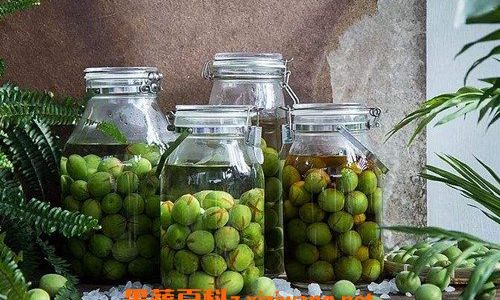
Understanding the Ingredients
Before diving into the recipe, it’s essential to understand the key ingredients and their roles in making plum juice. The primary ingredient, of course, is plums. There are several varieties of plums, including Japanese plums, European plums, and damson plums, each with its own unique flavor profile. For plum juice, Japanese plums (often labeled as “prunes” in some regions) are commonly used due to their high tartness and juicy flesh.
Sugar is another crucial ingredient, as it balances the tartness of the plums and adds sweetness to the juice. You can use white sugar, brown sugar, or even honey, depending on your preference. Some recipes also call for a small amount of salt, which enhances the flavors and brings out the natural sweetness of the plums.
Water is used to cook the plums and extract their juices. The amount of water needed may vary depending on the recipe and the juiciness of the plums. It’s important not to add too much water, as this can dilute the flavor of the juice.
Optional ingredients include ginger, cinnamon, and cloves, which can add complexity and warmth to the juice. These spices are particularly popular in winter versions of plum juice or in regions where colder climates prevail.
Preparing the Plums
-
Selection and Inspection: Start by selecting ripe, firm plums with no signs of bruising or mold. The skin should be smooth and slightly shiny, indicating freshness. Avoid overripe plums, as they can make the juice too mushy and lack flavor.
-
Washing: Rinse the plums thoroughly under cold running water to remove any dirt, pesticides, or debris. Pat them dry using a clean kitchen towel or let them air-dry.
-
Pitting: Remove the pits from the plums. You can do this by cutting the plums in half and scooping out the pits with a spoon, or by using a plum pitter, a kitchen tool specifically designed for this purpose.
-
Chopping (Optional): Depending on your preference and the recipe, you can chop the plums into smaller pieces. This can help speed up the cooking process and make it easier to extract the juices. However, some recipes call for whole plums or larger chunks, so follow the recipe accordingly.
Cooking the Plums
-
Combining Ingredients: In a large, heavy-bottomed pot, combine the prepared plums, sugar, and a small amount of water. The ratio of plums to sugar can vary, but a good starting point is 2 parts plums to 1 part sugar. The amount of water should be just enough to cover the bottom of the pot, preventing the plums from sticking but not enough to dilute the juice.
-
Simmering: Place the pot on the stove over medium heat. Stir occasionally to ensure the sugar dissolves and the plums don’t stick to the bottom of the pot. As the mixture heats up, you’ll notice the plums starting to release their juices. Once the mixture comes to a gentle boil, reduce the heat to low and let it simmer.
-
Skimming (Optional): As the plums cook, foam may form on the surface of the mixture. This foam is caused by impurities and proteins in the plums. You can skim it off using a spoon for a clearer juice, but it’s not essential.
-
Testing for Doneness: After about 30-45 minutes of simmering, the plums should be soft and tender, and the mixture should have a syrupy consistency. Taste the mixture to check for sweetness and tartness. If it’s too tart, you can add more sugar and let it simmer for a few more minutes until it reaches your desired flavor.
Extracting the Juice
-
Mashing (Optional): For a smoother juice, you can mash the cooked plums with a potato masher or the back of a spoon. This will help break down the flesh and release more juices. However, if you prefer a chunkier juice, you can skip this step.

-
Blending (Optional): For an even smoother juice, transfer the cooked mixture to a blender and blend until smooth. Be careful when blending hot liquids, as the blender can splatter and steam can escape. You may need to let the mixture cool slightly before blending.
-
Straining: To remove the pulp and seeds from the juice, pour the mixture through a fine-mesh sieve or cheesecloth. Press down on the solids with a spoon or ladle to extract as much juice as possible. Discard the solids or save them for another use, such as making plum jam or compote.
-
Adjusting Consistency: If the juice is too thick, you can add a little more water and stir to combine. If it’s too thin, you can simmer it for a few more minutes to reduce it. Taste and adjust the sweetness and tartness as needed.
Adding Flavor and Serving
-
Chilling: Once you’ve achieved your desired consistency and flavor, let the juice cool to room temperature. Transfer it to a clean container with a lid and refrigerate for at least a few hours or overnight. Chilling the juice will enhance its flavor and make it more refreshing.
-
Serving: When you’re ready to serve, pour the chilled plum juice into glasses over ice cubes. Garnish with a slice of lemon, lime, or a sprig of mint for an extra touch of freshness.
-
Flavor Variations: If you want to add some extra flavor to your plum juice, consider incorporating ginger, cinnamon, or cloves during the cooking process. These spices will add warmth and complexity to the juice, making it perfect for colder weather.
-
Storing: Properly stored, homemade plum juice can last for several days in the refrigerator. If you want to keep it for longer, you can freeze it in ice cube trays or airtight containers. Just make sure to thaw it in the refrigerator before serving.
Troubleshooting Common Issues
-
Too Tart: If your plum juice is too tart, you can add more sugar and let it simmer for a few more minutes until it reaches your desired sweetness. Alternatively, you can mix it with some sweetened tea or lemonade to balance the tartness.
-
Too Sweet: If your plum juice is too sweet, you can add a little more lemon juice or vinegar to add some tartness. You can also dilute it with some water or unsweetened tea.
-
Too Thick: If your plum juice is too thick, you can add a little more water and stir to combine. Let it simmer for a few minutes to blend the ingredients and achieve your desired consistency.
-
Too Thin: If your plum juice is too thin, you can simmer it for a few more minutes to reduce it. Be careful not to overcook it, as this can change its flavor and texture.
Conclusion
Making plum juice at home is a rewarding experience that allows you to control the ingredients and flavor to your liking. With a few simple steps and the right ingredients, you can create a refreshing and tangy beverage that’s perfect for any occasion. Whether you enjoy it on its own or with added flavors, plum juice is a delightful way to stay hydrated and indulge in a taste of Asia. So, why wait? Gather your ingredients and start making your own plum juice today!



0 comments