Introduction
Dried shrimp, commonly known as dried seaweed shrimp or simply dry sea shrimp, is a cherished ingredient in many cuisines worldwide. Its unique flavor, rich in umami, adds depth and complexity to dishes, making it a staple in kitchens across Asia and beyond. From soups and stir-fries to salads and snacks, dried shrimp can elevate any meal to new heights of culinary delight. However, making your own dried shrimp at home might seem like a daunting task, especially for those unfamiliar with the process. This comprehensive guide aims to demystify the art of creating perfect dried shrimp, ensuring you can enjoy this versatile ingredient fresh from your kitchen.
Understanding Dried Shrimp
Before diving into the preparation, it’s crucial to understand what dried shrimp entails. Essentially, it involves dehydrating fresh or previously frozen shrimp to preserve them and concentrate their flavors. The dehydration process removes moisture, thereby extending the shelf life and intensifying the shrimp’s natural taste. Dried shrimp come in various sizes, from tiny baby shrimp to larger, more robust varieties, each offering a distinct texture and flavor profile.
Choosing the Right Shrimp
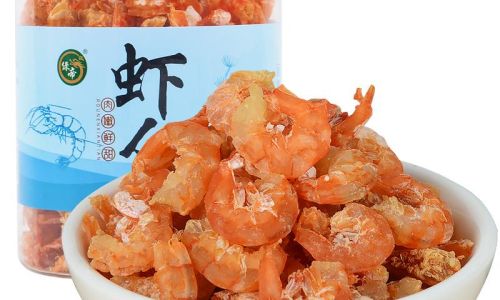
The quality of your final product begins with the shrimp you select. Here are some key considerations:
-
Species and Freshness: Opt for shrimp species known for their sweetness and firm texture, such as tiger shrimp, white shrimp, or pink shrimp. Freshness is paramount; use shrimp that have been caught and handled properly to ensure they are free from spoilage and off-flavors.
-
Size: The size of the shrimp will affect both the drying time and the final texture. Smaller shrimp dry quicker and are often used in powdered forms or as a flavoring agent. Larger shrimp retain more texture and are suitable for slicing or using whole in dishes.
-
Cleaning and Preparation: Before drying, shrimp should be thoroughly cleaned to remove any sand, grit, or internal organs. This involves peeling, deveining, and rinsing the shrimp under cold running water. Pat them dry using paper towels to remove excess moisture.
Equipment Needed
To make dried shrimp at home, you’ll need a few essential pieces of equipment:

-
Dehydrator: A food dehydrator is the most efficient tool for drying shrimp, providing consistent heat and airflow. However, if you don’t have a dehydrator, you can use your oven set to its lowest temperature with the door slightly ajar to allow moisture escape.
-
Trays and Mesh Sheets: Dehydrators typically come with trays and mesh sheets designed for drying foods. If using an oven, you can line baking sheets with parchment paper or use wire racks to elevate the shrimp.
-
Food-Safe Gloves: Handling shrimp, especially raw ones, can pose a food safety risk. Wearing gloves protects your hands and prevents cross-contamination.
-
Sharp Knife and Cutting Board: For slicing larger shrimp into more manageable pieces.
-
Storage Containers: Airtight containers or vacuum-sealed bags to store the finished dried shrimp.
Step-by-Step Guide to Making Dried Shrimp

-
Preparation:
- Begin by preparing your shrimp as mentioned earlier. Peel, devein, and rinse them thoroughly.
- Pat the shrimp dry using paper towels. Ensure they are as moisture-free as possible to facilitate even drying.
-
Marinating (Optional):
While not strictly necessary, marinating shrimp before drying can add an extra layer of flavor. Use a simple mixture of salt, sugar, and a touch of soy sauce or rice vinegar. Let the shrimp sit in the marinade for about 30 minutes to an hour, then pat them dry again to remove excess marinade.
-
Arranging on Trays:
- If using a dehydrator, spread the shrimp in a single layer on the mesh sheets. Ensure they are not overcrowded to allow for proper air circulation.
- If using an oven, arrange the shrimp on wire racks placed over baking sheets to prevent them from sticking and to allow air to flow around them.
-
Setting the Temperature:
- In a dehydrator, set the temperature to around 135°F (57°C). This low temperature ensures slow, even drying without cooking the shrimp.
- In an oven, set it to its lowest temperature, usually around 150°F (65°C), and prop the door open slightly with a wooden spoon or towel to let moisture escape.
-
Drying Time:
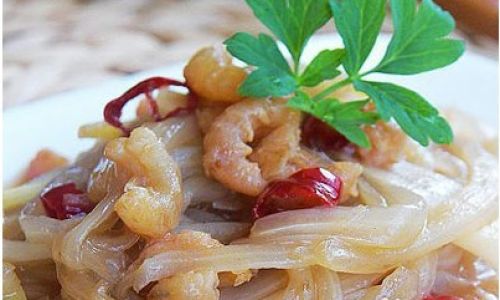
- Drying time can vary depending on the size and thickness of the shrimp, as well as the humidity and temperature in your kitchen. As a general guideline, small shrimp may take around 4-6 hours, while larger pieces could require up to 12 hours or more.
- Check the shrimp periodically. They should be dry to the touch, slightly flexible but not brittle. Over-drying can make them too hard and difficult to use.
-
Cooling and Storing:
- Once dried, remove the shrimp from the dehydrator or oven and let them cool completely on a wire rack. This prevents condensation, which could lead to mold.
- Store the dried shrimp in airtight containers or vacuum-sealed bags in a cool, dark place. Properly stored, they can last for several months.
Using Dried Shrimp
Dried shrimp are incredibly versatile and can be used in numerous ways:
- Soups and Stews: Add a handful to seafood soups or broths to boost their flavor.
- Stir-Fries: Use them as a garnish or incorporate them directly into stir-fries for an umami burst.
- Rice and Noodles: Mix into fried rice, noodles, or stir-fried vegetables for added texture and taste.
- Snacks: Grind into a powder and use as a seasoning for popcorn, nuts, or other snacks.
- Salads: Sprinkle over salads for a savory crunch.
- Sauces and Dressings: Infuse oils or make a shrimp paste to use as a base for dipping sauces or dressings.
Conclusion
Making your own dried shrimp is a rewarding culinary endeavor that not only saves money but also allows you to control the quality and flavor of the final product. With the right shrimp, equipment, and technique, you can create delicious, long-lasting dried shrimp that will elevate your cooking to new levels. Remember, patience is key during the drying process; rushing it can compromise the texture and taste. Experiment with different shrimp sizes, marinades, and uses to discover your favorite ways to enjoy this versatile ingredient. Happy drying!



0 comments