Introduction:
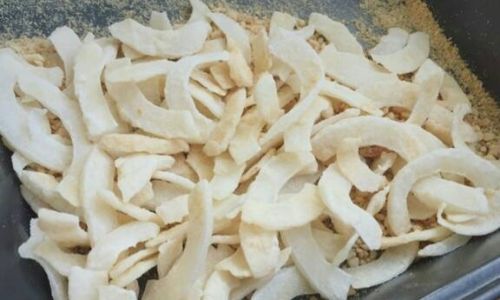
Coconut chips are a delightful and nutritious snack that offers a crunchy texture and a sweet, tropical flavor. They are perfect for satisfying your mid-afternoon munchies, adding a crunchy topping to your yogurt or ice cream, or simply enjoying as a standalone treat. While you can easily find coconut chips in most grocery stores, making them at home allows you to control the ingredients, the sweetness level, and even the texture to your liking. In this comprehensive guide, we’ll walk you through the process of making homemade coconut chips from fresh or dried coconut meat. Whether you’re a seasoned chef or a kitchen novice, you’ll find this recipe straightforward and rewarding.

Section 1: Understanding the Ingredients
Before diving into the recipe, let’s discuss the key ingredients you’ll need:
- Fresh Coconut or Dried Coconut Meat: Fresh coconut provides a more moist and slightly sweet flavor, while dried coconut meat offers a more concentrated coconut taste and a slightly chewier texture. Both can be used interchangeably depending on your preference.
- Coconut Oil (Optional): This is used to lightly coat the coconut slices, preventing them from sticking to the baking sheet and enhancing their golden-brown appearance.
- Sweeteners (Optional): If you prefer sweetened coconut chips, you can use a natural sweetener like honey, maple syrup, or coconut sugar. However, keep in mind that unsweetened coconut chips have a more versatile use and can be flavored later as needed.
- Salt (Optional): A pinch of sea salt can enhance the natural sweetness of the coconut and bring out its flavors.
- Spices and Extracts (Optional): For added flavor, consider incorporating spices like cinnamon, nutmeg, or cardamom, or extracts like vanilla or almond.
Section 2: Preparing the Coconut
Step 1: Open the Coconut
If you’re using a fresh coconut, you’ll need to crack it open. Place the coconut on a hard surface and use a sturdy knife or a coconut opener to pierce through the three soft “eyes” at one end. Drain the coconut water into a glass (you can drink it or use it in smoothies). Next, hold the coconut firmly and tap around its circumference with a hammer until it cracks open. Carefully peel away the outer husk and separate the coconut meat from the shell using a spoon.
Step 2: Remove the Brown Skin (If Using Fresh Coconut)
The brown, fibrous outer layer of fresh coconut meat can be removed using a vegetable peeler or a sharp knife. This step is optional but recommended for a smoother texture and a more appealing appearance.
Step 3: Slice the Coconut Meat
Using a sharp knife, slice the coconut meat into thin, even pieces. Aim for a thickness of about 1/8 to 1/4 inch (3 to 6 mm) for optimal crunchiness and even baking.
Section 3: Preparing for Baking
Step 4: Optional Coating
If you’re using coconut oil, lightly brush or spray it onto the coconut slices to prevent sticking. You can also toss the slices in a bowl with a small amount of oil to ensure even coating.
Step 5: Sweetening and Seasoning (Optional)
If you want sweetened coconut chips, drizzle a small amount of honey, maple syrup, or coconut sugar over the slices and gently toss to coat. For seasoned chips, sprinkle with salt, spices, or extracts and mix well.
Section 4: Baking the Coconut Chips
Step 6: Preheat the Oven

Preheat your oven to 325°F (165°C). Line a baking sheet with parchment paper or a silicone baking mat to prevent sticking.
Step 7: Arrange the Slices
Spread the coconut slices in a single layer on the prepared baking sheet, ensuring they are not overlapping. This will ensure even baking and maximum crispiness.
Step 8: Bake and Monitor
Bake the coconut slices for about 15-20 minutes, but keep a close eye on them. Coconut can burn quickly, so it’s best to check them every 5 minutes after the first 10 minutes of baking. The edges should start to turn golden brown, and the slices should be slightly firm to the touch.
Step 9: Cooling
Once done, remove the baking sheet from the oven and let the coconut chips cool completely on the sheet. They will continue to firm up and crisp as they cool.
Section 5: Storing Your Coconut Chips
Step 10: Airtight Container
Transfer the cooled coconut chips to an airtight container or a resealable plastic bag. They can be stored at room temperature for up to a week in a cool, dry place. For longer storage, you can place them in an airtight container and refrigerate for up to a month or freeze for up to three months.
Section 6: Serving and Enjoying
Step 11: Creative Serving Ideas
Coconut chips are incredibly versatile and can be enjoyed in various ways:
- Plain: As a standalone snack.
- With Yogurt or Ice Cream: As a crunchy topping.
- In Trail Mixes: Combined with nuts, seeds, and dried fruits.
- In Baking: Added to cookies, granola bars, or muffins for a tropical twist.
- Dipped in Chocolate: For a decadent treat.
Conclusion:
Making your own coconut chips is a rewarding kitchen project that allows you to customize the flavor and texture to your liking. With just a few simple ingredients and a bit of your time, you can enjoy fresh, crunchy, and delicious coconut chips that are free from preservatives and artificial flavors. Whether you prefer them sweet, savory, or plain, this recipe provides a solid foundation for creating your perfect coconut chip snack. So, the next time you’re craving something crunchy and tropical, why not give homemade coconut chips a try? You’ll be delighted with the results and might even find yourself with a new kitchen favorite. Happy baking!


0 comments