Table of content
There’s something undeniably magical about homemade strawberry jam. Unlike store-bought versions, which often lack vibrancy and taste overly sweet, a well-crafted homemade jam captures the essence of ripe, sun-kissed strawberries. It’s a versatile condiment that elevates breakfast toast, pancakes, yogurt bowls, and even desserts like ice cream or cheesecake. The best part? You don’t need advanced culinary skills or hours of labor to create it. This guide will walk you through a simple, foolproof method to make strawberry jam that’s bursting with flavor, texture, and natural sweetness. Let’s dive into the process, from selecting the freshest berries to sealing your jars with pride.
Why Homemade Strawberry Jam Stands Out
Store-bought jams often rely on artificial preservatives, thickeners, and excessive sugar to mask the lack of fresh ingredients. Homemade jam, on the other hand, allows you to control sweetness, texture, and flavor add-ins like vanilla, citrus zest, or herbs. Plus, it’s a fantastic way to preserve summer’s bounty when strawberries are at their peak—sweet, juicy, and affordable.
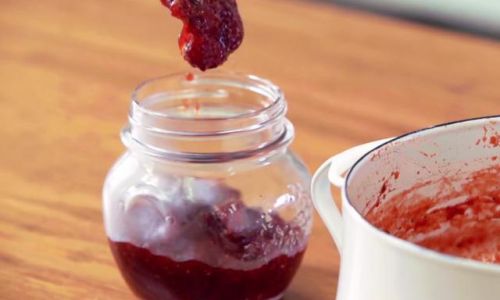
Ingredients You’ll Need
The beauty of this recipe lies in its simplicity. You’ll need just four core ingredients:
- Fresh strawberries (2 pounds / 900 grams): Opt for plump, fragrant berries with vibrant red color. Avoid mushy or moldy ones.
- Granulated sugar (1.5–2 cups / 300–400 grams): Adjust based on the sweetness of your berries. Less sugar yields a tangier jam; more sugar thickens it.
- Lemon juice (2 tablespoons): Freshly squeezed is best. It balances sweetness and aids in gelling.
- Optional: Pectin (1 packet): Use if you prefer a firmer set or if your strawberries are low in natural pectin.
Tools and Equipment
- Heavy-bottomed saucepan (4-quart): Prevents scorching during cooking.
- Wooden spoon or heatproof spatula: For stirring without scratching pans.
- Jar funnel and ladle: For mess-free filling.
- Sterilized glass jars with lids: Use 4–8 oz jars for easy portioning.
- Candy thermometer (optional): Ensures accurate temperature for gelling.
Step-by-Step Instructions
Prepare the Strawberries
- Wash and hull: Rinse berries under cool water, then pat dry. Remove the green stems (hulls) using a paring knife or a strawberry huller.
- Chop or mash: For a chunky jam, quarter the berries. For a smoother texture, pulse them lightly in a food processor or mash with a potato masher. Leave some texture for a rustic feel.
Macerate the Berries
Combine the strawberries and sugar in a large bowl. Toss gently to coat, then let them sit for 1–2 hours at room temperature. This step, called maceration, draws out natural juices and softens the fruit, ensuring even cooking.
Cook the Jam
- Transfer to the saucepan: Pour the macerated berries and their accumulated juice into the pan. Add lemon juice (and pectin, if using).
- Bring to a boil: Cook over medium-high heat, stirring occasionally to prevent sticking. The mixture will foam vigorously as it reaches a rolling boil.
- Skim foam (optional): Use a spoon to remove any grayish foam that rises to the top. This step isn’t mandatory but results in a clearer jam.
- Simmer and stir: Reduce heat to medium-low and simmer for 15–20 minutes, stirring frequently. The jam will thicken as water evaporates.
Test for Doneness
Determining when the jam is ready is crucial. Here are two methods:
- Temperature test: Insert a candy thermometer. The jam is done when it reaches 220°F (104°C) at sea level.
- Plate test: Place a small spoonful of jam on a chilled plate. Return it to the freezer for 1 minute. If it wrinkles when pushed with your finger, it’s ready.
Add Final Touches
Stir in any flavorings (e.g., a vanilla bean scraped of seeds, a splash of balsamic vinegar, or fresh herbs like basil or thyme) during the last 5 minutes of cooking.
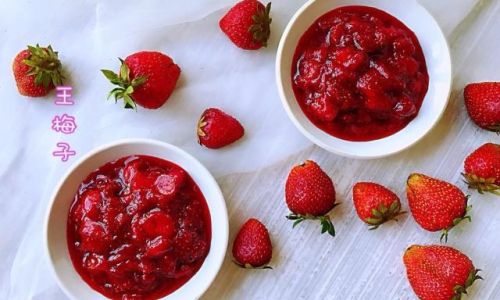
Fill and Seal Jars
- Sterilize jars: Wash jars and lids in hot, soapy water, then rinse thoroughly. Submerge them in boiling water for 10 minutes to sterilize. Keep them hot until ready to use.
- Ladle the jam: Use a funnel to fill jars, leaving ¼-inch (0.6 cm) headspace to allow for expansion during cooling.
- Seal tightly: Wipe rims with a clean cloth, then screw on lids finger-tight.
Cool and Store
- Let jars cool: Place them on a kitchen towel and leave undisturbed for 12–24 hours. You’ll hear a satisfying pop as the lids seal.
- Check seals: Press the center of each lid. If it doesn’t flex, the jar is sealed. Store in a cool, dark place for up to 1 year. Refrigerate after opening.
Tips for Perfect Jam Every Time
- Adjust sweetness: Taste the berries before adding sugar. If they’re exceptionally sweet, reduce the sugar by ¼–½ cup.
- Use low-sugar pectin: For a healthier twist, opt for pectin labeled “low or no sugar needed.”
- Freeze excess: If canning feels daunting, freeze the jam in airtight containers for up to 6 months.
- Experiment with flavors: Add a splash of Grand Marnier, a grated ginger chunk, or a cinnamon stick during cooking for a gourmet twist.
Troubleshooting Common Issues
- Jam is too runny: This could mean undercooking or insufficient pectin. Reheat the jam with 1–2 tablespoons of lemon juice or pectin and simmer longer.
- Jam is too thick: Overcooking breaks down pectin, causing stiffness. Next time, reduce cooking time.
- Crystallization: Excess sugar can crystallize. Ensure proper maceration and avoid over-stirring once the jam sets.
Serving Suggestions
- Breakfast classic: Slather on buttered toast, scones, or freshly baked biscuits.
- Dessert topping: Drizzle over vanilla ice cream, cheesecake, or Greek yogurt.
- Gift idea: Decorate jars with fabric lids and ribbons for a thoughtful, handmade present.
The Science Behind Jam-Making
Jam sets when pectin (a natural fiber in fruit) interacts with sugar and acid. Heat breaks down pectin chains, which then rebond as the mixture cools, creating a gel. Lemon juice provides acidity to stabilize this process. Without enough acid or sugar, the jam won’t set properly.
Why Homemade Jam Is Worth the Effort
Beyond the flavor, making jam connects you to seasonal rhythms and reduces food waste. It’s a meditative process—the aroma of simmering berries, the rhythmic stirring, and the pride of preserving nature’s fleeting sweetness. Plus, it’s a sustainable choice that minimizes packaging waste from store-bought jars.
Conclusion
Strawberry jam is more than a breakfast staple—it’s a labor of love that transforms simple ingredients into a timeless treat. Whether you’re a novice cook or a seasoned pro, this recipe ensures success with minimal fuss. Experiment with flavors, share jars with friends, and savor the taste of summer all year round. Remember, the best jam is made with patience, quality ingredients, and a dash of creativity. Happy preserving!



0 comments