Introduction

Clams, known for their delicate flavor and nutritional value, are a staple in many culinary traditions worldwide. From the coastal regions of Asia to the seashores of Europe and America, clams have been a cherished delicacy for centuries. However, enjoying these bivalves can sometimes come with a challenge: removing the sand and mud that they naturally accumulate within their shells. Improperly cleaned clams can ruin the dining experience, leaving a gritty texture in your mouth. Therefore, mastering the art of cleaning clams is crucial for anyone who wishes to savor their full, unadulterated taste. This guide will provide you with comprehensive steps and tips on how to effectively clean sand and mud from clams, ensuring your next seafood feast is both delicious and satisfying.
Understanding Clam Biology and Habitat
Before diving into the cleaning process, it’s essential to understand a bit about clams and their natural environment. Clams are filter-feeders, meaning they extract food particles and oxygen from the water by using their gills. This process also involves taking in suspended particles like sand and mud, which can get trapped inside their bodies. The type and amount of sediment vary depending on the clam’s habitat. For instance, clams from sandy bottoms tend to have more sand, while those from muddy environments may contain more mud.
Preparation and Safety Measures
Before starting the cleaning process, ensure you have the necessary tools and take appropriate safety measures. You’ll need a large bowl or bucket, a strainer, a knife (preferably one with a dull edge to avoid cutting the clams), and a clean cloth or paper towels. Additionally, wear gloves to protect your hands from potential cuts or irritations caused by the clam shells.
Step-by-Step Cleaning Process
-
Sorting and Inspection
Begin by sorting through your clams. Discard any that are cracked, broken, or have gaps in their shells, as these are likely to be dead or dying and may contain harmful bacteria. Live clams should be tightly closed or respond to touch by closing their shells. -
Soaking in Fresh Water
Place the live clams in a large bowl or bucket filled with fresh, cold water. The water should cover the clams completely. Allow them to soak for about 20-30 minutes. This initial soak helps to loosen some of the surface dirt and debris. -
Changing the Water
After the initial soak, drain the water and replace it with fresh, clean water. Repeat this process 2-3 times. Each time you change the water, you’ll notice less debris in the water, indicating that the clams are gradually releasing their internal sand and mud. -
Saltwater Soak (Optional but Recommended)
For a deeper clean, you can soak the clams in a saltwater solution. Create a brine by mixing about 1/4 cup of non-iodized salt per gallon of water. Soak the clams in this solution for another 20-30 minutes. Saltwater mimics the clams’ natural environment and encourages them to expel any remaining sand and mud more effectively. -
Agitating the Clams
Gently agitate the clams in the water by swirling the bowl or bucket in a circular motion. This movement stimulates the clams to expel more sand and debris. Be careful not to be too rough, as you don’t want to harm the clams or cause them to release their juices prematurely. -
Rinsing and Straining
Once you’ve soaked and agitated the clams, drain the water through a strainer to catch any remaining sand and debris. Rinse the clams under cold running water, ensuring you wash off any remaining particles.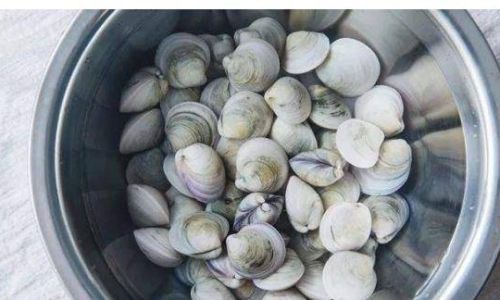
-
Final Inspection
Before cooking, give each clam a final inspection. Look for any remaining bits of sand or mud stuck to the shells or inside the hinge area. Use a dull knife or a small brush to gently scrape off any stubborn debris.
Tips for Successful Cleaning
-
Avoid Using Soap or Detergents: Never clean clams with soap, bleach, or any other chemical cleaners. These substances can be harmful and alter the taste of the clams.
-
Temperature Control: Keep the soaking water at a cool temperature. Warm water can stress the clams and cause them to release their juices prematurely, which can affect their flavor and texture.
-
Timing is Key: Don’t soak clams for too long, especially in saltwater, as this can cause them to absorb too much salt, making them too salty to eat.
-
Storage Before Cleaning: If you’re not planning to clean the clams immediately after purchasing, store them in a cool, damp environment, such as a refrigerator with a damp cloth over them. This helps keep them alive and fresh until you’re ready to clean them.
Cooking and Enjoying Your Cleaned Clams
Now that your clams are beautifully cleaned, it’s time to cook and enjoy them. Whether you’re steaming, sautéing, or baking them, the key to a successful dish lies in their freshness and cleanliness. Popular clam recipes include clam chowder, clam bake, and stuffed clams. Each preparation method highlights the clam’s delicate flavor and texture, making every bite a delightful experience.
Conclusion
Cleaning sand and mud from clams may seem like a daunting task, but with the right techniques and patience, it becomes a straightforward process. By following the steps outlined in this guide, you’ll be able to enjoy your clams without the worry of gritty particles ruining your meal. Remember, the key to successful clam cleaning is thoroughness, attention to detail, and respecting the natural processes of these delicate creatures. With these principles in mind, you’ll be well-equipped to transform raw, sandy clams into a culinary delight that will be cherished by all who taste them. Happy cleaning and bon appétit!




0 comments