Table of content
Introduction
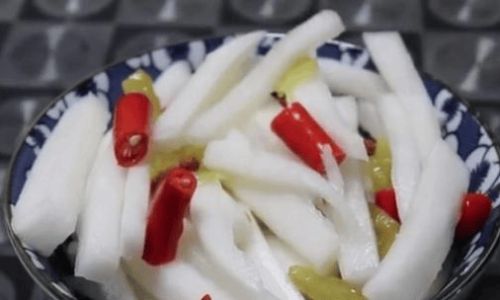
Pickled radish strips, known for their satisfying crunch and tangy-sweet flavor, are a beloved condiment and snack across many cuisines. Whether served alongside grilled meats, tossed into salads, or enjoyed straight from the jar, these vibrant strips add a burst of texture and freshness to any meal. While store-bought versions are convenient, homemade pickled radish strips offer unparalleled crispness and allow you to customize the seasoning to your taste. This comprehensive guide will walk you through the process of making restaurant-quality pickled radish strips at home, from selecting the freshest ingredients to mastering the pickling technique. By the end, you’ll have a jar of zesty, crunchy radish strips ready to elevate your dishes.
Why Make Pickled Radish Strips at Home?
Homemade pickled radish strips boast several advantages over their store-bought counterparts. First, you control the ingredients, avoiding preservatives, excess sugar, or artificial flavors. Second, the texture is unmatched—freshly pickled radish retains a satisfying snap that softens over time in commercial products. Finally, the process is simple, cost-effective, and endlessly customizable. With minimal effort, you can create a pantry staple that impresses guests and adds gourmet flair to everyday meals.

Ingredients and Tools You’ll Need
Before diving into the recipe, gather the following ingredients and tools to ensure a seamless cooking experience:
Ingredients
- Fresh white radishes (daikon): 2 medium-sized radishes (about 1.5 lbs). Look for firm, unblemished roots with vibrant green tops.
- Salt: 2 tablespoons (kosher or sea salt preferred for its coarse texture).
- Sugar: 1–2 tablespoons (adjust to taste; white granulated or cane sugar works best).
- Rice vinegar (or distilled white vinegar): ½ cup.
- Water: ½ cup (filtered or purified to avoid chlorine taste).
- Optional seasonings:
- Red pepper flakes (1–2 tsp for heat).
- Fresh garlic (3–4 cloves, minced).
- Ginger (1-inch piece, julienned).
- Black peppercorns (1 tsp).
Tools
- Sharp knife and cutting board: For slicing radishes into uniform strips.
- Mandoline slicer (optional): For even, paper-thin cuts.
- Large mixing bowl: To toss radishes with salt.
- Colander: For draining excess liquid.
- Clean glass jars with lids: 2–3 pint-sized jars (sterilized for long-term storage).
- Small saucepan: To heat the pickling brine.
Step-by-Step Instructions
Preparing the Radishes
- Wash and peel: Rinse the radishes under cool water, scrubbing off any dirt. Trim the greens and root ends. Use a vegetable peeler to remove the tough outer skin, revealing the crisp white flesh beneath.
- Slice into strips: Cut the radishes into ¼-inch thick batons. For a decorative touch, use a mandoline to create uniform strips. Alternatively, hand-slice with a knife, aiming for consistency in thickness to ensure even pickling.
Salting the Radishes
- Draw out moisture: Place the radish strips in a large bowl and toss with 2 tablespoons of salt. This step, called “dehydrating,” removes excess water from the radishes, resulting in a crisper texture.
- Let rest: Allow the salted radishes to sit at room temperature for 1–2 hours. You’ll notice liquid pooling at the bottom of the bowl—this is normal and essential for achieving crunchiness.
- Rinse and drain: After resting, rinse the radishes thoroughly under cold water to remove excess salt. Pat dry with a clean kitchen towel or paper towels.
Preparing the Pickling Brine
- Combine liquids: In a small saucepan, whisk together ½ cup water, ½ cup vinegar, 1–2 tablespoons sugar, and any optional seasonings (e.g., red pepper flakes, minced garlic).
- Heat gently: Bring the mixture to a simmer over medium heat, stirring until the sugar dissolves completely. Remove from heat and let cool to room temperature.
Packing the Jars
- Layer radishes and aromatics: Divide the drained radish strips evenly between sterilized jars. Add julienned ginger or peppercorns for extra flavor, if desired.
- Pour in brine: Once the brine has cooled, pour it over the radishes, ensuring they’re fully submerged. Leave ½ inch of headspace at the top of each jar to prevent overflow during storage.
- Seal tightly: Wipe the jar rims with a damp cloth to remove any brine, then secure the lids.
Pickling Process
- Let flavors meld: Allow the jars to sit at room temperature for 1–2 hours to kickstart the pickling process. Then, transfer them to the refrigerator.
- Wait patiently: For the best flavor and texture, let the radishes pickle for at least 24–48 hours before serving. The longer they sit, the more pronounced the tangy flavor becomes.
Expert Tips for Perfectly Crisp Radish Strips
- Choose the Right Radish: Daikon radishes are ideal for pickling due to their high water content and mild sweetness. Avoid older radishes, which may develop a woody texture.
- Uniformity Matters: Slice radishes into even strips to ensure they pickle at the same rate.
- Don’t Skip Salting: Salting draws out moisture and seasons the radishes from within—skipping this step results in soggy, bland strips.
- Adjust Seasonings to Taste: Start with the basic brine recipe, then experiment with additional flavors like star anise, bay leaves, or citrus zest.
- Use Non-Reactive Containers: Glass jars are best for pickling, as metal can react with acidic ingredients.
Troubleshooting Common Issues
- Mushy Radishes: Over-salting or insufficient rinsing can cause sogginess. Ensure you rinse thoroughly after salting.
- Too Salty: Soak the radishes in cold water for 15 minutes before pickling to reduce saltiness.
- Dull Flavor: Let the pickles sit longer in the brine, or add more vinegar/sugar next time.
- Cloudy Brine: This is harmless and often due to residual starch in the radishes.
Serving Suggestions
- As a Side Dish: Pair with fried rice, dumplings, or grilled meats.
- In Salads: Toss with mixed greens, avocado, and sesame dressing.
- On Sandwiches: Add crunch to banh mi, burgers, or wraps.
- As a Snack: Enjoy chilled with a sprinkle of sesame seeds.
Storage and Shelf Life
- Refrigeration: Homemade pickled radish strips will keep for 2–3 weeks in the refrigerator.
- Avoid Contamination: Always use clean utensils to remove radishes from the jar.
- Check for Spoilage: Discard if you notice mold, off-odors, or excessive bubbling.
Variations to Try
- Spicy Pickled Radishes: Add 1–2 tablespoons of gochugaru (Korean red pepper flakes) to the brine.
- Sweet and Sour: Increase sugar to 3 tablespoons and add a splash of pineapple juice.
- Garlic-Dill: Toss in fresh dill sprigs and 4–5 smashed garlic cloves.
- Korean-Style: Include sliced onions, Asian pear, and a dash of fish sauce.
- Quick Pickle: For immediate use, skip refrigeration and serve after 1 hour (though texture will soften faster).
Health Benefits of Radishes
Radishes are low in calories and rich in vitamin C, fiber, and antioxidants. They aid digestion, support hydration, and may even reduce inflammation. Pickling preserves many of these nutrients while adding probiotic benefits from the fermentation process (if using a vinegar-based brine, which is non-fermented but still nutritious).

Conclusion
Mastering the art of pickled radish strips opens a world of culinary possibilities. With just a few pantry staples and a bit of patience, you can create a versatile condiment that transforms ordinary meals into extraordinary experiences. Whether you prefer them fiery, sweet, or subtly spiced, homemade pickled radish strips are a testament to the joy of simple, handcrafted flavors. So grab a radish, sharpen your knife, and let the pickling begin—your taste buds will thank you.


0 comments