Table of content
Cutting a cake might seem like a straightforward task, but achieving perfectly smooth and non-sticky slices can be quite challenging, especially for those who haven’t mastered the art yet. Whether you’re a professional baker, a home chef, or simply someone who loves to entertain with homemade desserts, presenting beautifully sliced cakes can elevate your creations to the next level. This comprehensive guide will walk you through various techniques and tips to ensure that your cake slices are not only visually appealing but also enjoyable to eat.
Understanding the Basics: Tools and Preparation
Before diving into the specifics of cutting techniques, let’s start with the essentials: the right tools and proper preparation.
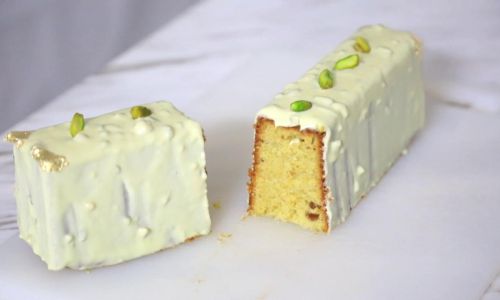
Tools You’ll Need
- Sharp Knife: A dull knife is your enemy when it comes to slicing cakes. A sharp one will glide through the layers effortlessly, minimizing compression and ensuring cleaner cuts.
- Serrated Knife: Especially useful for cakes with a tender crumb, such as chiffon or sponge cakes, as the serrated edge helps to grip and cut through without tearing.
- Offset Spatula: This is invaluable for transferring slices onto serving plates without damaging them.
- Cake Leveler: A tool specifically designed to create flat, even layers, which is particularly helpful if you’re working with tiered cakes.
- Cake Stand or Plate: A sturdy base that allows you to rotate the cake while cutting.
- Parchment Paper or Cake Board: Placing the cake on parchment or a dedicated cake board can prevent sticking and make handling easier.
Preparation Steps
- Chill the Cake: For cakes with a softer texture, chilling them slightly before cutting can firm up the structure, making slicing neater.
- Clean the Knife: Wipe your knife after each slice to prevent crumbs from building up and making subsequent cuts messy.
- Use a Guide: Marking the cake with a toothpick or a thin skewer can help you achieve even slices, especially if you’re aiming for specific portion sizes.
Techniques for Smooth and Non-Sticky Slices
The Gentle Press and Pull Method
This technique is ideal for dense cakes like pound cakes or cheesecakes.
- Step 1: Place the cake on a stable surface. If it’s a large cake, consider using a cake stand that allows for easy rotation.
- Step 2: Insert the knife at a slight angle, pressing gently but firmly into the cake.
- Step 3: Use a slow, steady motion to pull the knife through the cake, maintaining consistent pressure.
- Step 4: Wipe the knife clean before making the next cut.
The Sawing Technique
Perfect for cakes with a tender crumb, like sponge or angel food cakes.
- Step 1: Position the knife at the desired starting point.
- Step 2: Apply gentle pressure and use a gentle back-and-forth motion, similar to sawing, but with minimal force to avoid compressing the cake.
- Step 3: Continue sawing until the knife completely cuts through the cake.
- Step 4: Again, clean the knife before making subsequent cuts.
The Hot Knife Trick
Especially useful for sticky cakes like caramel-filled desserts or those with a high moisture content.

- Step 1: Run the knife under hot water for a few seconds. Dry it quickly with a towel to avoid steaming the cake.
- Step 2: Cut through the cake using a swift, decisive motion. The heat from the knife will help melt any sticky elements, preventing them from adhering to the blade.
- Step 3: Reheat the knife as needed between slices.
Handling Different Cake Types
Frosted Cakes
- Chill the Frosting: If the frosting is too soft, chilling the entire cake for about 15-20 minutes can firm it up, making slicing cleaner.
- Use a Crumb Coat: Applying a thin layer of frosting (crumb coat) and letting it set before adding the final layer can prevent crumbs from mixing with the frosting and making slices messy.
Layered Cakes
- Level the Layers: Before stacking, use a cake leveler to ensure each layer is flat. This will make slicing through multiple layers easier and more uniform.
- Support the Layers: When cutting layered cakes, especially tall ones, use a spatula or another flat tool to gently support the layers from the bottom, preventing them from shifting or collapsing.
Decorated Cakes
- Cut Around Decorations: If the cake is decorated with fragile elements like fresh fruit or delicate toppings, carefully cut around these decorations to avoid damaging them.
- Use a Cake Ring: For intricate designs, a cake ring can help you create clean slices by providing a barrier that prevents the knife from cutting into the decorations.
Troubleshooting Common Issues
Sticky Slices
- Check the Frosting Consistency: Ensure the frosting is not too runny. Adding a bit of powdered sugar or cornstarch can help thicken it.
- Use a Non-Stick Spray: Lightly misting the knife with a non-stick cooking spray can also help prevent sticking.
Crumbly Slices
- Use a Serrated Knife: As mentioned earlier, a serrated knife is your best friend for tender cakes.
- Avoid Over-Handling: Touching the cake too much before cutting can make it crumbly. Work quickly and efficiently.
Final Thoughts
Achieving perfectly smooth and non-sticky cake slices is a combination of using the right tools, employing the correct techniques, and paying attention to detail. With practice, you’ll develop a feel for how different cakes respond to various cutting methods. Remember, the key is patience and precision. Whether you’re slicing a simple vanilla sponge or a multi-tiered masterpiece, the tips and techniques outlined in this guide will help you elevate your cake-cutting skills and impress your guests with beautifully presented slices. Happy baking and slicing!


0 comments