Roasted soybean flour, known for its rich, nutty aroma and versatile culinary applications, is a staple ingredient in many global cuisines. From adding depth to baked goods to thickening soups and sauces, this golden-brown powder elevates dishes with its unique flavor profile. While store-bought versions are readily available, crafting your own roasted soybean flour at home allows you to control the quality, freshness, and intensity of the final product. This comprehensive guide will walk you through the entire process, from selecting the finest soybeans to storing your homemade flour for long-lasting use.
Understanding Roasted Soybean Flour
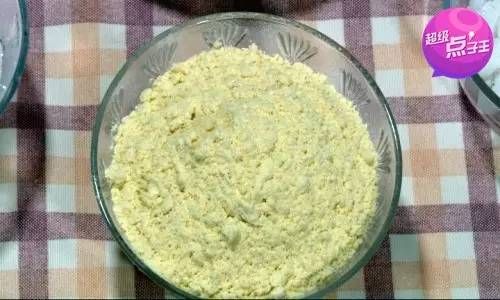
Before diving into the recipe, it’s essential to grasp what sets roasted soybean flour apart. Unlike raw soybean flour, which has a grassy, beany taste, roasting transforms the beans into a fragrant, caramelized ingredient. The roasting process not only enhances flavor but also neutralizes enzymes that could cause bitterness. The result is a flour with a mild sweetness and a hint of smokiness, making it ideal for both sweet and savory preparations.
Roasted soybean flour is categorized into two main types: full-fat and defatted. Full-fat flour retains the bean’s natural oils, yielding a richer, more moist product, while defatted flour undergoes oil extraction, resulting in a lighter, more absorbent texture. The choice depends on your culinary needs—full-fat works well in no-bake desserts or as a coating, while defatted is perfect for baking, where a neutral base is desired.
Ingredients and Equipment
To embark on this culinary adventure, you’ll need minimal ingredients and tools. The star of the show is, of course, soybeans. Opt for high-quality, non-GMO soybeans to ensure the best flavor and nutritional value. Avoid beans that appear discolored, shriveled, or damp, as these may indicate spoilage or poor storage conditions.
Ingredients:
- 2 cups dried soybeans (approximately 400 grams)
- Optional: A pinch of salt or sugar for seasoning (adjust to taste)
Equipment:
- A heavy-bottomed skillet or frying pan (cast iron works exceptionally well for even heat distribution)
- A wooden spoon or spatula for stirring
- A baking sheet (for cooling)
- A high-speed blender, food processor, or coffee grinder (for grinding)
- A fine-mesh sieve or sifter (to achieve a uniform texture)
- Airtight containers for storage
Step 1: Preparing the Soybeans
Begin by rinsing the soybeans under cool running water to remove any dirt or debris. Spread them evenly on a clean kitchen towel and pat dry. While this step isn’t strictly necessary, it ensures the beans roast evenly without steaming.
Next, inspect the beans for any small stones, pebbles, or damaged beans. Though rare, these impurities can disrupt the roasting process and damage your equipment. Once sorted, transfer the beans to a bowl and set them aside while you prepare your workspace.
Step 2: Roasting the Soybeans
Roasting is the heart of this recipe—it’s where the magic happens. The goal is to achieve a golden-brown hue while developing a deep, toasty flavor. Achieving perfection requires patience and constant attention, as over-roasting can lead to bitterness, while under-roasting leaves the beans raw and astringent.
Method 1: Stovetop Roasting
- Place your skillet over medium-low heat. Allow it to preheat for 2–3 minutes to ensure even roasting.
- Add the soybeans to the dry skillet. Spread them into a single layer to promote uniform cooking.
- Stir continuously using a wooden spoon or spatula. This prevents hotspots and ensures each bean roasts evenly.
- Roast for 15–20 minutes, or until the beans emit a nutty aroma and turn a light golden brown. Listen for a subtle crackling sound—this indicates the beans are drying out and beginning to toast.
- Perform the “snap test”: As the beans cool slightly, they should crisp up. If they bend instead of snapping, they need more time.
Method 2: Oven Roasting
For larger batches or those preferring a hands-off approach, the oven offers excellent results:
- Preheat your oven to 350°F (175°C).
- Spread the soybeans in a single layer on a baking sheet.
- Roast for 20–25 minutes, stirring every 5–7 minutes to prevent burning.
- The beans are ready when they turn golden-brown and release a rich, toasted scent.
Pro Tip: Regardless of the method, avoid high heat. Low and slow roasting preserves flavor and prevents scorching.
Step 3: Cooling the Roasted Soybeans
Once roasted to perfection, transfer the beans to a baking sheet lined with parchment paper. Spread them out to cool completely—this step is crucial for two reasons. First, cooling halts the cooking process, preventing over-roasting. Second, it allows the beans to crisp up, making grinding easier.
Resist the temptation to grind the beans while they’re still warm. Heat can cause moisture buildup in the grinder, leading to clumpy flour. Allow at least 30 minutes for cooling, or until the beans feel dry and brittle to the touch.
Step 4: Grinding the Soybeans into Flour
Now comes the transformation from bean to powder. The key here is patience and gradual grinding to achieve a fine, silky texture.
Using a Blender or Food Processor:
- Add a small handful of cooled soybeans to the blender or food processor. Overfilling can strain the motor and result in uneven grinding.
- Pulse in short bursts (10–15 seconds each) to break down the beans.
- Gradually increase to a medium speed, blending for 30–45 seconds at a time.
- Pause frequently to scrape down the sides and redistribute the mixture.
- Repeat until the flour reaches your desired consistency. For ultra-fine flour, blend in multiple batches.
Using a Coffee Grinder:
A coffee grinder is ideal for small quantities but requires more patience:
- Fill the grinder no more than halfway with soybeans.
- Grind in 10-second intervals, shaking the grinder between pulses to ensure even grinding.
- Strain the flour through a sieve after each batch to separate coarse particles. Regrind the larger bits until only fine powder remains.
Achieving the Perfect Texture:
- For coarse flour: Stop grinding once the beans resemble coarse cornmeal.
- For fine flour: Continue until the texture resembles powdered sugar.
- For ultra-fine flour: Sift the flour through a fine-mesh sieve and regrind any larger particles.
Step 5: Seasoning and Customization
While pure roasted soybean flour is delightful on its own, this is your chance to get creative. Add a pinch of salt or sugar to enhance the natural flavors, or experiment with spices like cinnamon, vanilla, or matcha for a gourmet twist.
Flavor Variations:
- Sweet: Mix in 1–2 tablespoons of powdered sugar or coconut sugar.
- Savory: Add a teaspoon of smoked paprika, garlic powder, or nutritional yeast.
- Spiced: Incorporate a pinch of cayenne pepper, cardamom, or star anise.
Stir the seasonings into the flour until evenly distributed, then taste and adjust as needed.
Step 6: Storing Your Roasted Soybean Flour
Proper storage is essential to maintain freshness and prevent spoilage. Roasted soybean flour, like all nut-based flours, contains oils that can turn rancid if exposed to heat, light, or moisture.
Best Practices:
- Transfer the flour to airtight containers, such as glass jars with tight-fitting lids or resealable bags.
- Store in a cool, dark place (like a pantry) away from direct sunlight.
- For extended shelf life (up to 6 months), refrigerate or freeze the flour. Allow refrigerated flour to come to room temperature before use to prevent condensation.
Shelf Life:
- Pantry: 2–3 months
- Refrigerator: 4–6 months
- Freezer: 6–12 months
Troubleshooting Common Issues
Even seasoned cooks encounter hiccups. Here’s how to fix common problems:
-
Uneven Roasting:
- Cause: Overcrowding the pan or inconsistent heat.
- Fix: Roast in smaller batches and stir continuously.
-
Bitter Flavor:
- Cause: Over-roasting or burnt beans.
- Fix: Discard burnt beans and reduce roasting time.
-
Clumpy Flour:
- Cause: Grinding warm beans or high humidity.
- Fix: Ensure beans are completely cool before grinding. Store flour with a silica packet to absorb moisture.
-
Coarse Texture:
- Cause: Insufficient grinding time.
- Fix: Sift the flour and regrind larger particles.
Culinary Uses for Roasted Soybean Flour
Your homemade flour is a culinary chameleon. Here are some ways to incorporate it into your cooking:
- Baking: Substitute up to 25% of wheat flour in recipes for bread, muffins, or pancakes. It adds moisture and a nutty flavor.
- Smoothies and Shakes: Blend 1–2 tablespoons into your favorite beverage for a protein boost.
- Soups and Stews: Whisk into broths or gravies as a thickener.
- No-Bake Treats: Mix with dates, nuts, and honey for energy bars or truffles.
- Savory Coatings: Combine with spices to coat tofu, tempeh, or vegetables before frying.
Health Benefits of Roasted Soybean Flour
Beyond its culinary versatility, roasted soybean flour boasts impressive nutritional credentials:
- High in Protein: A ¼-cup serving provides 10–12 grams of plant-based protein.
- Rich in Fiber: Aids digestion and promotes satiety.
- Contains Essential Nutrients: Iron, calcium, magnesium, and B vitamins support overall health.
- Gluten-Free: A safe alternative for those with celiac disease or gluten sensitivities.
Cultural Significance and History
Soybeans have been cultivated for over 5,000 years, originating in East Asia. Traditional Chinese medicine prized soybeans for their balancing properties, while Japanese cuisine incorporated roasted soybean flour (kinako) into desserts like daifuku (mochi filled with sweet bean paste). In India, besan (chickpea flour) is ubiquitous, but roasted soybean flour is gaining popularity as a protein-rich substitute.
Conclusion
Making roasted soybean flour at home is a rewarding endeavor that connects you to centuries-old traditions while empowering your culinary creativity. With patience and practice, you’ll master the art of roasting and grinding, yielding a flour that outshines store-bought varieties in flavor and freshness. Whether you’re baking a loaf of bread, thickening a stew, or experimenting with vegan desserts, your homemade soybean flour will elevate every dish. So, preheat your skillet, gather your soybeans, and embark on a journey of flavor and nutrition—one golden-brown bean at a time.



0 comments