Introduction
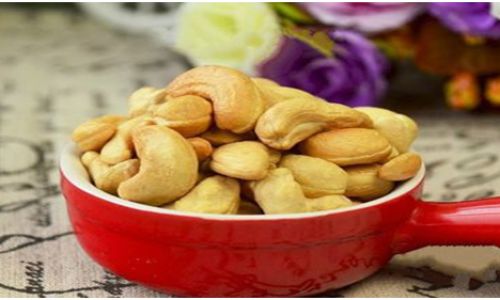
Salt-baked cashews are a delightful snack that combines the natural, buttery flavor of cashews with the subtle, savory taste of salt. This classic preparation method enhances the nut’s inherent creaminess and adds a delightful crunch, making it an irresistible treat for both casual snacking and elegant gatherings. While many people enjoy salt-baked cashews as a store-bought snack, making them at home allows you to control the level of saltiness, ensure freshness, and customize the flavor profile to your liking.
In this comprehensive guide, we’ll walk you through the entire process of making salt-baked cashews from start to finish. We’ll cover everything from selecting the best cashews to achieving the perfect balance of salt and heat. By following these detailed steps, you’ll be able to create a batch of delicious, homemade salt-baked cashews that rival any store-bought variety.
Section 1: Understanding the Ingredients
Before diving into the recipe, it’s essential to understand the key ingredients and their roles in the salt-baking process.

1 Cashews
Cashews are the seeds of the cashew apple, found inside a hard, pear-shaped shell that grows on the cashew tree. They are native to tropical regions, particularly Brazil and India, but are now cultivated worldwide. When choosing cashews for salt-baking, look for nuts that are:
- Fresh: Ideally, buy cashews that have been recently harvested to ensure maximum freshness and flavor.
- Whole: Avoid broken or cracked nuts, as these can burn more easily during the baking process.
- Unsalted: Start with unsalted cashews to control the final saltiness of your snack.
2 Salt
Salt is crucial for enhancing the flavor of the cashews and creating the signature salt-baked texture. When selecting salt for this recipe, consider:
- Coarse Salt: Coarse sea salt or kosher salt is preferred because it adheres better to the nuts and provides a more even distribution of saltiness.
- Fine Salt: While fine salt can be used, it may dissolve more quickly during baking, resulting in a less pronounced salt flavor.
3 Baking Ingredients (Optional)
While salt and cashews are the essential ingredients, you can also add a few optional items to enhance the final product:
- Olive Oil or Vegetable Oil: A light coating of oil can help the salt stick to the nuts and promote even baking.
- Seasonings: For a twist on traditional salt-baked cashews, consider adding a pinch of spices such as paprika, garlic powder, or cumin.
Section 2: Equipment and Tools
To make salt-baked cashews, you’ll need a few basic kitchen tools and pieces of equipment. Here’s a list of what you’ll need:
- Baking Sheet: A rimmed baking sheet is essential to prevent the nuts from spilling over during baking.
- Parchment Paper or Silicone Baking Mat: These will prevent the nuts from sticking to the baking sheet and make cleanup easier.
- Mixing Bowls: You’ll need at least one large mixing bowl for tossing the nuts with salt and oil.
- Measuring Spoons: For accurately adding salt and any optional seasonings.
- Oven: Preheat your oven to the correct temperature to ensure even baking.
- Cooling Rack: After baking, you’ll need a cooling rack to let the nuts cool and crisp up.
Section 3: Preparing the Cashews
Now that you have all the ingredients and equipment ready, let’s dive into the preparation process.
1 Preheat the Oven
Preheat your oven to 350°F (175°C). This temperature is crucial for achieving the perfect balance of crispy exterior and creamy interior.
2 Rinse and Dry the Cashews
Start by rinsing the cashews under cold running water to remove any dust or debris. Pat them dry thoroughly using a clean kitchen towel or paper towels. Any moisture left on the nuts can cause them to steam instead of bake, resulting in a softer texture.
3 Optional: Toast the Cashews Lightly
If you prefer a deeper, nuttier flavor, you can lightly toast the cashews before adding the salt. Spread them in a single layer on the prepared baking sheet and toast them in the preheated oven for about 5-7 minutes, stirring occasionally to prevent burning. Remove them from the oven and let them cool slightly before proceeding to the next step.
Section 4: Adding the Salt and Oil
Once the cashews are prepared, it’s time to add the salt and oil.
1 Mixing the Ingredients
Place the dried (or toasted) cashews in a large mixing bowl. Drizzle a small amount of olive oil or vegetable oil over the nuts, just enough to lightly coat them. Use your hands or a spatula to toss the nuts until they are evenly coated with oil.
Next, sprinkle the coarse salt over the nuts. The amount of salt you use will depend on your personal preference, but a general guideline is about 1-2 teaspoons per pound of cashews. Again, toss the nuts until the salt is evenly distributed.
2 Adding Optional Seasonings
If you’re adding any optional seasonings, such as paprika, garlic powder, or cumin, sprinkle them over the nuts at this stage and toss to combine.
Section 5: Baking the Cashews
Now that the nuts are seasoned, it’s time to bake them.
1 Spreading on the Baking Sheet
Spread the seasoned cashews in a single layer on the prepared baking sheet. Make sure they are not overcrowded, as this will ensure even baking and prevent the nuts from steaming.
2 Baking Time
Place the baking sheet in the preheated oven and bake for about 10-15 minutes, stirring halfway through to ensure even baking. Keep a close eye on the nuts, as they can burn quickly, especially if they are overcrowded or the oven is too hot.
3 Checking for Doneness
The cashews are done when they are golden brown and fragrant. They should have a slightly crispy exterior but still be creamy inside. To test for doneness, remove one nut from the baking sheet and let it cool for a minute before tasting. If it’s still too soft or has a raw flavor, bake for an additional 2-3 minutes and check again.
Section 6: Cooling and Serving
Once the cashews are baked to perfection, it’s essential to let them cool properly to achieve the desired texture.
1 Cooling on a Rack
Transfer the baked cashews to a cooling rack and let them cool completely. This step is crucial because it allows the nuts to crisp up and develop their final texture. If you skip this step and store the nuts while they are still warm, they will lose their crunchiness.
2 Storing the Cashews
Once cooled, store the salt-baked cashews in an airtight container at room temperature. They will stay fresh for about a week. For longer storage, you can place them in an airtight container and store them in the refrigerator for up to a month. To reheat, simply place them in a single layer on a baking sheet and warm them in a preheated 300°F (150°C) oven for about 5 minutes.
Section 7: Customizing Your Salt-Baked Cashews
While traditional salt-baked cashews are delicious, there are endless possibilities for customizing this classic snack to suit your taste preferences. Here are a few ideas to inspire you:
- Spicy Kick: Add a pinch of cayenne pepper or red pepper flakes for a spicy twist.
- Herbal Notes: Incorporate dried herbs such as thyme, rosemary, or oregano for a savory, aromatic flavor.
- Sweet and Salty: Mix in a small amount of brown sugar or honey for a sweet-and-salty combination.
- Citrus Zest: Add the zest of a lemon, lime, or orange for a refreshing citrus flavor.
- Cheesy Delight: Sprinkle a light layer of grated Parmesan or cheddar cheese over the nuts before baking for a cheesy twist.
Conclusion
Making salt-baked cashews at home is a rewarding culinary project that allows you to enjoy a delicious, fresh snack tailored to your taste preferences. By following the steps outlined in this guide, you’ll be able to create a batch of crispy, flavorful nuts that are sure to impress. Whether you’re enjoying them as a standalone snack, pairing them with a favorite beverage, or incorporating them into a more elaborate dish, salt-baked cashews are a versatile and delicious addition to your culinary repertoire.
Remember, the key to success is attention to detail, from selecting the freshest ingredients to carefully monitoring the baking process. With a bit of practice, you’ll soon be able to perfect your salt-baked cashews and share your creations with friends and family. Happy baking!


0 comments