Introduction
Salt beef, a culinary delight that has stood the test of time, is a dish deeply rooted in the traditions of various cultures worldwide. From its origins in ancient preservation techniques to its modern-day status as a gourmet delight, salt beef has evolved into a dish that combines flavor, texture, and history. This article embarks on a culinary journey to uncover the authentic preservation method for salt beef, exploring its historical context, the science behind the process, and a step-by-step guide to achieving the perfect salt beef at home.

Historical Context
The history of salt beef is intertwined with the histories of preservation, trade, and migration. In ancient times, salt was a precious commodity used to preserve food, enabling civilizations to store meat for extended periods without refrigeration. Salt beef, or corned beef as it is commonly known in some regions, originated as a way to preserve beef for long voyages and winter storage.
The term “corned beef” stems from the early method of preserving meat, which involved rubbing coarse salt crystals, resembling grains of corn, into the flesh. This process not only preserved the meat but also added flavor and texture. Over time, the method evolved, incorporating additional spices and herbs to enhance the taste profile of the final dish.
Different cultures have adopted and adapted the salt beef preservation method, each contributing their unique twists and flavors. In Europe, particularly in countries like Ireland and the United Kingdom, salt beef has become a staple in traditional diets, often associated with cultural festivals and national cuisine. In the United States, salt beef is closely linked to Jewish and Irish immigrant communities, where it has been a cornerstone of ethnic cuisine for generations.
The Science Behind Salt Beef Preservation
Understanding the science behind salt beef preservation is crucial to achieving the perfect dish. The process relies on a combination of osmosis, dehydration, and microbial inhibition.
-
Osmosis: When salt is applied to meat, it draws out moisture through osmosis. This creates a brine solution that further preserves the meat by creating an environment hostile to bacteria and other microorganisms.
-
Dehydration: As moisture is drawn out, the meat undergoes dehydration, reducing the water activity (Aw) of the tissue. Microorganisms need water to grow and multiply, so reducing Aw makes it difficult for them to survive.
-
Microbial Inhibition: Salt itself has inhibitory properties against many types of bacteria, fungi, and other microorganisms. By creating a high-salt environment, the growth of these organisms is suppressed, thereby extending the shelf life of the meat.

In addition to these preservation mechanisms, the use of spices and herbs in salt beef recipes provides additional layers of flavor and, in some cases, additional preservative properties. For example, garlic and onions contain natural antioxidants and antimicrobial compounds that can further enhance the preservation process.
Authentic Preservation Method for Salt Beef
Achieving the perfect salt beef at home requires attention to detail, patience, and a commitment to traditional methods. Below is a step-by-step guide to the authentic preservation method for salt beef:
Ingredients:
- Fresh beef brisket or round (about 5-7 pounds)
- Coarse sea salt or kosher salt (about 1 cup per 5 pounds of meat)
- Black peppercorns (about 2 tablespoons per 5 pounds of meat)
- Whole allspice berries (about 1 tablespoon per 5 pounds of meat)
- Bay leaves (2-3 per 5 pounds of meat)
- Garlic cloves (6-8 per 5 pounds of meat, crushed)
- Fresh rosemary sprigs (2-3 per 5 pounds of meat)
- Fresh thyme sprigs (2-3 per 5 pounds of meat)
- Water (for brining)
Equipment:
- Large non-reactive container (glass, ceramic, or stainless steel)
- Cheesecloth or a clean kitchen towel
- Heavy-duty plastic wrap or butcher paper
- String (for tying the meat)
- Large pot (for cooking)
Step-by-Step Guide:
-
Preparation of the Meat:
- Start with a high-quality piece of beef brisket or round. Trim any excess fat, but leave a small layer for flavor and moisture retention.
- Rinse the meat thoroughly under cold running water and pat it dry with paper towels.
-
Mixing the Brine Ingredients:
- In a large bowl, combine the coarse sea salt, black peppercorns, allspice berries, and bay leaves. Crush the spices slightly with the back of a spoon to release their flavors.
- Add the crushed garlic cloves, rosemary sprigs, and thyme sprigs to the spice mixture.
-
Creating the Brine:

- In a large non-reactive container, pour in enough water to fully submerge the meat. The exact amount will depend on the size of your container and the meat.
- Gradually add the spice mixture to the water, stirring until the salt is fully dissolved. Taste the brine to ensure it is well-seasoned. It should taste quite salty.
-
Brining the Meat:
- Submerge the meat completely in the brine, ensuring it is fully covered. Use a plate or a weight to keep the meat submerged if necessary.
- Cover the container with a lid or cheesecloth secured with a rubber band to prevent contamination.
- Refrigerate the brined meat for 7-10 days, stirring the brine occasionally to redistribute the spices. The longer the meat is brined, the saltier and more flavorful it will become.
-
Rinsing and Drying:
- After the brining period, remove the meat from the brine and rinse it thoroughly under cold running water to remove any excess salt and spices.
- Pat the meat dry with paper towels. Air-dry it further by placing it on a rack set over a rimmed baking sheet in the refrigerator for 24 hours. This helps to develop a pellicle, a tacky surface that promotes the formation of a flavorful crust during cooking.
-
Wrapping and Storing:
- Once the meat is dry, wrap it tightly in several layers of heavy-duty plastic wrap or butcher paper. Make sure there are no gaps or air pockets, as this can cause the meat to dry out during storage.
- For long-term storage, place the wrapped meat in a vacuum-sealed bag or a tightly sealed container and store it in the refrigerator for up to 2 weeks or in the freezer for up to 6 months.
-
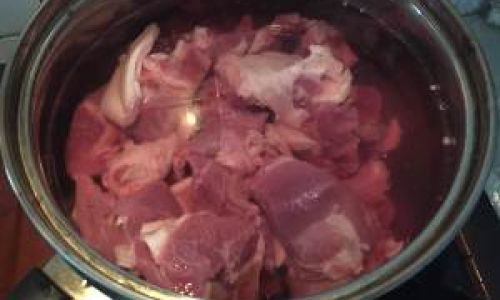
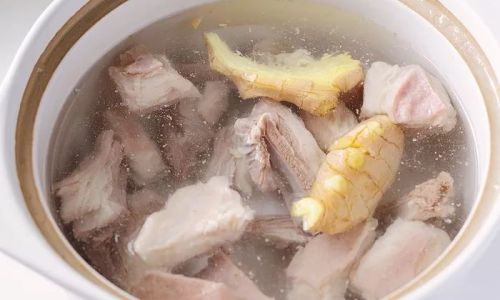
Cooking the Salt Beef:
- To cook the salt beef, place it in a large pot and cover it with fresh water. The water should be at least an inch above the meat.
- Bring the water to a gentle simmer over medium-low heat. Do not boil vigorously, as this can cause the meat to become tough.
- Skim off any foam or impurities that rise to the surface.
- Add additional spices or herbs if desired (e.g., carrots, onions, celery for a richer broth).
- Simmer the meat until it is tender and cooked through, usually 3-4 hours for brisket and 4-6 hours for round. Test for doneness by inserting a fork into the thickest part of the meat; it should slide in easily.
-
Serving and Enjoying:
- Once cooked, remove the meat from the pot and let it rest for at least 30 minutes before slicing. This allows the juices to redistribute, ensuring a moist and flavorful final dish.
- Salt beef can be served in various ways, including thinly sliced on sandwiches, shredded for salads, or served with mashed potatoes and vegetables for a hearty meal.
Conclusion
The authentic preservation method for salt beef is a testament to the wisdom of ancient food preservation techniques and the evolution of culinary traditions. By following the steps outlined in this guide, you can create a dish that combines the rich flavors of history with the satisfaction of a homemade meal. Salt beef is not just a food; it is a cultural artifact, a bridge between past and present, and a culinary adventure that invites you to explore the depths of flavor and tradition. Enjoy your culinary journey, and bon appétit!


0 comments