Table of content
Sponge gourd, also known as luffa or Chinese okra, is a versatile vegetable prized for its mild flavor and tender texture when cooked correctly. One of the most common questions home cooks ask is, “How long does it take to sauté sponge gourd until it’s perfectly cooked?” The answer depends on several factors, including the thickness of the slices, the heat of your stove, and your desired texture. This article will explore the nuances of cooking sponge gourd, providing detailed timelines, techniques, and tips to ensure your dish turns out tender, flavorful, and never mushy.
Understanding Sponge Gourd: A Brief Introduction
Before diving into cooking times, it’s essential to understand the vegetable itself. Sponge gourd (Luffa acutangula) is a member of the cucumber family, native to South Asia but widely used in Asian, African, and Middle Eastern cuisines. Its flesh is pale green, slightly ridged, and contains a soft, spongy interior that becomes more pronounced as the vegetable matures. Young sponge gourds are tender and ideal for quick cooking methods like sautéing, while older ones may require longer cooking or peeling to remove tougher skin.
Nutritionally, sponge gourd is low in calories but rich in fiber, vitamins A and C, and minerals like magnesium and potassium. Its neutral taste makes it a perfect canvas for absorbing flavors from garlic, ginger, soy sauce, or other seasonings.

Factors Affecting Cooking Time
The time it takes to sauté sponge gourd varies based on several variables:
- Thickness of Slices: Thicker slices (1/2 inch or more) will require longer cooking than thin ones (1/4 inch).
- Heat Level: High heat cooks faster but risks burning if not monitored. Medium heat allows for even cooking.
- Desired Texture: Some prefer a crisp-tender texture (5–7 minutes), while others aim for softness (8–10 minutes).
- Pan Material: Stainless steel pans retain heat differently than non-stick or cast iron, affecting cooking speed.
- Quantity: Overcrowding the pan lowers the temperature and increases cooking time.
How Long to Sauté Sponge Gourd: A Step-by-Step Guide
Preparation (5–10 minutes)
- Wash and Peel: Rinse the gourd under cold water. Use a vegetable peeler to remove the prickly outer skin (if mature) or leave it on for younger gourds.
- Slice Uniformly: Cut the gourd into rounds, half-moons, or matchsticks. Consistency in size ensures even cooking.
- Optional Salting: For extra crispness, toss slices with a pinch of salt and let them sit for 10 minutes. Rinse and pat dry before cooking.
Sautéing on the Stovetop (7–12 minutes total)
- Heat the Pan: Place a skillet or wok over medium-high heat. Add 1–2 tablespoons of oil (sesame, vegetable, or olive).
- Aromatics (Optional): For added flavor, sauté minced garlic, ginger, or shallots for 1–2 minutes until fragrant.
- Add Sponge Gourd: Spread the slices in a single layer. Avoid overcrowding; cook in batches if needed.
- Cooking Time:
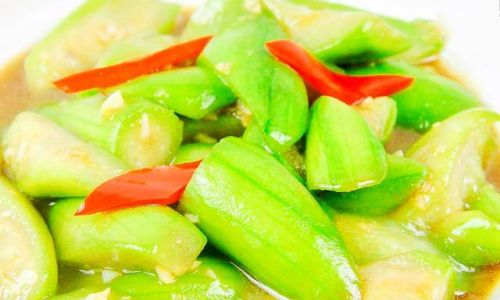
- Crisp-Tender: Sauté for 5–7 minutes, stirring occasionally. The gourd will turn bright green and retain a slight firmness.
- Soft and Tender: Cook for 8–10 minutes, stirring gently. The slices will wilt and become translucent.
- Season: Add soy sauce, oyster sauce, or a splash of water/broth to steam-cook briefly (1–2 minutes) if desired.
- Finish: Toss with herbs (cilantro, basil) or a drizzle of sesame oil before serving.
Stir-Frying (5–8 minutes)
Stir-frying is quicker than sautéing due to higher heat.

- Prep: Follow the same steps as above.
- Cook: Stir continuously over high heat for 3–4 minutes. Add a splash of liquid if the pan dries out.
- Texture: Expect a crisp-tender result. For softness, reduce heat to medium and cook 2–3 minutes longer.
Common Mistakes to Avoid
- Overcooking: Sponge gourd turns mushy if cooked beyond 12 minutes. Remove from heat while still slightly firm.
- Undercooking: Raw gourd has a grassy taste. Ensure it’s heated through.
- Uneven Slices: Thick and thin pieces will cook unevenly. Use a sharp knife for precision.
- Crowding the Pan: Steam builds up instead of sautéing, leading to sogginess.
How to Check Doneness
- Visual Cues: The gourd should turn from pale green to a vibrant, almost translucent hue.
- Texture Test: Pierce a slice with a fork. It should offer slight resistance (crisp-tender) or glide through easily (soft).
- Taste Test: Sample a piece to gauge tenderness.
Cooking Time Variations Based on Recipe
- With Meat or Tofu: If adding protein, sauté it first, then cook the gourd separately. Combine during the last 2–3 minutes.
- In Soups or Stews: Add sliced gourd 5–7 minutes before serving to prevent overcooking.
- Grilled or Roasted: Thicker slices (3/4 inch) take 10–15 minutes at 400°F (200°C), flipping halfway.
Pro Tips for Perfect Sponge Gourd Every Time
- Use a Non-Stick Pan: Reduces oil usage and prevents sticking.
- Add Acid: A splash of rice vinegar or lime juice brightens the flavor.
- Garnish Creatively: Top with toasted sesame seeds, crushed peanuts, or chili flakes.
- Freeze Leftovers: Cooked gourd freezes well for up to 3 months. Reheat gently in a pan.
Recipe Idea: Garlic Sautéed Sponge Gourd
Ingredients (Serves 4):
- 2 medium sponge gourds (1.5 lbs), sliced
- 3 garlic cloves, minced
- 2 tbsp vegetable oil
- 1 tbsp soy sauce
- 1/4 tsp red pepper flakes (optional)
- Salt and pepper to taste
Instructions:

- Heat oil in a pan over medium heat. Add garlic and pepper flakes; sauté 1 minute.
- Add sponge gourd and stir. Cook 6–8 minutes until tender.
- Drizzle with soy sauce; toss to coat. Season and serve.
Conclusion
Cooking sponge gourd to perfection is an art that balances time, heat, and texture. Whether you prefer a crisp-tender bite or silky softness, mastering the 7–12 minute sauté window ensures a dish that’s both delicious and nutritious. Experiment with seasonings, cooking methods, and pairings to discover your favorite preparation. With practice, you’ll learn to gauge doneness by sight, touch, and taste—turning a simple vegetable into a culinary masterpiece.
Remember, the key to perfect sponge gourd lies in patience and attention. So next time you’re in the kitchen, set a timer, stir with care, and savor the rewards of your labor. Happy cooking!


0 comments