Introduction
Frying oysters, a culinary delight enjoyed across various cultures, is an art form that combines precision, flavor, and texture. Whether you’re a seasoned chef or an enthusiastic home cook, mastering the technique to create crispy, golden-brown, and mouthwatering fried oysters can elevate your culinary repertoire. This comprehensive guide will walk you through every step, from selecting the freshest oysters to achieving the perfect frying temperature, ensuring your fried oysters are nothing short of exquisite.
Section 1: Selecting the Right Oysters
The foundation of any great dish starts with quality ingredients, and fried oysters are no exception. Here are some key considerations when choosing oysters for frying:
1 Freshness Matters
Freshness is paramount when dealing with seafood, especially oysters. Look for oysters that are still alive and have a tight, firm shell. When you tap them lightly, they should close immediately. If they remain open or have a gaping shell, it’s a sign they might not be fresh.
2 Variety and Size
Different varieties of oysters have distinct flavors and textures. For frying, smaller to medium-sized oysters are ideal because they cook more evenly and maintain a pleasant bite. Popular varieties for frying include Pacific oysters, Eastern oysters, and Kumamoto oysters.
3 Source and Seasonality
Oysters are seasonal, and their availability and quality vary by region. Whenever possible, buy locally sourced oysters that are in season. This not only ensures freshness but also supports local fisheries.
Section 2: Preparing the Oysters
Once you’ve selected your oysters, it’s time to prepare them for frying. This involves shucking, cleaning, and seasoning them properly.
1 Shucking the Oysters
Shucking oysters can be intimidating, but with the right tools and technique, it becomes a manageable task. You’ll need an oyster knife, a thick cloth or glove to protect your hand, and a stable surface.
- Step 1: Hold the oyster cupped side down in a towel to stabilize it.
- Step 2: Insert the tip of the oyster knife into the hinge of the shell, wiggling it gently to loosen it.
- Step 3: Twist the knife slightly to open the shell, cutting the muscle that attaches the oyster to the shell.
- Step 4: Carefully run the knife along the top shell to loosen the oyster completely.
- Step 5: Discard the top shell and any debris or fragments of shell attached to the oyster.
2 Cleaning the Oysters

Under cold running water, rinse the oysters gently to remove any remaining shell fragments or sand. Be cautious not to let the water pressure disrupt the oyster’s shape or texture.
3 Seasoning the Oysters
Before coating the oysters in breadcrumbs or batter, season them lightly. Salt and freshly ground black pepper are classic choices, but you can also add a pinch of cayenne pepper for a bit of heat or some herbs like dill or parsley for added flavor.
Section 3: The Breading and Batter Options
The breading or batter is crucial for achieving a crispy exterior that contrasts with the tender, juicy interior of the oyster. Here are a few popular options:
1 Classic Breadcrumb Coating
- Ingredients: Fine breadcrumbs, grated Parmesan cheese (optional), salt, pepper, garlic powder, paprika.
- Method: Mix the breadcrumbs with a bit of grated Parmesan cheese (if using) and seasonings. Dredge each oyster lightly in flour, dip into beaten egg, and then coat evenly with the breadcrumb mixture. Press the crumbs gently onto the oysters to ensure they adhere well.
2 Cornmeal Batter
- Ingredients: Cornmeal, all-purpose flour, baking powder, salt, pepper, milk or buttermilk, and an egg.
- Method: Combine the dry ingredients in a bowl. In another bowl, whisk together the milk or buttermilk and egg until smooth. Gradually add the wet ingredients to the dry, mixing until just combined. The batter should be thick but pourable. Dip each oyster into the batter, ensuring it’s fully coated.
3 Tempura Batter
- Ingredients: Ice-cold water, cornstarch, all-purpose flour, and a pinch of baking soda.
- Method: Combine equal parts cornstarch and all-purpose flour in a bowl. Add a pinch of baking soda and slowly whisk in ice-cold water until the batter reaches a thick, but pourable consistency. The key to tempura is to use ice-cold water, which helps create a lighter, crispier coating. Dip each oyster into the batter and let any excess drip off before frying.
Section 4: Frying Techniques
Now that your oysters are prepared, it’s time to fry them. The key to successful frying lies in maintaining the correct oil temperature and using the right oil.
1 Choosing the Right Oil
Neutral oils like peanut oil, canola oil, or grapeseed oil are ideal for frying because they have a high smoke point and neutral flavor, allowing the oysters’ natural flavors to shine. Avoid using olive oil, as its lower smoke point can cause the oil to smoke and impart unwanted flavors.
2 Maintaining Oil Temperature
The ideal frying temperature for oysters is between 350°F to 375°F (175°C to 190°C). Use a deep-fry thermometer to monitor the temperature accurately. If the oil is too hot, the oysters will burn before cooking through; if it’s too low, they will absorb too much oil and become greasy.
3 Frying the Oysters
- Preheat the oil: Pour enough oil into a deep fryer or a heavy-bottomed pot to fully submerge the oysters. Heat the oil to the desired temperature.
- Fry in batches: Do not overcrowd the pot. Fry the oysters in small batches to maintain the oil temperature. Use a slotted spoon or frying basket to carefully lower the oysters into the hot oil.
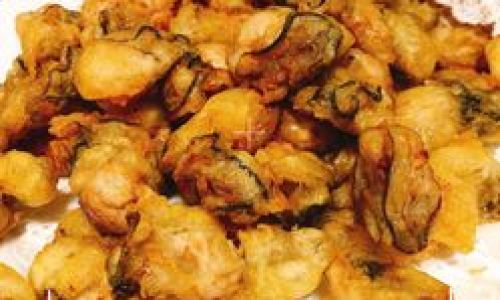
- Cooking time: Fry for about 1 to 2 minutes, or until golden brown and crispy. The exact time depends on the size of the oysters and the batter or coating used.
- Draining: Once done, remove the oysters from the oil and let them drain on a wire rack or paper towels to remove any excess oil.
Section 5: Serving and Enjoying Your Fried Oysters
The final touch to elevate your fried oysters from good to great is how you serve them. Here are some serving suggestions and ideas to complement your dish:
1 Light Accompaniments
- Lemon Wedges: A squeeze of fresh lemon juice adds brightness and cuts through the richness of the fried oysters.
- Tartar Sauce: A classic tartar sauce made with mayonnaise, pickles, capers, and a hint of mustard adds creaminess and tang.
- Cocktail Sauce: A blend of ketchup, horseradish, and a splash of Worcestershire sauce offers a tangy, savory contrast.
2 Creative Garnishes
- Fresh Herbs: A sprinkle of fresh parsley, chives, or dill adds a fresh, aromatic touch.
- Microgreens: A bed of microgreens or baby arugula under the oysters adds a pop of color and a subtle crunch.
- Citrus Zest: A light dusting of lemon or orange zest enhances the citrus notes.
3 Presentation
Presentation can make a dish look as good as it tastes. Arrange the fried oysters on a platter lined with paper towels to absorb any remaining oil. Garnish with fresh herbs, citrus zest, and a drizzle of your chosen sauce. For an added touch, serve with lemon wedges and a small bowl of tartar or cocktail sauce on the side.
Section 6: Tips and Troubleshooting
Even the most seasoned cooks can encounter issues when frying oysters. Here are some tips to troubleshoot common problems and ensure your dish is perfect:
1 Soggy Oysters
- Solution: Ensure the oil temperature is correct and maintain it throughout frying. Overcrowding the pot can drop the temperature, causing the oysters to absorb too much oil.
2 Uneven Cooking
- Solution: Use a thermometer to monitor the oil temperature accurately. Fry in small batches to ensure even cooking.
3 Batter Falling Off
- Solution: Ensure the oysters are fully coated in flour or seasoned before dipping into the batter or breadcrumbs. This helps the coating adhere better.
4 Oil Splattering
- Solution: Make sure the oysters are dry before frying. Excess moisture can cause the oil to splatter.
Conclusion
Frying oysters is a delightful culinary endeavor that combines the art of preparation with the science of cooking. By following the steps outlined in this guide, from selecting the freshest oysters to mastering the frying technique, you


0 comments