Pickled radish, with its refreshing crunch and tangy-sweet flavor, is a beloved condiment and side dish across global cuisines. Whether served alongside rich meats, tossed into salads, or enjoyed as a standalone snack, achieving the perfect balance of crispiness and taste requires attention to detail. This comprehensive guide will walk you through selecting the finest ingredients, mastering preparation techniques, and troubleshooting common pitfalls to ensure your pickled radish turns out irresistibly delicious every time.
Why Pickled Radish Stands Out
Pickled radish, often called takuan in Japanese cuisine or mu chua in Vietnamese dishes, is celebrated for its ability to elevate meals with minimal effort. Its crisp texture contrasts beautifully with soft or fatty foods, while its vibrant flavor cuts through richness. Unlike store-bought versions, which may lack texture or rely on excessive preservatives, homemade pickled radish allows you to control sweetness, acidity, and spice levels. The key to success lies in understanding the science behind preservation and the culinary art of balancing flavors.
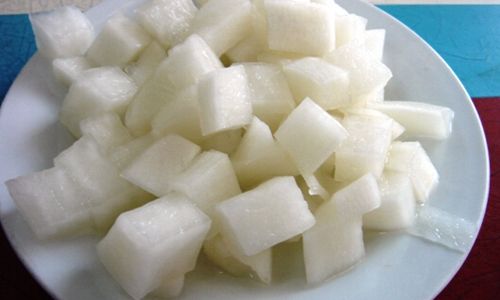
Selecting the Perfect Radish
The foundation of great pickled radish begins with choosing the right vegetable. Daikon radish, a long, white variety native to East Asia, is the most common choice due to its mild spiciness and high water content, which contributes to crispness. When selecting daikon:
- Look for firmness: Avoid radishes with soft spots or wrinkled skin, as these indicate age or improper storage.
- Check the size: Medium to large daikons (8–12 inches long) are ideal, as they offer a better yield and uniform texture.
- Opt for freshness: The greens, if attached, should be vibrant and perky, signaling the radish was recently harvested.
Smaller radishes, such as cherry belle or French breakfast varieties, can also be used but may require shorter pickling times due to their thinner skin and delicate flesh.
Essential Ingredients and Tools
Beyond the radish itself, a handful of pantry staples will transform this root vegetable into a culinary delight:
- Vinegar: Rice vinegar (unseasoned) is traditional for its mild acidity, but apple cider vinegar or white wine vinegar can add complexity. Avoid distilled white vinegar, which may overpower the radish’s natural flavor.
- Sweetener: Sugar balances the vinegar’s tang. White granulated sugar is classic, but honey, agave, or maple syrup offer unique twists.
- Salt: Kosher or sea salt is preferred for its clean taste. Avoid iodized salt, which can impart a metallic flavor.
- Water: Use filtered water to prevent off-flavors from chlorine or minerals.
- Optional Flavor Boosters: Sliced garlic, ginger, chili flakes, or black peppercorns add depth.
Tools:
- A sharp knife or mandoline slicer for uniform cuts.
- A large bowl for salting.
- A sterilized glass jar with an airtight lid.
Step-by-Step Preparation
Slicing the Radish
Uniformity is critical for even pickling. Slice the radish into thin rounds, matchsticks, or half-moons. For maximum crispness, aim for ⅛-inch thickness. A mandoline slicer ensures precision, but a sharp knife and steady hand work just as well.
Pro Tip: Thicker slices retain more crunch but require longer pickling times. Experiment to find your preference.
Salting and Dehydrating
This step is non-negotiable for crispy results. Salt draws out excess moisture from the radish, preventing sogginess during pickling.
- Toss the sliced radish with 1–2 tablespoons of salt per pound of radish.
- Let it sit for 1–2 hours, stirring occasionally.
- Rinse thoroughly under cold water to remove excess salt, then pat dry with a clean kitchen towel or paper towels.
Why it works: Excess water dilutes the brine and softens the radish. Proper salting ensures the vegetable absorbs the pickling liquid without becoming mushy.
Preparing the Brine
The brine’s balance of acidity, sweetness, and salt determines the final flavor. A standard ratio is 1:1:1 vinegar to water to sugar, but adjustments are encouraged.
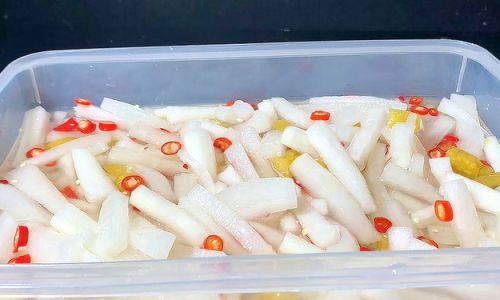
- Combine 1 cup vinegar, 1 cup water, ½ cup sugar, and 1 tablespoon salt in a saucepan.
- Bring to a gentle simmer, stirring until sugar and salt dissolve.
- Remove from heat and let cool completely.
Variations:
- Spicy: Add 1–2 teaspoons of red pepper flakes or sliced jalapeños.
- Aromatic: Include 3–4 garlic cloves, a 1-inch ginger knob (sliced), or a star anise pod.
- Herb-Infused: Toss in a handful of fresh dill, cilantro, or basil before pickling.
Pickling Process
- Pack the dried radish slices tightly into the sterilized jar, leaving ½ inch of headspace.
- Pour the cooled brine over the radish, ensuring it’s fully submerged.
- Seal the jar and refrigerate.
Timing:
- Minimum: 4 hours for a mild flavor.
- Optimal: 12–24 hours for balanced tang and crunch.
- Long-Term: The flavor deepens over 3–5 days, but the radish remains crisp for up to 2 weeks.
Achieving Maximum Crispness
- Cold Brine: Chill the brine before pouring it over the radish. Cold liquid slows enzyme activity, preserving texture.
- Avoid Overcooking the Brine: Boiling the brine is unnecessary and may soften the radish. A gentle simmer suffices.
- Dry Thoroughly: Even traces of moisture after salting can lead to sogginess.
- Use the Right Vinegar: Acidic vinegars like apple cider vinegar (5% acidity) preserve crispness better than milder options.
Troubleshooting Common Issues
- Soggy Radish: Likely caused by insufficient salting or residual moisture. Next time, salt for longer or pat dry more aggressively.
- Overly Salty Brine: Rinse the radish under cold water for an extra minute before pickling.
- Bitter Aftertaste: Reduce the vinegar ratio or switch to a milder type.
- Cloudy Brine: This is harmless and often due to residual starch from the radish. Strain the brine before reuse.
Serving Suggestions
- As a Side Dish: Pair with grilled meats, fried rice, or tacos.
- In Salads: Toss with cucumbers, carrots, and a sesame-soy dressing.
- On Sandwiches: Add a layer to banh mi or burgers for a zesty crunch.
- As a Snack: Serve with nuts or cheese for a quick appetizer.
Beyond Daikon: Experimenting with Other Radishes
While daikon is traditional, other radishes offer unique flavors and textures:
- Watermelon Radish: Pink-fleshed and mildly peppery, it adds a vibrant hue.
- Red Radish: Spicier and crunchier, ideal for spicy pickles.
- Black Radish: Earthy and pungent, best suited for hearty stews or robust salads.
Adjust pickling times accordingly—thinner-skinned varieties may soften faster.
Preservation and Storage
Homemade pickled radish lasts 2–3 weeks in the refrigerator. For longer storage:
- Use a water-bath canning method for shelf-stable jars.
- Avoid cross-contamination by always using clean utensils.
Conclusion
Pickled radish is a testament to the magic of simple ingredients transformed by patience and precision. By mastering the art of salting, brining, and balancing flavors, you can create a condiment that rivals gourmet store-bought versions. Whether you prefer it fiery, sweet, or herb-infused, the key lies in understanding the interplay between acidity, sugar, and texture. So grab a daikon, sharpen your knife, and embark on a pickling adventure—your taste buds will thank you.
With this guide in hand, you’re now equipped to craft pickled radish that’s not just a side dish, but a star ingredient in your culinary repertoire. Happy pickling!


0 comments