Table of content
Making mulberry wine at home is a delightful and rewarding endeavor that not only allows you to enjoy the unique flavor of mulberries but also gives you the satisfaction of crafting your own beverage. Mulberries, with their sweet and slightly tart taste, are perfect for fermenting into wine. While the process may seem intricate to beginners, it’s actually quite straightforward once you understand the basic steps. This guide will walk you through how to easily make mulberry wine at home, ensuring you end up with a delicious, homemade libation.

Understanding the Basics of Wine Making
Before diving into the specifics of making mulberry wine, it’s essential to grasp the fundamental principles of wine production. Wine making involves the fermentation of fruit sugars by yeast, which converts them into alcohol and carbon dioxide. The quality of your wine depends on several factors, including the type and ripeness of the mulberries, the yeast strain used, the fermentation conditions, and the aging process.

Equipment and Ingredients
Before starting, you’ll need to gather some basic equipment and ingredients. Here’s a comprehensive list:

Equipment:
- Fermentation Bucket or Carboy: A large, food-grade container with a tight-fitting lid for primary fermentation.
- Secondary Fermentation Carboy: A smaller, clear carboy for the second stage of fermentation.
- Siphon Hose: A flexible tube for transferring the wine without disturbing the sediment.
- Hydrometer: A tool to measure the specific gravity of the must (unfermented juice), helping you determine the alcohol content.
- Thermometer: To monitor the fermentation temperature.
- Funnel: For pouring liquids into bottles.
- Bottles and Corks: Clean, sterile bottles with tight-fitting corks or stoppers.
- Racking Cane: A long, narrow tube used to guide liquid out of a carboy.
- Potato Masher or Fruit Crusher: To break down the mulberries.
- Cheesecloth or Fine-Mesh Strainer: For filtering out solids.
- Stirring Spoon: A long-handled spoon for mixing.
- Clean Cloths and Rubber Gloves: For sanitation and handling the must.
Ingredients:
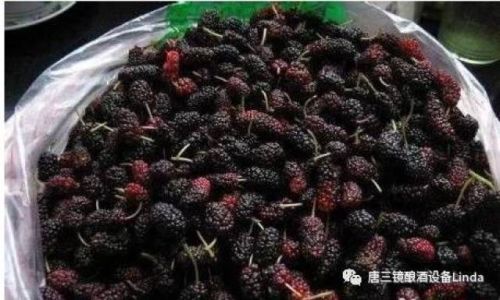
- Mulberries: Fresh or frozen, preferably organic and free of pesticides.
- Sugar: Granulated sugar to boost the fermentation process. The amount depends on your taste preference and the natural sugar content of the mulberries.
- Water: Clean, filtered water to adjust the consistency of the must.
- Yeast: Wine yeast, such as Red Star Premier Cuvee or Lalvin EC-1118, which is specifically designed for wine making.
- Pectic Enzyme: Optional but recommended to break down pectin in the mulberries, improving juice clarity.
- Campden Tablets (Potassium Metabisulfite): For sanitizing equipment and stabilizing the wine before bottling.
- Acid Blend: To adjust the acidity if needed, though fresh mulberries usually have a balanced acidity.
Step-by-Step Guide to Making Mulberry Wine
Step 1: Preparation and Sanitization
- Clean and Sanitize Equipment: Wash all equipment thoroughly with hot, soapy water and rinse well. Sanitize with a solution of one Campden tablet dissolved in a gallon of water. Let the equipment air-dry or dry with clean paper towels.
- Inspect Mulberries: Sort through the mulberries, removing any stems, leaves, or moldy fruit.
Step 2: Crushing the Mulberries
- Crush the Mulberries: Use a potato masher or fruit crusher to break down the mulberries into a pulp. This helps release the juices and makes it easier for the yeast to access the sugars.
- Transfer to Fermentation Bucket: Place the crushed mulberries into your fermentation bucket.
Step 3: Mixing the Must
- Add Water and Sugar: Measure out the desired amount of water and sugar. Generally, for every 3 pounds of mulberries, you’ll use about 1.5 pounds of sugar and enough water to make a total volume of about 5 gallons. Adjust based on your taste preference and the natural sweetness of the mulberries.
- Dissolve Sugar: Heat a portion of the water and dissolve the sugar completely. Let it cool to room temperature before adding it to the mulberry pulp.
- Combine Ingredients: Pour the sugar solution and remaining water into the fermentation bucket with the mulberry pulp. Stir well to mix.
Step 4: Adjusting and Testing
- Take Initial Gravity Reading: Use your hydrometer to measure the specific gravity of the must. This will help you determine the potential alcohol content of your wine.
- Add Pectic Enzyme: If using, sprinkle the pectic enzyme over the surface of the must and stir gently to distribute. This will help clarify the juice.
- Adjust Acidity and pH: Test the acidity and pH of the must using appropriate test kits. If necessary, add an acid blend to adjust the acidity. Mulberry wine should have a balanced acidity for optimal flavor.
Step 5: Adding Yeast
- Activate Yeast: Follow the instructions on the yeast packet to activate the yeast. Typically, this involves sprinkling the yeast over a small amount of warm water (about 100-110°F or 38-43°C) and letting it sit for about 10 minutes until it becomes frothy.
- Pitch Yeast: Once the yeast is activated, pour it into the must, stirring gently to distribute evenly.
Step 6: Primary Fermentation
- Cover and Vent: Cover the fermentation bucket with a loose-fitting lid or cloth to allow carbon dioxide to escape.
- Monitor Temperature: Keep the fermentation bucket in a cool, dark place where the temperature remains between 65-75°F (18-24°C). Check the temperature regularly and adjust as needed.
- Stir Daily: Stir the must gently each day for the first few days to ensure even fermentation.
- Monitor Fermentation: Observe the fermentation activity. Bubbles and foam on the surface indicate active fermentation.
Step 7: Racking and Secondary Fermentation
- Transfer to Secondary Carboy: After about a week, when fermentation slows down (indicated by a reduction in bubbling), use the siphon hose to transfer the wine (now called “must”) into the secondary fermentation carboy, leaving behind the sediment.
- Fit Airlock: Attach an airlock to the secondary carboy to allow any remaining carbon dioxide to escape while preventing oxygen from entering.
Step 8: Aging and Clarifying
- Age the Wine: Allow the wine to age in the secondary carboy for at least a month, preferably longer. The longer it ages, the more complex the flavors will become.
- Rack Again: Periodically, rack the wine into a clean carboy, leaving behind any sediment that has settled at the bottom. This can be done every few months.
- Add Finings (Optional): To further clarify the wine, you can add finings such as bentonite or gelatin. Follow the manufacturer’s instructions for use.
Step 9: Stabilizing and Bottling
- Stabilize the Wine: Add a Campden tablet per gallon of wine to stop any remaining fermentation and kill any remaining yeast. Let the wine sit for another week.
- Sweeten (Optional): If you prefer a sweeter wine, you can add a small amount of non-fermentable sweetener like potassium sorbate at this stage.
- Bottle the Wine: Use the siphon hose to transfer the wine into clean, sterile bottles. Fill each bottle to the neck, insert a cork or stopper, and secure it tightly.
- Label and Store: Label the bottles with the date and any other relevant information. Store the bottles in a cool, dark place for further aging if desired, or enjoy immediately.
Conclusion
Making mulberry wine at home is a rewarding hobby that allows you to create a unique and delicious beverage tailored to your taste preferences. By following the steps outlined in this guide, you can easily transform fresh or frozen mulberries into a bottle of homemade wine that you can enjoy with friends and family. Remember, patience is key in wine making—the longer you allow your wine to age, the more complex and flavorful it will become. Happy fermenting!


0 comments