Table of content
Making homemade ice cream is a delightful and rewarding culinary endeavor that allows you to customize flavors, textures, and even the shape of your frozen treats. One of the most enjoyable aspects of DIY ice cream creation is using molds to fashion unique and visually appealing desserts. Whether you’re looking to craft whimsical shapes for children’s parties, elegant designs for adult gatherings, or simply want to add a twist to your usual ice cream routine, molds offer endless possibilities. This comprehensive guide will walk you through the process of how to make ice cream using molds, from selecting the right equipment to perfecting your final product.
Understanding the Basics of Ice Cream Molds
Before diving into the specifics of making ice cream with molds, it’s crucial to understand the types of molds available and their unique features.
Types of Molds
- Silicone Molds: Silicone is a popular choice for ice cream molds due to its flexibility, non-stick properties, and ease of cleaning. These molds can be twisted or bent to release the ice cream without breaking it.
- Plastic Molds: Plastic molds are often more affordable than silicone and come in a variety of shapes and sizes. However, they may require more force to release the ice cream, which can sometimes lead to cracks or deformation.
- Rigid Metal or Ceramic Molds: These molds are less common for ice cream but can be used for specific decorative purposes. They tend to conduct heat more efficiently, which can affect freezing times.
Shapes and Designs
Ice cream molds come in an array of shapes and designs, catering to various themes and occasions. Common shapes include:
- Classic Rounds and Squares: Perfect for everyday use or layering in desserts.
- Animal and Character Molds: Ideal for children’s parties or themed events.
- Geometric and Abstract Designs: Great for adding a modern twist to your ice cream presentation.
- Holiday-Specific Molds: Such as hearts for Valentine’s Day, stars for Independence Day, or snowflakes for winter.
Preparing Your Ingredients
The quality of your ice cream largely depends on the ingredients you use. Here’s a basic recipe to get you started, which you can customize to your liking.
Basic Ice Cream Recipe
Ingredients:
- 2 cups heavy cream
- 1 cup whole milk
- ¾ cup granulated sugar
- Pinch of salt
- 1 tablespoon pure vanilla extract (or other flavorings like cocoa powder, fruit purees, etc.)
- 4 large egg yolks (optional for a richer texture)
Instructions:
- Combine Cream, Milk, Sugar, and Salt: In a medium saucepan, whisk together the heavy cream, whole milk, granulated sugar, and a pinch of salt until the sugar is fully dissolved.
- Heat the Mixture: Place the saucepan over medium heat and cook, stirring occasionally, until the mixture is warm to the touch but not boiling.
- Temper the Egg Yolks (if using): In a separate bowl, whisk the egg yolks until smooth. Gradually ladle in about a cup of the warm cream mixture, whisking constantly to temper the yolks. This prevents them from curdling.
- Combine and Cook: Pour the egg yolk mixture back into the saucepan with the remaining cream mixture. Cook, stirring constantly with a wooden spoon or spatula, until the mixture thickens and coats the back of the spoon (about 170°F or 77°C). Do not let it boil.
- Cool the Custard: Remove the saucepan from heat and stir in the vanilla extract (or other flavorings). Place the saucepan in an ice water bath and stir occasionally until the custard is cool to the touch.
- Chill the Mixture: Cover the custard with plastic wrap pressed directly onto the surface to prevent a skin from forming. Refrigerate for at least 2 hours or until thoroughly chilled.
Preparing the Molds
Once your ice cream base is ready and chilled, it’s time to prepare the molds.
Cleaning and Preparing the Molds
- Wash Thoroughly: Use warm, soapy water to clean your molds, ensuring no soap residue remains. Rinse well and dry completely.
- Light Greasing (if necessary): For plastic molds, you may need to lightly grease the interior with a neutral oil like vegetable oil to prevent sticking. Silicone molds generally do not require greasing.
Pouring and Freezing
Now, it’s time to pour your chilled ice cream base into the molds and freeze them.
Pouring the Mixture
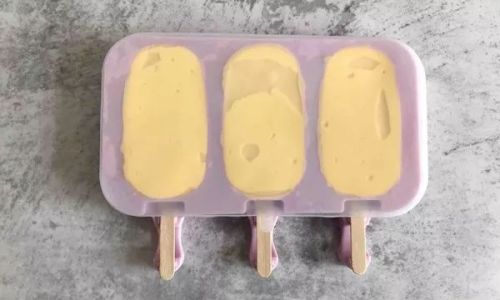
- Fill the Molds: Carefully pour the chilled ice cream base into the prepared molds, filling them to the desired level. Avoid overfilling, as the ice cream will expand slightly as it freezes.
- Tap to Remove Air Bubbles: Gently tap the filled molds on the countertop to release any air bubbles.
Freezing Techniques
- Using a Freezer: Place the filled molds on a flat surface in the freezer. Depending on the size and shape of the molds, freezing can take anywhere from 2 to 6 hours. Smaller molds will freeze faster than larger ones.
- Flash Freezing (optional): For quicker results, use a flash freezer or place the molds in a single layer on a baking sheet in the freezer for about 30 minutes before transferring them to a more compact storage arrangement.
Removing the Ice Cream from the Molds
Once your ice cream is fully frozen, it’s time to release it from the molds.
Removing Silicone Molds
- Gentle Flexing: For silicone molds, simply flex the sides gently to loosen the ice cream. If it’s stuck, you can run the bottom of the mold under warm water for a few seconds to help release it.
Removing Plastic Molds
- Running Under Warm Water: For plastic molds, run the outside of the mold under warm water for a few seconds. This will help loosen the ice cream without melting it too much. Use a gentle twisting motion to release the ice cream.
Decorating and Serving
Once your ice cream is out of the molds, you can decorate and serve it to your liking.
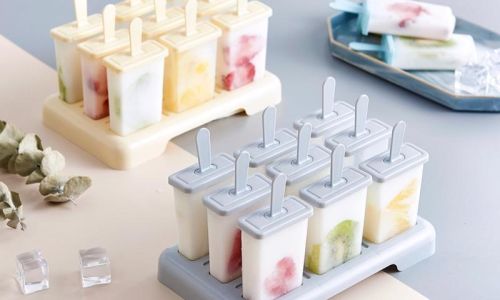
Decorating Ideas
- Drizzling Chocolate: Melt some chocolate and drizzle it over the ice cream for a decadent touch.
- Adding Toppings: Sprinkle with crushed nuts, sprinkles, or fruit.
- Dipping in Sauce: Dip the bottom of the ice cream in melted chocolate, caramel, or fruit sauce for an added treat.
Serving Suggestions
- On a Plate: Serve individual molds of ice cream on plates garnished with fresh fruit, whipped cream, or mint leaves.
- In a Cone: For a more traditional approach, gently press the frozen ice cream into waffle cones or sugar cones.
- Layered Desserts: Use molded ice cream as a layer in trifles, parfaits, or other layered desserts.
Storage Tips
Proper storage is key to maintaining the quality of your homemade ice cream.
- Freezer Storage: Place the molded ice cream in an airtight container or freezer bag to prevent freezer burn. Label with the date for future reference.
- Avoiding Freezer Burn: To minimize freezer burn, wrap each piece of ice cream individually in plastic wrap or parchment paper before placing them in the container.
Troubleshooting Common Issues
Making ice cream with molds can sometimes present challenges. Here are some common issues and how to solve them.
- Ice Cream is Too Hard: If your ice cream is too hard to scoop or release from the mold, let it sit at room temperature for a few minutes before attempting to remove it.
- Ice Crystals Forming: This can happen if the ice cream is not churned or mixed enough during freezing. Using an ice cream maker can help prevent this. If you’re freezing by hand, stir the mixture occasionally during the freezing process.
- Sticking to the Mold: Ensure your molds are clean and, if necessary, lightly greased. Silicone molds are generally less prone to sticking issues.
Conclusion
Making ice cream using molds is a fun and creative way to elevate your homemade desserts. With the right tools, ingredients, and techniques, you can craft beautiful, delicious ice cream shapes that cater to any occasion. Whether you’re looking for a fun activity with kids, a unique addition to your next party, or simply a way to impress your friends and family, using molds to make ice cream is a rewarding endeavor that delivers delicious results. Happy molding and enjoy your homemade ice cream creations!


0 comments