Introduction
In the culinary world, there’s something inherently satisfying about preparing dishes that bring back fond memories of childhood, family gatherings, or simply a delightful meal enjoyed with friends. One such dish that fits this description perfectly is homemade fried river shrimp. Crispy on the outside, tender on the inside, and bursting with flavor, fried river shrimp is a delightful appetizer or main course that can elevate any meal. While many might think of it as a restaurant-only delicacy, the truth is, making fried river shrimp at home is easier than you might think. With the right ingredients and techniques, you can create a mouthwatering dish that rivals even the best seafood restaurants. In this guide, we’ll walk you through every step of making homemade fried river shrimp, from sourcing the shrimp to perfecting the frying process.
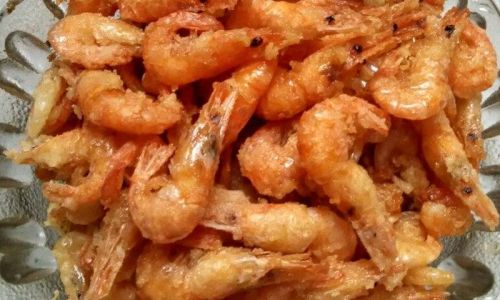
Section 1: Sourcing and Preparing the River Shrimp
The first step in making homemade fried river shrimp is, of course, sourcing the shrimp itself. River shrimp, known for their delicate flavor and firm texture, are ideal for frying. When purchasing river shrimp, look for fresh, firm shrimp with a slightly translucent appearance and a mild, fresh scent. Avoid shrimp that have a strong fishy odor or appear slimy, as these are signs of freshness.
Once you have your shrimp, it’s time to prepare them for frying. Start by rinsing the shrimp under cold running water to remove any dirt or debris. Pat them dry thoroughly using paper towels. Moisture is the enemy of crispy fried foods, so ensuring the shrimp are dry is crucial.
Next, you’ll need to devein and peel the shrimp if they’re not already prepared. Deveining involves removing the black intestinal tract that runs along the shrimp’s back. You can do this using a sharp knife or a shrimp deveiner tool. Peeling the shrimp is straightforward; simply grasp the head and pull it toward the tail, and the shell should come off easily. If you prefer, you can leave the tail intact for a more visually appealing presentation.
Section 2: Seasoning the Shrimp
Now that your shrimp are clean and ready, it’s time to season them. Seasoning is crucial for adding flavor to the shrimp and ensuring they’re not just a blank canvas for the frying oil. Start by placing the shrimp in a large mixing bowl.
A simple seasoning blend can include salt, black pepper, garlic powder, and paprika. For an extra layer of flavor, you can also add a pinch of cayenne pepper or red pepper flakes if you like a bit of heat. Mix the seasoning well with the shrimp, ensuring each piece is evenly coated.
For an additional flavor boost, consider marinating the shrimp for at least 30 minutes before frying. You can use a marinade made with olive oil, lemon juice, garlic, and herbs like parsley or dill. This will not only infuse the shrimp with more flavor but also help them cook more evenly.
Section 3: Preparing the Frying Station
While the shrimp are marinating, it’s time to set up your frying station. You’ll need a deep, heavy-bottomed pot or fryer filled with enough vegetable oil to fully submerge the shrimp. Peanut oil, canola oil, or grapeseed oil are all good choices for frying because they have a high smoke point and neutral flavor.
Heat the oil to 350°F (175°C). Using a thermometer to monitor the temperature is essential to ensure the shrimp cook properly without burning. If the oil is too hot, the shrimp will burn on the outside before cooking through on the inside. If it’s too cold, they’ll absorb too much oil and become greasy.
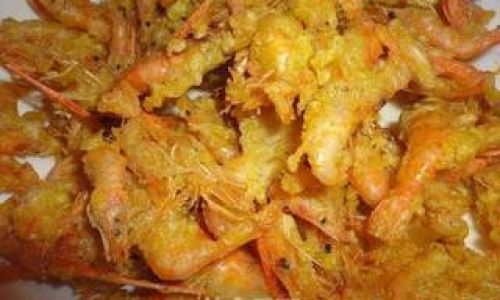
To prevent the shrimp from sticking to each other and the bottom of the pot, you’ll need a way to keep them separate during frying. You can use a wire basket or a slotted spoon, but a frying rack designed specifically for deep-frying small foods is the most effective tool.
Section 4: Frying the Shrimp
Once the oil has reached the desired temperature, it’s time to fry the shrimp. Work in batches to avoid overcrowding the pot, which can lower the oil temperature and result in soggy shrimp. Carefully lower the shrimp into the hot oil using your chosen frying tool.
Fry the shrimp for about 1-2 minutes per batch, or until they turn golden brown and crispy. They should float to the surface when they’re done. Use a slotted spoon or wire basket to remove them from the oil and let them drain on a plate lined with paper towels to absorb any excess oil.
Section 5: Serving and Enjoying Your Fried River Shrimp
Now that your fried river shrimp are perfectly crispy and golden, it’s time to serve and enjoy them. You can serve them as an appetizer with a dipping sauce like cocktail sauce, tartar sauce, or even a spicy aioli. For a more substantial meal, pair them with a side of rice, steamed vegetables, or a fresh salad.
Don’t forget to garnish your fried river shrimp with a sprinkle of fresh herbs like parsley, chives, or cilantro for an added touch of color and flavor. And, of course, enjoy them hot and fresh for the best texture and flavor.
Conclusion
Making homemade fried river shrimp might seem like a daunting task, but with the right ingredients, tools, and techniques, it’s entirely achievable. From sourcing and preparing the shrimp to seasoning, frying, and serving, each step is crucial in creating a dish that’s not only delicious but also bursting with flavor and texture. So, the next time you’re craving a crispy, flavorful seafood treat, why not give homemade fried river shrimp a try? With this guide, you’ll have all the knowledge and skills you need to create a restaurant-quality dish right in your own kitchen. Happy frying!

0 comments