Grissini, those slender, crispy Italian breadsticks, have captivated taste buds worldwide with their rustic charm and versatile flavor. Originating in Turin, Italy, these delicate sticks were traditionally crafted by hand, embodying simplicity and elegance. Today, they remain a beloved appetizer, snack, or accompaniment to soups and salads. While store-bought versions abound, there’s an unparalleled satisfaction in creating them at home, where you control the ingredients and customize the flavors. This comprehensive guide will walk you through the process of making authentic Grissini, from selecting the finest ingredients to mastering the shaping technique. Whether you’re a seasoned baker or a novice in the kitchen, this recipe promises crispy, golden-brown breadsticks that rival those from an Italian nonna’s oven.
The Essence of Grissini: Ingredients and Tools
To embark on your Grissini-making journey, gather the following ingredients:
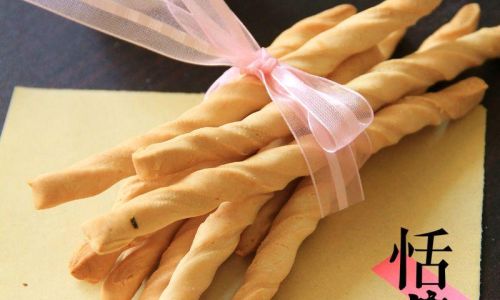
- 400g (3⅓ cups) bread flour (or all-purpose flour for a lighter texture)
- 7g (2¼ tsp) active dry yeast (or instant yeast for quicker rising)
- 1 tsp fine sea salt
- 1 tbsp olive oil (plus extra for brushing)
- 200ml (¾ cup + 1 tbsp) warm water (around 40°C/105°F)
- Semolina flour (for dusting, optional but recommended for texture)
- Toppings of choice: sesame seeds, poppy seeds, rosemary, sea salt, or grated Parmesan
Equipment you’ll need includes a large mixing bowl, a wooden spoon or dough whisk, a rolling pin, a baking sheet, and parchment paper. A pizza cutter or sharp knife will also prove invaluable for slicing the dough into uniform strips.
Step 1: Activating the Yeast
The foundation of exceptional Grissini lies in a well-fermented dough. Begin by activating the yeast in warm water. In a small bowl, combine the warm water and a pinch of sugar (to feed the yeast). Sprinkle the yeast over the surface and let it sit for 5–10 minutes until frothy. This step ensures the yeast is alive and active, crucial for a light, airy texture.
Step 2: Mixing the Dough
In a large mixing bowl, whisk together the bread flour and salt. Create a well in the center and pour in the activated yeast mixture along with the olive oil. Using a wooden spoon or your hands, gradually incorporate the dry ingredients into the wet, forming a shaggy dough. If the mixture feels too dry, add a tablespoon of water at a time; if sticky, sprinkle in extra flour. The goal is a soft, slightly tacky dough that cleans the sides of the bowl.
Step 3: Kneading the Dough
Transfer the dough to a lightly floured surface and knead for 8–10 minutes. This process develops gluten, the protein network responsible for the breadsticks’ characteristic chew. To knead properly, push the dough away from you with the heel of your hand, fold it back over itself, and rotate. Repeat this motion until the dough becomes smooth, elastic, and springs back when pressed. Shape it into a ball.
Step 4: First Rise (Fermentation)
Place the dough in a lightly oiled bowl, turning it to coat. Cover with a damp kitchen towel or plastic wrap and let it rise in a warm, draft-free spot for 1–1½ hours, or until doubled in size. This fermentation period allows the yeast to produce carbon dioxide, creating air pockets that contribute to the Grissini’s airy crumb.
Step 5: Shaping the Grissini
Once risen, gently deflate the dough and transfer it to a lightly floured surface. Using a rolling pin, roll it into a rectangle approximately ¼-inch (6mm) thick. The thinner the dough, the crispier the final product. Lightly dust the surface with semolina flour to prevent sticking and add a subtle crunch.
Using a pizza cutter or sharp knife, slice the dough into ½-inch (1.25cm) wide strips. For uniformity, trim the edges to create straight lines. Gently stretch each strip to about 10–12 inches (25–30cm) in length, maintaining an even thickness. If the dough resists stretching, let it rest for 5 minutes to relax the gluten.
Step 6: Adding Flavor and Texture
This is where creativity shines. Brush each strip lightly with olive oil and sprinkle with your chosen toppings. Classic options include sesame seeds, cracked black pepper, or fresh rosemary. For a cheesy twist, dust with grated Parmesan. Gently press the toppings into the dough to ensure they adhere during baking.

Step 7: Second Rise (Optional)
For a slightly lighter texture, let the shaped Grissini rest for 15–20 minutes before baking. This brief rise allows the dough to puff slightly, yielding a more delicate crumb. However, Grissini can also be baked immediately for a crisper finish.
Step 8: Baking to Perfection
Preheat your oven to 220°C (425°F). Line two baking sheets with parchment paper and arrange the Grissini strips about ½-inch (1.25cm) apart. Bake for 12–15 minutes, rotating the trays halfway through, until golden brown and crisp. Keep a close eye during the final minutes to prevent burning.
Step 9: Cooling and Storing
Transfer the baked Grissini to a wire rack to cool completely. They will crisp further as they cool. Store in an airtight container at room temperature for up to a week. For longer storage, freeze them in a resealable bag for up to three months.
Variations and Expert Tips
- Whole Wheat Grissini: Substitute 100g (¾ cup) of bread flour with whole wheat flour for a nutty flavor and added fiber.
- Spicy Kick: Add ½ tsp red pepper flakes to the dough or sprinkle with smoked paprika before baking.
- Gluten-Free Option: Use a 1:1 gluten-free flour blend and increase the rising time by 30 minutes.
- Twisted Sticks: For a decorative touch, twist two strips together before baking.
Troubleshooting:
- Dough Not Rising? Ensure your yeast is fresh and the water temperature is between 40–43°C (105–110°F).
- Burnt Edges? Reduce oven temperature by 10°C (50°F) and check 2–3 minutes earlier.
- Too Thick? Roll the dough thinner next time and bake for an additional minute.
Serving Suggestions
Grissini’s versatility shines in various settings:
- Appetizer Platter: Pair with cured meats, olives, and soft cheeses like burrata.
- Soup Companion: Serve alongside minestrone or ribollita for dipping.
- Cocktail Hour: Skewer with prosciutto and melon for an elegant hors d’oeuvre.
The Timeless Appeal of Grissini
Grissini’s enduring popularity stems from their balance of simplicity and sophistication. Each crisp, golden stick tells a story of Italian culinary heritage—a testament to the magic of flour, water, and time. Whether enjoyed with a glass of Chianti or as a midday snack, homemade Grissini elevate everyday moments into celebrations of flavor and craftsmanship. With practice, you’ll refine your technique, discovering the joy of creating a classic that transcends borders and generations. Buon appetito!


0 comments