Table of content
Quail eggs, with their delicate flavor and petite size, have become a culinary favorite in gourmet dishes, appetizers, and even as a standalone snack. Their diminutive stature, however, often poses a challenge: peeling them without mangling the tender whites or leaving half the egg clinging to the shell. This guide delves into the science and art of boiling quail eggs to perfection, ensuring they slip out of their shells effortlessly, every single time. Whether you’re a home cook experimenting with haute cuisine or a busy parent preparing a quick, protein-packed meal, mastering this technique will elevate your kitchen prowess.
Understanding Quail Eggs: Why Are They So Tricky to Peel?
Before diving into the cooking process, it’s essential to grasp why quail eggs are notoriously difficult to peel. Unlike chicken eggs, which have a thicker shell and a larger air pocket, quail eggs possess a fragile, paper-thin exterior that adheres tightly to the egg white. This adhesion is exacerbated by the egg’s freshness; the fresher the egg, the more stubbornly the membrane clings to the shell. Additionally, quail eggs cook rapidly due to their size, making timing critical—overcooking turns the yolk chalky and rubbery, while undercooking leaves the white too soft to peel cleanly.
The Science Behind Effortless Peeling
Peeling quail eggs successfully hinges on manipulating two factors: temperature control and pH levels. When eggs are boiled, the heat causes the protein in the white to coagulate. Simultaneously, the shell’s inner membrane—a thin, transparent layer—can fuse to the white if not properly separated. Rapid cooling after boiling (an “ice bath”) halts the cooking process and creates a temperature shock that shrinks the egg slightly, pulling it away from the shell.
Introducing a mild alkaline environment by adding baking soda to the cooking water can further aid peeling. Baking soda raises the water’s pH, weakening the bond between the membrane and the shell. However, this step is optional and may slightly alter the egg’s taste if overused.
Step-by-Step Method for Perfectly Boiled, Easy-to-Peel Quail Eggs
Selecting and Preparing the Eggs
- Freshness Matters: Ideally, use eggs that are 3–5 days old. Fresher eggs are harder to peel, so if possible, purchase them a few days in advance.
- Room Temperature: Remove eggs from the refrigerator 30 minutes before boiling to minimize temperature shock, which can cause cracking.
Boiling the Water
- Use a Deep Pot: Fill a saucepan with enough water to cover the eggs by at least 2 inches. Overcrowding leads to uneven cooking.
- Add Salt or Baking Soda (Optional): For easier peeling, add 1 teaspoon of salt or ½ teaspoon of baking soda per quart of water. Stir gently to dissolve.
- Bring to a Rolling Boil: High heat ensures the eggs cook quickly and evenly.
Cooking Time Precision
- Gentle Lowering: Use a slotted spoon to carefully place the eggs into the boiling water. Avoid dropping them, as this can crack the shells.
- Timing is Key:
- Soft-Boiled: 2.5–3 minutes (runny yolk, firm white).
- Medium-Boiled: 4 minutes (jammy yolk, tender white).
- Hard-Boiled: 5 minutes (fully cooked yolk and white).
- Adjust for Altitude: If cooking at high elevations, add 30 seconds to 1 minute to the cooking time, as water boils at lower temperatures.
The Ice Bath Shock
- Prepare an Ice Bath: Fill a large bowl with ice and cold water while the eggs cook.
- Immediate Transfer: As soon as the timer ends, use the slotted spoon to move the eggs into the ice bath. Let them chill for at least 5 minutes. This halts cooking and loosens the membrane.
Peeling Technique
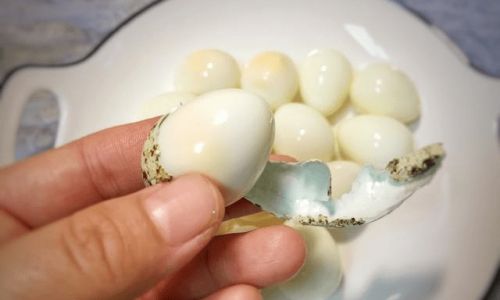
- Crack and Roll: Gently tap the egg on a hard surface to create a spiderweb of cracks. Roll it between your palms to loosen the shell further.
- Peel Under Running Water: Hold the egg under a thin stream of cold water. The water seeps under the membrane, helping it separate from the white. Start peeling from the broader end, where the air pocket is located.
- Patience Over Force: Rushing can tear the white. Work methodically, removing small shell fragments at a time.
Pro Tips for Flawless Results
- Prick the Shell (Carefully): Some chefs recommend piercing the broader end of the shell with a needle before boiling to release trapped air. However, this requires precision to avoid puncturing the membrane and causing leaks.
- Steam Instead of Boil: For ultra-delicate eggs, steam them in a basket over boiling water for 6–7 minutes. Steaming cooks more gently and reduces shell adhesion.
- Age Your Eggs: If you have the foresight, store fresh quail eggs in a carton at room temperature for 24–48 hours before boiling. This dries the shell slightly, making peeling easier.
- Avoid Overcrowding: Cook eggs in batches if necessary. Overlapping eggs can cause uneven heating and shell damage.
Troubleshooting Common Peeling Problems
-
Shell Sticks to the White:
- Cause: Insufficient cooling or overly fresh eggs.
- Fix: Extend the ice bath time to 10 minutes. Next time, use slightly older eggs.
-
Eggshell Cracks During Boiling:
- Cause: Rapid temperature changes or rough handling.
- Fix: Let eggs warm to room temperature first. Lower them gently into the water.
-
Mushy Whites:
- Cause: Overcooking.
- Fix: Reduce cooking time by 30 seconds. Use a timer religiously.
-
Undercooked Yolks:
- Cause: Insufficient boiling time.
- Fix: Increase time by 1 minute, but monitor closely to avoid overcooking.
Creative Ways to Use Perfectly Boiled Quail Eggs
Once mastered, the art of peeling quail eggs opens doors to endless culinary possibilities:
- Deviled Quail Eggs: Halve the eggs, remove the yolks, and mix with mayonnaise, mustard, and spices. Pipe the mixture back into the whites.
- Pickled Eggs: Marinate peeled eggs in a brine of vinegar, sugar, and spices for a tangy snack.
- Salad Garnish: Slice hard-boiled eggs and scatter over green salads or grain bowls for a pop of color and protein.
- Sushi Toppings: Use soft-boiled eggs in ramen or as a garnish for sushi rolls.
- Appetizer Skewers: Thread peeled eggs onto skewers with cherry tomatoes, olives, and cubes of cheese.
Storage and Shelf Life
- Unpeeled Quail Eggs: Store in the refrigerator for up to 1 week. Do not freeze raw eggs, as this damages the texture.
- Peeled Quail Eggs: Submerge in a container of cold water and refrigerate for up to 3 days. Change the water daily to maintain freshness.
- Cooked Eggs in Sauces: If pickling or marinating, they can last 2–3 weeks in the refrigerator.
Conclusion: Practice Makes Perfect
Peeling quail eggs is a skill that rewards patience and precision. While the process may seem finicky at first, mastering the balance of timing, temperature, and technique will yield consistently beautiful results. Experiment with cooking times to suit your taste preferences, and don’t be discouraged by a few stubborn shells along the way. With practice, you’ll soon find yourself effortlessly peeling quail eggs like a seasoned chef, ready to incorporate these tiny treasures into your favorite dishes.
Whether you’re hosting a dinner party, meal-prepping for the week, or simply craving a gourmet snack, the ability to boil and peel quail eggs perfectly is a game-changer. So boil that water, set your timer, and embrace the satisfaction of a perfectly peeled quail egg—a testament to the magic that happens when science meets culinary artistry.



0 comments