Introduction
Almonds, revered for their rich flavor, nutritional value, and versatility in cuisine, are a beloved staple in kitchens worldwide. However, accessing the delicate kernel within its sturdy shell requires patience, precision, and the right approach. Whether you’re a home cook preparing almond meal for baking, a snack enthusiast craving fresh kernels, or a culinary enthusiast exploring traditional methods, mastering the art of shelling almonds is a rewarding skill. This article delves into the techniques, tools, and secrets to efficiently and safely crack almonds, ensuring minimal waste and maximum yield. From time-tested hand methods to innovative kitchen hacks, we’ll explore how to transform tough-shelled almonds into culinary treasures.
Understanding Almond Shells
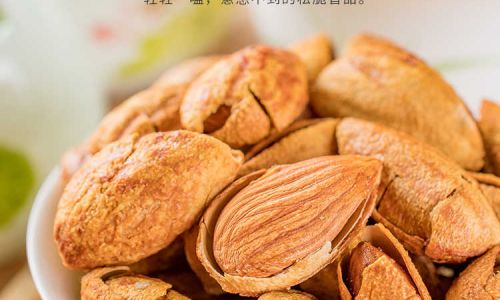
Before diving into shelling methods, it’s essential to grasp the anatomy of an almond. Encased in a hard, outer hull, the almond kernel is protected by a woody shell that varies in thickness and texture depending on the variety. Some almonds, like the Nonpareil, have relatively thin shells, while others, such as the Mission or Carmel, boast thicker, more resilient coatings. The shell’s ridges and seams can provide clues about the easiest way to crack it without damaging the kernel inside.
Hand Cracking: The Traditional Approach
For purists and those seeking a meditative culinary ritual, hand cracking almonds is a timeless practice. This method requires no special tools—just your hands, a steady surface, and a bit of finesse.

-
Positioning the Almond: Hold the almond between your thumb and index finger, placing it on a stable surface like a countertop or cutting board. Identify the almond’s natural seam, a faint line running along one side, which often indicates the weakest point of the shell.
-
Applying Pressure: Using your other hand, gently press the almond against the surface while twisting slightly. The goal is to exert force along the seam, encouraging the shell to split without crushing the kernel. If the shell resists, avoid excessive force, as this may shatter the almond inside.
-
Using a Rolling Pin or Mallet: For larger batches, place almonds in a thick kitchen towel or resealable plastic bag. Gently tap them with a rolling pin, meat mallet, or the flat side of a knife. The towel or bag contains the almonds, preventing them from scattering, while the controlled taps crack the shells.
Pro Tip: Practice makes perfect. Start with a few almonds to gauge the required pressure, and adjust your technique as needed.
Leveraging Nutcrackers and Specialized Tools
For those who prefer mechanical assistance, nutcrackers offer precision and efficiency. Several types exist, each suited to different almond varieties and preferences.

-
Lever-Style Nutcrackers: These tools resemble pliers, with a hinged design that amplifies force. Place the almond in the jaw, position the seam toward the fulcrum, and squeeze the handles. The lever action cracks the shell with minimal effort, making them ideal for thicker-shelled varieties.
-
Screw-Type Nutcrackers: Operated by twisting a handle, these devices apply gradual, even pressure. Insert the almond into the holder, turn the screw until the shell cracks, then reverse the screw to release the kernel. This method reduces the risk of over-crushing.
-
Spring-Loaded Nutcrackers: Perfect for repetitive use, these tools feature a spring mechanism that resets after each crack. Position the almond, press down, and let the spring do the work. They’re lightweight and portable, making them a favorite for outdoor gatherings.
Kitchen Utensils as Almond-Shelling Allies
Your kitchen likely houses utensils that double as almond-cracking tools. Get creative with these household items:
-
Chef’s Knife: Lay the almond on a cutting board. Hold the knife horizontally above the almond, with the blade’s spine facing down. Press firmly but gently on the spine, using the almond’s seam as a guide. The blade’s edge remains unused, ensuring safety.

-
Bottle Opener: Insert the opener’s tip into the almond’s seam and twist. The lever action pries the shell open, mimicking the motion used to open bottle caps.
-
Pliers: For stubborn shells, use needle-nose pliers. Grip the almond near the seam and gently squeeze while twisting. The pliers’ precision helps avoid kernel damage.
The Boiling Method: Softening Shells with Heat
For an unconventional yet effective approach, boiling almonds loosens the shells, making them easier to crack.
-
Blanching: Bring a pot of water to a rolling boil. Add almonds and simmer for 1–2 minutes. Drain immediately and rinse under cold water to halt cooking.
-
Drying: Pat the almonds dry. The heat expands the shell, creating tiny fissures. Once cooled, the shells become brittle and easier to crack by hand or with minimal force.

Pro Tip: This method also peels the almond’s thin, inner skin, yielding blanched kernels ideal for recipes requiring a smooth texture.
Safety First: Avoiding Common Pitfalls
Shelling almonds can lead to injuries if done carelessly. Follow these safety guidelines:
- Protect Your Hands: Wear gloves if using heavy tools like hammers or pliers to prevent blisters or cuts.
- Stabilize Your Workspace: Use non-slip mats or damp cloths to keep almonds and tools from sliding.
- Avoid Power Tools: Never use electric drills or saws, as they pose severe risks of flying debris or injury.
- Supervise Children: If teaching youngsters, opt for soft-shelled varieties and adult supervision.
Storing Shelled Almonds
Once cracked, almonds require proper storage to maintain freshness:
- Airtight Containers: Transfer kernels to glass jars or resealable bags, removing excess air to prevent oxidation.
- Refrigeration: Store in the crisper drawer for up to six months.
- Freezing: For long-term storage, freeze kernels in vacuum-sealed bags for up to a year.
Creative Uses for Shelled Almonds
The possibilities for shelled almonds are endless:
- Almond Flour: Grind kernels in a food processor for gluten-free baking.
- Almond Milk: Soak, blend, and strain for dairy-free milk.
- Garnishes: Toast kernels and sprinkle over salads, oatmeal, or desserts.
- Almond Butter: Process until smooth for a creamy spread.
Common Mistakes to Avoid

- Over-Crushing: Applying excessive force shatters kernels. Start with gentle pressure.
- Ignoring Seams: Cracking away from the seam increases kernel damage.
- Skipping Sorting: Discard almonds with signs of mold or rancidity before shelling.
Conclusion
Shelling almonds is both a practical skill and a culinary adventure. Whether you prefer the rhythm of hand cracking, the efficiency of specialized tools, or the science of boiling, each method offers a gateway to enjoying almonds at their freshest. Experiment with techniques, refine your approach, and savor the satisfaction of cracking nature’s bounty. With patience and practice, you’ll master the art of almond shelling, turning a simple nut into a versatile ingredient and a testament to the joy of handcrafted food.


0 comments