Introduction
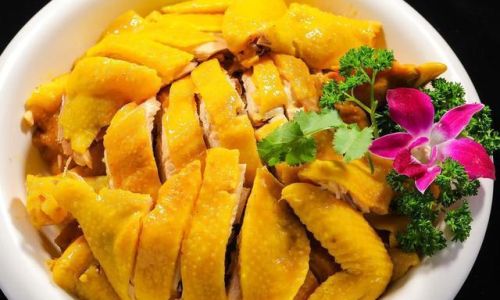
White-cut chicken, a cornerstone of Cantonese cuisine, is revered for its delicate flavor and tender texture. Traditionally, the dish emphasizes the purity of the chicken’s taste, achieved through minimal seasoning and precise cooking. However, achieving a crispy skin—a feature that elevates the dish from ordinary to extraordinary—requires a nuanced understanding of culinary techniques. This article delves into the science and craft behind rendering the skin of white-cut chicken irresistibly crisp, ensuring every bite offers a satisfying contrast between the succulent meat and the crunchy exterior.
Understanding the Basics of White-Cut Chicken
Before exploring crispiness, it’s essential to grasp the fundamentals. White-cut chicken, or bái qiē jī, is typically prepared by simmering a whole chicken in water seasoned with ginger, scallions, and sometimes Shaoxing wine. The meat is then cooled in an ice bath to halt cooking, resulting in a silky texture. The skin, while tender, often lacks the crispiness diners crave. To transform this classic dish, we must manipulate variables like temperature, moisture, and fat rendering.
Selecting the Right Chicken
The journey to crispy skin begins with ingredient selection. Opt for a free-range or organic chicken, as these birds tend to have thinner, less fatty skin compared to their factory-farmed counterparts. A younger chicken (around 3–4 pounds) is ideal, as its skin is more pliable and less likely to become rubbery during cooking. Avoid frozen birds, as ice crystals can damage the skin’s texture.
Pre-Preparation Rituals
A. Air-Drying: The Secret Weapon
The key to crispiness lies in moisture removal. After thoroughly cleaning the chicken, pat it dry with paper towels. Next, hang it in a well-ventilated area or place it on a wire rack in the refrigerator, uncovered, for at least 4 hours (or overnight). This step allows residual moisture to evaporate, tightening the skin and creating a canvas for crispiness.
B. Optional: Brining or Marinading
While traditional white-cut chicken skips marinades, a light brine can enhance flavor and texture. Dissolve 3 tablespoons of salt in 4 cups of cold water, submerge the chicken for 1–2 hours, then rinse and dry. For added complexity, infuse the brine with crushed ginger and garlic. However, skip acidic ingredients like vinegar, as they can soften the skin.
The Three-Step Poaching Method
A. First Boil: Tightening the Skin
Fill a large pot with water, adding ginger slices, scallions, and a pinch of salt. Bring to a rolling boil. Using tongs, gently submerge the chicken breast-side down for 30 seconds, then flip it. Repeat this thrice—a technique called “shocking”—to contract the skin and seal in juices.
B. Simmering: Gentle Cooking
Reduce the heat to a bare simmer (around 185°F/85°C). Submerge the chicken completely, using a plate to keep it submerged if needed. Cook for 25–30 minutes, depending on size. Avoid vigorous boiling, as agitation can rupture the skin.
C. Ice Bath: The Crisp Catalyst
Immediately transfer the chicken to an ice bath for 10 minutes. This rapid cooling halts cooking and firms up the skin, creating a taut surface ideal for crisping.
Post-Cooking Dry-Aging
After the ice bath, pat the chicken dry again. For maximum crispiness, return it to the refrigerator, uncovered, for another 2 hours. This second drying phase eliminates any residual moisture absorbed during poaching.
The Final Crisp: Heat and Fat Rendering
A. Oven Roasting (Post-Poaching)
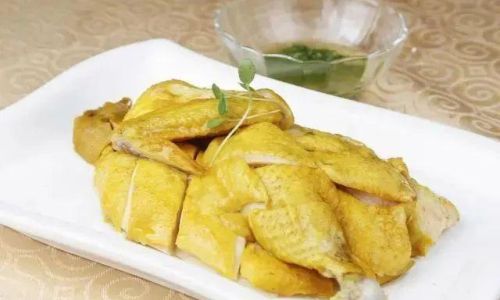
Preheat your oven to 475°F (245°C). Place the chicken on a wire rack set over a baking tray (to catch drippings). Roast for 8–10 minutes, or until the skin bubbles and turns golden. This high heat melts subcutaneous fat, leaving the skin paper-thin and crackling.
B. Pan-Frying (Alternative Method)
For smaller batches, heat 2 tablespoons of oil in a skillet. Place the chicken skin-side down over medium-low heat. Cover with a splatter screen and fry for 10–12 minutes, or until the skin is golden and crisp. Flip occasionally to ensure even browning.
C. Blowtorch Technique (Advanced)
Chefs sometimes use a blowtorch to char the skin post-poaching. Hold the flame 6 inches from the surface and move it steadily to avoid burning. This method caramelizes the skin’s surface, adding a smoky crunch.
The Role of Baking Soda: Friend or Foe?
Some recipes advocate rubbing the skin with a baking soda solution (1 teaspoon per 4 cups water) to break down proteins and enhance crispiness. While effective, this step can impart a slight alkaline taste if not rinsed thoroughly. Use sparingly and neutralize with a vinegar rinse if desired.
Avoiding Common Pitfalls
- Overcooking: Overly cooked chicken releases excess moisture, softening the skin. Use a thermometer—target 160°F (71°C) in the thickest part of the thigh.
- Crowding the Pot: Ensure the chicken is fully submerged but not cramped, as this causes uneven cooking.
- Skipping Drying Steps: Rushing the drying process leads to soggy skin. Patience is paramount.
Serving and Pairing
Crispy-skinned white-cut chicken deserves a stellar presentation. Carve it just before serving to prevent moisture from the meat softening the skin. Pair with a classic ginger-scallion dipping sauce, enhanced with a touch of chili oil for heat. For a modern twist, serve alongside a tangy plum sauce or a citrus-infused soy reduction.
Storage and Reheating
Crispy skin is best enjoyed immediately. If reheating, use an air fryer at 375°F (190°C) for 5 minutes to revive crispness. Avoid microwaving, as it steams the skin.
Conclusion
Achieving crispy skin in white-cut chicken is a blend of tradition and innovation. By mastering drying techniques, controlling heat, and understanding the interplay of moisture and fat, you can transform this humble dish into a culinary masterpiece. Whether you opt for oven roasting, pan-frying, or a chef’s blowtorch, the result will be a symphony of textures—tender meat beneath a shatteringly crisp skin—that honors the dish’s heritage while pushing its boundaries. Experiment, refine, and savor the crunch.
0 comments