Introduction
Sugar-coated peanuts, often referred to as “candied peanuts” or “glazed peanuts,” are a beloved snack across the globe. This delightful treat combines the earthy richness of roasted peanuts with a crisp, sweet caramelized coating, creating a harmony of textures and flavors that is both addictive and satisfying. While store-bought versions are readily available, crafting this snack at home allows for complete control over the ingredients, sweetness level, and texture. Moreover, the process of making sugar-coated peanuts is surprisingly straightforward, requiring minimal equipment and basic pantry staples. This article will delve into the history, science, and technique behind this classic confection, ensuring that even novice cooks can achieve perfect results. We will explore the role of each ingredient, the importance of temperature control, and troubleshooting common pitfalls. By the end of this guide, you will not only master the recipe but also gain a deeper appreciation for the culinary alchemy that transforms simple ingredients into a timeless snack.
The Origins and Cultural Significance
The concept of coating nuts in sugar dates back centuries, with roots in various culinary traditions. In China, for example, hong zao (red-cooked peanuts) are a traditional New Year’s treat, symbolizing prosperity and good fortune. Similarly, in Mexican cuisine, cacahuates garapiñados are a street food staple, often sold in paper cones at festivals and markets. European confectioners also have their versions, such as the French cacahuètes grillées caramélisées, which are frequently served alongside coffee or after-dinner drinks. The universal appeal of sugar-coated peanuts lies in their balance of sweetness and crunch, making them a versatile snack for gatherings, gifts, or everyday indulgence.
Ingredients and Equipment
To embark on your sugar-coated peanut journey, gather the following ingredients:
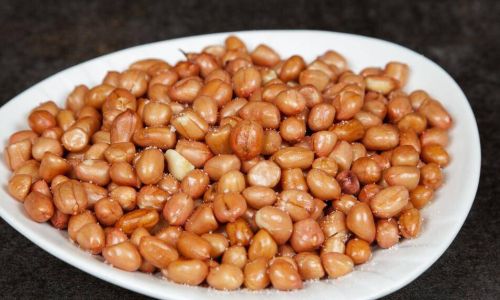
- 2 cups raw peanuts (unsalted, preferably with skins removed for a cleaner taste)
- 1 cup granulated sugar
- ½ cup water
- 1 teaspoon vegetable oil (optional, for added shine)
- ¼ teaspoon salt (to balance sweetness)
- ½ teaspoon vanilla extract (optional, for flavor enhancement)
Equipment Checklist:
- A heavy-bottomed skillet or wok (preferably non-stick)
- A wooden spoon or silicone spatula
- A baking sheet lined with parchment paper
- A candy thermometer (optional but recommended for precision)
- A fine-mesh sieve (for separating excess sugar)
The Science Behind the Sweetness
The process of sugar-coating peanuts involves a delicate dance of heat and moisture. When sugar is heated with water, it dissolves to form a simple syrup. As the water evaporates, the syrup thickens, and the sugar molecules begin to recrystallize. However, with precise temperature control, the sugar can be caramelized into a golden amber liquid before cooling into a brittle, glass-like coating around the peanuts. The addition of a small amount of oil or fat (such as butter) can inhibit recrystallization, promoting a smoother, shinier glaze. Salt is not merely a flavor enhancer; it also lowers the sugar’s freezing point, preventing it from becoming overly brittle.
Step-by-Step Preparation
Preparing the Peanuts
Start by selecting high-quality raw peanuts. While roasted peanuts can be used, raw ones allow for better absorption of flavors during the cooking process. If your peanuts have skins, gently rub them between your palms to remove most of the papery husks. This step ensures a cleaner appearance and prevents the skins from burning during cooking. Rinse the peanuts under cold water and pat them dry thoroughly—excess moisture can cause the sugar syrup to seize prematurely.
Creating the Sugar Syrup
In a heavy-bottomed skillet, combine the sugar and water over medium heat. Stir gently until the sugar dissolves completely. Resist the urge to stir vigorously, as this can cause the sugar to recrystallize prematurely. Instead, swirl the pan occasionally to ensure even heating. If using a candy thermometer, attach it to the side of the pan, ensuring the tip does not touch the bottom. The ideal temperature range for this stage is between 230°F (110°C) and 240°F (116°C), known as the “soft-ball stage.” At this point, the syrup will thicken slightly but still flow freely.
Introducing the Peanuts
Once the syrup reaches the desired temperature, add the peanuts to the pan. Stir immediately to coat them evenly with the syrup. Reduce the heat to medium-low to prevent scorching. Continue stirring constantly, ensuring the peanuts are thoroughly coated and the syrup reduces further. This stage requires patience, as it may take 10–15 minutes for the syrup to transform into a sandy, crystalline texture.
The Caramelization Phase
As the water continues to evaporate, the sugar will begin to recrystallize around the peanuts. At this point, increase the heat slightly to encourage caramelization. The sugar will start to melt again, turning a golden amber color. This is a critical juncture: undercooking will result in a grainy texture, while overcooking risks burning the sugar. If using a thermometer, aim for 300°F (150°C) to 310°F (154°C), the “hard-crack stage,” where the syrup forms brittle threads when dropped into cold water.
Adding Flavor and Finish
Remove the pan from heat immediately upon reaching the desired color. Stir in the vegetable oil (if using) and vanilla extract. The oil will help the sugar coating achieve a glossy finish, while the vanilla adds a subtle aromatic note. Sprinkle the salt evenly over the mixture and stir vigorously to distribute it.
Cooling and Separating
Pour the hot peanuts onto the prepared baking sheet, spreading them into a single layer with your spatula. Allow them to cool for 5–10 minutes. At this stage, the sugar coating will harden, but the peanuts may still clump together. Gently break apart any large clusters using your hands or a fork. For perfectly individual peanuts, allow them to cool completely before separating.
Storage and Shelf Life
Once cooled, transfer the sugar-coated peanuts to an airtight container. They can be stored at room temperature for up to two weeks, though they are best enjoyed within the first few days for optimal crunch. Avoid refrigeration, as moisture can cause the sugar coating to soften.
Troubleshooting Common Issues
Sugar Crystallization
If the sugar syrup begins to crystallize prematurely (indicated by a grainy texture), add a few drops of lemon juice or cream of tartar. The acid will help dissolve the crystals and prevent further recrystallization.
Burnt Sugar
If the sugar turns dark brown or black, it has burned. Unfortunately, there is no salvaging burnt sugar—discard the mixture and start fresh. To prevent this, never leave the pan unattended during the caramelization phase.
Sticky Coating
If the peanuts remain sticky after cooling, they were undercooked. Return them to the pan and heat gently over low heat, stirring constantly, until the sugar coating hardens.
Clumping
Excessive clumping often results from uneven heating or insufficient stirring. Ensure the peanuts are coated evenly during the syrup stage and separate them immediately after pouring onto the baking sheet.
Variations and Creative Twists
Spiced Sugar-Coated Peanuts
Add 1 teaspoon of ground cinnamon, cayenne pepper, or smoked paprika to the sugar syrup for a flavorful twist. Adjust the spice levels to taste.
Chocolate-Dipped Peanuts
Melt dark or milk chocolate and dip half of each sugar-coated peanut in the chocolate. Allow to harden on parchment paper for a decadent treat.
Sesame-Crusted Peanuts
Toss the peanuts in toasted sesame seeds during the final cooling stage for added texture and nuttiness.
Savory-Sweet Blend
Incorporate a pinch of chili flakes or lime zest into the sugar syrup for a bold, unexpected flavor profile.
Health Considerations and Substitutions
While sugar-coated peanuts are undeniably indulgent, they can be adapted for dietary needs. For a lower-sugar version, use a sugar substitute like erythritol or monk fruit. However, note that these alternatives may affect the texture and caramelization process. For a vegan option, substitute the vegetable oil with coconut oil. Those with nut allergies can replace peanuts with pumpkin seeds or sunflower seeds, adjusting the cooking time accordingly.
The Role of Temperature Control
Mastering the caramelization process hinges on understanding temperature zones. A candy thermometer is invaluable for precision, but visual cues can also guide you:
- Thread Stage (230–235°F): Syrup forms thin threads when drizzled.
- Soft Ball (235–245°F): Syrup forms a soft, pliable ball in cold water.
- Hard Ball (250–265°F): Syrup forms a firm ball that holds its shape.
- Soft Crack (270–290°F): Syrup separates into hard but pliable threads.
- Hard Crack (300–310°F): Syrup forms brittle threads that snap when bent.
For sugar-coated peanuts, targeting the hard-crack stage ensures a crisp, glass-like coating.
Culinary Applications Beyond Snacking
Sugar-coated peanuts are not limited to standalone snacking. They can elevate both sweet and savory dishes:
- Salads: Crush and sprinkle over green salads for added crunch.
- Desserts: Use as a garnish for ice cream, cakes, or brownies.
- Cheese Boards: Pair with aged cheddar or blue cheese for a sweet-salty contrast.
- Trail Mix: Combine with dried fruits and dark chocolate for an energy-boosting mix.
Conclusion
Crafting sugar-coated peanuts is a rewarding culinary endeavor that marries science with artistry. By understanding the interplay of heat, sugar, and nuts, you can create a snack that is visually stunning, texturally satisfying, and bursting with flavor. Whether enjoyed straight from the bowl, gifted to loved ones, or incorporated into creative dishes, these glazed peanuts are sure to impress. Experiment with spices, coatings, and presentations to make this classic treat your own. With practice, you will refine your technique, turning a simple recipe into a testament to the joy of homemade confections. So, grab your skillet, measure your ingredients, and embark on a journey to sweet and crunchy perfection—your taste buds will thank you.

0 comments