Table of content
Egg tarts, with their buttery, flaky crusts and creamy, custard-like fillings, are a beloved treat in bakeries worldwide. But what if you crave these delicate pastries but lack an oven? Fear not! This guide will walk you through creating crystal egg tarts—a variation featuring a translucent, jelly-like filling—using simple kitchen tools and stovetop methods. Perfect for beginners or those with limited equipment, this recipe delivers elegance and flavor without the need for baking. Let’s dive into the art of crafting these shimmering delights.
What Are Crystal Egg Tarts?
Crystal egg tarts, also known as jing ying dan ta in Chinese cuisine, are a twist on the classic Portuguese-inspired egg tart. Instead of a traditional baked custard, the filling is set with agar-agar or gelatin, giving it a glossy, wobbly texture that resembles crystal. The crust remains buttery and crisp, providing a delightful contrast to the smooth, silky interior. This recipe skips the oven entirely, relying on steaming or stovetop cooking to achieve the perfect consistency.
Ingredients You’ll Need
Before starting, gather these ingredients:
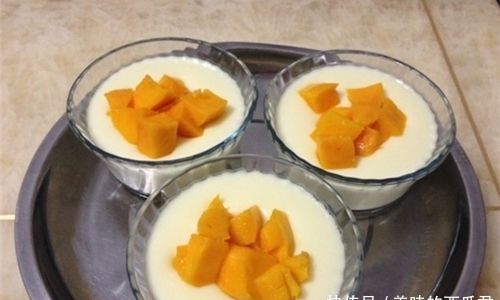
For the Crust (Pastry):
- 1½ cups (180g) all-purpose flour
- ½ cup (113g) unsalted butter, cold and cubed
- 2–3 tbsp ice water
- 1 tbsp granulated sugar
- ¼ tsp salt
For the Crystal Filling:
- 1 cup (240ml) whole milk
- ½ cup (120ml) heavy cream
- 3 large egg yolks
- ¼ cup (50g) granulated sugar
- 1 tsp vanilla extract
- 1 tbsp agar-agar powder (or 2 tsp gelatin powder)
- ¼ cup (60ml) water (if using gelatin)
Tools Required:
- Mixing bowls
- Whisk or electric mixer
- Rolling pin
- Muffin tin or tart molds
- Steamer basket or large pot with a lid
- Parchment paper or silicone baking cups
- Fine-mesh sieve
Step 1: Preparing the Crust
The foundation of a great egg tart is a tender, buttery crust. Follow these steps:
-
Combine Dry Ingredients:
In a large mixing bowl, whisk together the flour, sugar, and salt. Add the cold, cubed butter. Using a pastry cutter, fork, or your fingertips, work the butter into the flour until the mixture resembles coarse crumbs. -
Add Ice Water:
Sprinkle 2 tablespoons of ice water over the mixture. Gently stir with a fork until the dough begins to clump. If it feels too dry, add the remaining tablespoon of water, one teaspoon at a time. -
Form the Dough:
Transfer the dough to a lightly floured surface. Knead briefly until smooth, then shape it into a disk. Wrap in plastic wrap and refrigerate for at least 30 minutes. Chilling relaxes the gluten and prevents shrinkage during cooking.
Step 2: Shaping the Crust
Once chilled, roll out the dough:
-
Roll the Dough:
Lightly flour your work surface and rolling pin. Roll the dough to ⅛-inch (3mm) thickness. Use a cookie cutter or glass to cut circles slightly larger than your tart molds. -
Line the Molds:
Press each dough circle into greased muffin tins or tart molds. Prick the bases with a fork to prevent puffing. Freeze the shaped crusts for 15 minutes while preparing the filling.
Step 3: Making the Crystal Filling
The star of this recipe is the luminous, jelly-like filling. Here’s how to achieve it:
Using Agar-Agar (Vegetarian Option):
-
Bloom the Agar-Agar:
In a small saucepan, whisk the agar-agar powder into ¼ cup (60ml) of water. Let it sit for 5 minutes to hydrate. -
Heat the Milk Mixture:
In another saucepan, combine the milk, heavy cream, and sugar. Warm over medium heat, stirring until the sugar dissolves. Do not boil. -
Combine and Simmer:
Add the bloomed agar-agar to the milk mixture. Bring to a gentle simmer, stirring constantly for 2–3 minutes until the agar-agar dissolves completely. Remove from heat.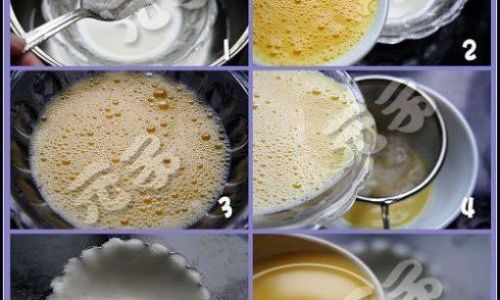
Using Gelatin (Non-Vegetarian Option):
-
Bloom the Gelatin:
Sprinkle the gelatin powder over ¼ cup (60ml) of cold water. Let it sit for 5 minutes to soften. -
Heat the Milk Mixture:
In a saucepan, warm the milk, heavy cream, and sugar over medium heat until steaming. -
Dissolve the Gelatin:
Add the bloomed gelatin to the warm milk mixture. Stir until fully dissolved, then remove from heat.
Finish the Filling:
-
Temper the Eggs:
In a bowl, whisk the egg yolks and vanilla extract. Slowly pour a ladle of the hot milk mixture into the eggs, whisking constantly to prevent curdling. -
Combine and Strain:
Pour the tempered egg mixture back into the saucepan. Whisk until smooth. Strain through a fine-mesh sieve to remove any lumps.
Step 4: Assembling and Cooking the Tarts
Now, assemble and cook your tarts using one of these methods:
Method 1: Steaming
-
Fill the Crusts:
Remove the chilled tart shells from the freezer. Pour the filling into each shell, filling it to ¾ full. -
Prepare the Steamer:
Bring a pot of water to a boil. Place the muffin tin in a steamer basket and lower it into the pot. Cover with a lid. -
Steam:
Steam for 15–20 minutes until the filling is set but still slightly wobbly. Avoid overcooking, as this will make the filling rubbery.
Method 2: Stovetop Bain-Marie
-
Create a Water Bath:
Fill a large pot with 1–2 inches of water. Place a heatproof trivet or folded kitchen towel at the bottom. -
Arrange the Tarts:
Place the filled tart shells on a heatproof plate. Lower the plate into the pot, ensuring water doesn’t touch the plate.
-
Cook:
Cover the pot and simmer over low heat for 20–25 minutes. Check periodically to maintain a gentle simmer.
Method 3: Microwave (Quick Option)
-
Fill and Cover:
Pour the filling into the tart shells. Cover each tart loosely with microwave-safe plastic wrap. -
Microwave:
Cook in 30-second intervals on medium power, rotating the tray each time, until the filling is set (about 2–3 minutes total).
Step 5: Cooling and Unmolding
-
Chill Thoroughly:
Once cooked, transfer the tarts to a wire rack. Let them cool to room temperature, then refrigerate for at least 2 hours to firm up. -
Unmold:
Gently run a knife around the edges of each tart. Carefully remove them from the molds. If using silicone molds, peel them away easily.
Tips for Perfect Crystal Egg Tarts
-
Chill the Dough:
Cold dough is easier to handle and less likely to shrink. -
Avoid Overcooking the Filling:
The filling should jiggle slightly when done—it will firm up as it cools. -
Customize Flavors:
Add a splash of coconut milk, matcha powder, or mango puree to the filling for unique twists. -
Use a Bain-Marie for Even Cooking:
This method ensures gentle, uniform heat without scorching. -
Storage:
Store tarts in an airtight container in the refrigerator for up to 3 days.
Troubleshooting Common Issues
-
Filling Too Runny?
Increase agar-agar or gelatin by ½ teaspoon next time.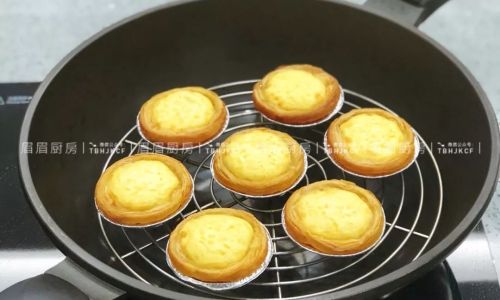
-
Crust Soggy?
Ensure the tart shells are fully baked/steamed before adding the filling. -
Lumps in Filling?
Always strain the mixture through a sieve. -
Tarts Stuck in Molds?
Grease molds generously or use silicone liners.
Serving Suggestions
- Dust with powdered sugar or cocoa for elegance.
- Serve with fresh berries or a drizzle of caramel sauce.
- Pair with jasmine tea or espresso for a classic afternoon treat.
Variations to Explore
-
Matcha Crystal Tarts:
Whisk 1 tsp matcha powder into the filling mixture. -
Mango Passion Fruit Tarts:
Fold 2 tbsp mango puree and 1 tbsp passion fruit curd into the filling. -
Black Sesame Tarts:
Add 1 tbsp black sesame paste to the filling and garnish with toasted sesame seeds.
The Science Behind Crystal Fillings
Agar-agar, derived from seaweed, sets at room temperature and withstands higher heat than gelatin, making it ideal for steaming. Gelatin, an animal-based protein, melts at body temperature, yielding a softer texture. Both act as gelling agents, trapping liquid to create the signature wobble of crystal tarts.
Why This Recipe Works Without an Oven
Traditional egg tarts rely on oven heat to bake the custard and crust simultaneously. By separating the processes—steaming the filling and pre-cooking the crust—we achieve similar textures without baking. The crust is par-baked via steaming or stovetop heat, while the agar-agar/gelatin sets the filling gently.
Final Thoughts
Crystal egg tarts are a testament to culinary adaptability. By harnessing stovetop methods and alternative gelling agents, you can recreate bakery-quality treats at home, no oven required. Whether you’re catering to dietary preferences, equipment limitations, or simply craving a unique dessert, this recipe delivers elegance in every bite. Experiment with flavors, share your creations, and savor the joy of homemade pastries—one wobbly, glossy tart at a time.
Now, grab your apron, preheat your steamer, and embark on a journey to crystal-clear perfection! 🍮✨


0 comments