Introduction
Colorful rice balls, often referred to as onigiri in Japanese cuisine or jomuh-bap in Korean traditions, have transcended cultural boundaries to become a beloved dish worldwide. These whimsical, handheld meals combine the simplicity of steamed rice with the joy of visual creativity, making them perfect for family meals, picnics, or bentō boxes. What sets them apart is their adaptability—you can infuse rice with natural dyes derived from vegetables, spices, or edible flowers, transforming a humble grain into a canvas of hues. This article delves into the art of crafting colorful rice balls at home, offering tips, techniques, and inspiration to elevate this comfort food into a culinary masterpiece. Whether you’re a novice cook or a seasoned home chef, this guide will empower you to experiment with flavors, textures, and colors while honoring the dish’s humble roots.
The Appeal of Colorful Rice Balls
Beyond their aesthetic charm, colorful rice balls offer a nutritious and customizable meal. By using natural colorants like spinach (green), beetroot (pink), turmeric (yellow), and butterfly pea flowers (blue), you can sneak extra vitamins and antioxidants into your diet. Additionally, the process of shaping and assembling the rice balls encourages mindfulness, turning meal prep into a therapeutic activity. For families, this dish doubles as an educational opportunity to teach children about nutrition and creativity in the kitchen.
Ingredients and Tools You’ll Need
Before diving into the recipe, gather your ingredients and tools. While the exact quantities may vary based on serving size, here’s a baseline for 4–6 rice balls:
-
Base Ingredients:
- 2 cups short-grain sushi rice (or jasmine rice for a softer texture)
- 5 cups water
- 1 tbsp rice vinegar (or apple cider vinegar as a substitute)
- 1 tsp sugar
- 1/2 tsp salt
-
Natural Colorants:
- Green: 1/2 cup fresh spinach leaves (blanched and blended with 1 tbsp water)
- Pink/Red: 1 small beet (roasted and pureed with 1 tbsp water)
- Yellow: 1/2 tsp turmeric powder dissolved in 1 tbsp hot water
- Blue/Purple: 1 tsp dried butterfly pea flowers steeped in 1/4 cup hot water (strain after 10 minutes)
-
Fillings (Optional):
- 1/4 cup cooked salmon, flaked
- 1 avocado, sliced
- 1/4 cup pickled radish (takuan)
- 1 tbsp black sesame seeds
- 2 sheets nori seaweed, cut into strips
-
Tools:
- Rice cooker or medium saucepan
- Fine-mesh strainer
- Blender or food processor (for pureeing colorants)
- Mixing bowls (one for each color)
- Plastic wrap or a rice ball mold
- Gloves (to prevent staining hands)
Step-by-Step Preparation
Cooking the Perfect Rice
The foundation of great rice balls is flawlessly cooked rice. Rinse the sushi rice under cold water until the water runs clear to remove excess starch. This step prevents gummy texture. Combine the rice and water in a rice cooker or saucepan. If using a stove, bring to a boil, then reduce heat to low, cover, and simmer for 15 minutes. Remove from heat and let it steam, covered, for an additional 10 minutes. Fluff gently with a fork.
Seasoning the Rice
In a small bowl, whisk together the rice vinegar, sugar, and salt until dissolved. Drizzle this mixture over the cooked rice, folding gently to combine. Avoid overmixing, as this can break the grains. Let the rice cool to room temperature—warm rice is easier to mold, but scorching heat will make it sticky.
Preparing Natural Colorants
While the rice cooks, prepare your colorants:
- Green: Blanch spinach in boiling water for 30 seconds, then plunge into ice water. Squeeze out excess liquid and blend with 1 tbsp water until smooth.
- Pink/Red: Wrap the beet in foil and roast at 400°F (200°C) for 45 minutes. Peel, chop, and blend with 1 tbsp water.
- Yellow: Dissolve turmeric in hot water; stir until no lumps remain.
- Blue/Purple: Steep butterfly pea flowers in hot water for 10 minutes, then strain.
Coloring the Rice
Divide the seasoned rice into four bowls (one for each color). Add 1–2 tsp of each colorant to the respective bowls, stirring until the rice is evenly tinted. Adjust the intensity by adding more colorant or diluting with unseasoned rice. For pastel shades, use less dye; for bold hues, increase gradually.
Assembling the Rice Balls
Method 1: Hand-Shaped
- Wet your hands to prevent sticking.
- Scoop a palm-sized portion of colored rice and flatten it into a disc.
- Add a filling (e.g., salmon, avocado) to the center, leaving a border.
- Gently fold the rice around the filling, shaping it into a triangle, ball, or cylinder.
- Wrap with a nori strip or sprinkle with sesame seeds for garnish.
Method 2: Mold-Assisted
- Line a rice ball mold with plastic wrap.
- Layer colored rice and fillings alternately.
- Press firmly to compact, then tap the mold to release the rice ball.
Creative Variations
- Layered Rainbow Balls: Alternate colors in layers for a striped effect.
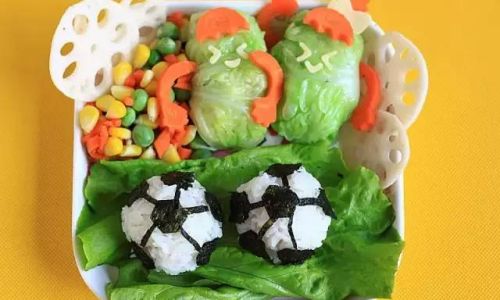
- Animal Shapes: Use cookie cutters or freehand molding to create pandas, cats, or hearts.
- Stuffed Surprises: Hide a small cube of cheese or cherry tomato inside for a delightful burst of flavor.
Tips for Perfect Rice Balls
- Rice Consistency: Slightly undercooked rice holds shape better. If the rice is too sticky, rinse your hands with cold water or a vinegar-water mix (1:1 ratio).
- Storage: Wrap rice balls tightly in plastic wrap and refrigerate for up to 24 hours. Reheat gently in the microwave or enjoy cold.
- Gluten-Free Options: Use tamari instead of soy sauce for dipping, and ensure fillings are certified gluten-free.
- Kid-Friendly Twists: Involve children in mixing colors or shaping the rice. Use cookie cutters to create fun shapes like stars or dinosaurs.
Pairing Suggestions
Colorful rice balls pair beautifully with:
- Dipping Sauces: Soy sauce mixed with wasabi, teriyaki glaze, or a yuzu-kosho mayo.
- Sides: Edamame, miso soup, or a crisp cucumber salad.
- Beverages: Green tea, iced matcha latte, or a fruity hibiscus tea.
Troubleshooting Common Issues
- Rice Falls Apart: The rice was too dry or overhandled. Next time, add a touch more vinegar or handle gently.
- Colors Fade: Natural dyes may lose vibrancy over time. Serve immediately or brush with a lemon juice-water mix to preserve hues.
- Sticky Hands: Keep a bowl of vinegar-water nearby to rinse gloves or hands between colors.
Cultural Significance and Modern Adaptations
Traditionally, rice balls symbolized prosperity and portability in Japanese and Korean cultures. Farmers carried them as field meals, while samurai relied on them during battles. Today, chefs and home cooks globally reinvent the dish, incorporating global flavors like curry powder, kimchi, or smoked gouda. Social media has further popularized onigiri as a trendy food art, with hashtags like #RiceBallArt and #BentoInspiration showcasing endless creativity.
Conclusion
Colorful rice balls are more than a meal—they’re a celebration of creativity, culture, and connection. By mastering the basics of rice preparation, coloring, and shaping, you unlock a world of possibilities. Whether you’re crafting a whimsical bento for a child’s lunch or hosting a dinner party with artisanal rice ball canapés, this dish invites experimentation. So gather your ingredients, don your apron, and let your imagination run wild. After all, the most memorable meals are those made with love, laughter, and a splash of color.
Final Thoughts
As you embark on your rice ball journey, remember that perfection isn’t the goal—joy is. Embrace uneven shapes, unexpected color blends, and the occasional mishap. Each rice ball tells a story: of heritage, innovation, and the simple pleasure of sharing food with those you love. Bon appétit!
0 comments